Difference between revisions of "Exporting meshes to Creation Kit"
imported>Nali m |
|||
| (One intermediate revision by one other user not shown) | |||
| Line 120: | Line 120: | ||
==Part 5. Other== | ==Part 5. Other== | ||
In NifSkope you can see three | In NifSkope you can see three weird blocks. "1 BSInvMarker", "2 BSXFlags" and "3 NiStringExtraData". Move mouse over them. | ||
[[image:meshimportcreationkit28.jpg|BSInvMarker]] | [[image:meshimportcreationkit28.jpg|BSInvMarker]] | ||
| Line 167: | Line 167: | ||
3. At start menu open console and type "coc KatlasFarm". | 3. At start menu open console and type "coc KatlasFarm". | ||
[[Category:Community Tutorials]] | |||
Latest revision as of 13:30, 26 November 2023
Part 1[edit | edit source]
First you need a mesh. Create it using 3D Studio Max, Blender, Maya or any modeling program. When the mesh is done, export it as .obj to "..Skyrim\Data\Meshes". If you don't have Meshes in Data folder, create it.
Now download NifSkope. Launch NifSkope. You may need a base mesh that includes Skyrim-ready texture(s) and collision object(s). Grab one here
Open "CollisionMesh.nif" in NifScope. Then import your mesh as OBJ (File -> Import -> Import .OBJ) on it.
You should see the mesh now.
Part 2[edit | edit source]
In previous picture you can see "13 NiNode". It is the mesh you imported. It has your mesh shape(s) (="14 NiTriShape") and texture(s).
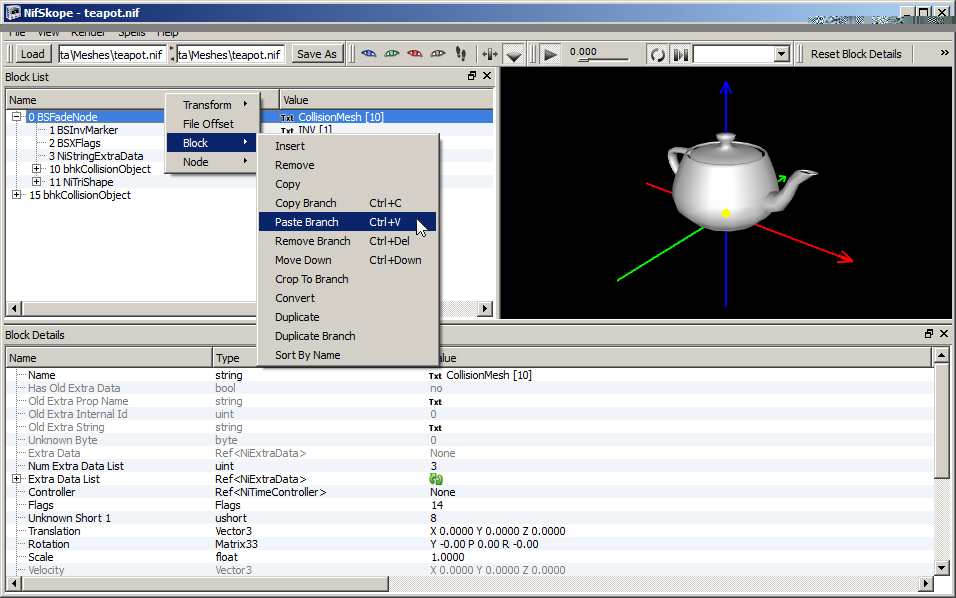
Because Creation Kit does not support NiNodes (it will crash), you need to move "14 NiTriShape" under "0 BSFadeNode". Right click "14 NiTriShape" and select Block -> Copy Branch.
Now right click "0 BSFadeNode" and select Block -> Paste Branch.
You don't need "13 NiNode" anymore so you may delete it. Right click on it and select Block -> Remove Branch.
Part 3. Texture[edit | edit source]
You need three textures as .dds . Default texture, normal map (texture_n) and masked (texture_m). Install 'NVidia Texture Tools for Adobe Photoshop' to do the work. Download
Launch Photoshop.
1. Open your texture.
2. If the texture doesn't have alpha channel, create it saving it as .BMP 32-bit somewhere.
3. Re-open your BMP and now save it as .dds 'DXT1 RGB 4 bpp | no alpha' to "..Skyrim\Data\Textures". If you don't have Textures folder, create it.
4. Re-open BMP again, goto "Filter -> NVIDIA Tools -> NormalMapFilter..." Press OK.
5. It is a normal map for the texture. Save it as .dds 'DXT1 ARGB 4 bpp | 1-bit alpha' named "yourtexturename_n".
Return to NifSkope.
1. Delete "15 NiMaterialProperty". Block -> Remove Branch.
2. Click on "13 NiTriShape".
3. At Block Details find "Properties".
4. Collapse it and type in first one "11".
Now "11 BSLightingShaderProperty" should move under "13 NiTriShape". "11 BSLightingShaderProperty" is used to set textures and shaders.
Notice that the textures you may set are only used in Creation Kit and Skyrim, which means that the mesh you see in NifSkope should stay untextured.
Part 4. Collision[edit | edit source]
1. Save your mesh to "..Skyrim\Data\Meshes". File -> Save As...
2. Right click on mesh and select "Transform -> Scale Verticles". Set X, Y and Z to 0.1 and press Scale. DO NOT SAVE THE MESH!!
3. Right click on mesh again and select "Havok -> Create Convex Shape". Set value to 0.1 and press OK. STILL DO NOT SAVE THE MESH!!
4. 'Create Convex Shape' created "9 bhkCollisionObject" under "0 BSFadeNode". Copy it. Block -> Copy Branch. DO NOT SAVE!!
5. Reload older mesh. (.nif)
6. After loading the mesh, delete current collision object (="10 bhkCollisionObject")
7. Now right click "0 BSFadeNode" and press Block -> Paste Branch.
8. Click "0 BSFadeNode" and find in Block Details "Collision Object". Type there "8". Now "8 bhkCollisionObject" should move under "0 BSFadeNode".
9. Right click on mesh, select flags, select Continue and press Accept.
10. Save it.
"10 bhkConvexVerticlesShape" is the collision shape.
If you zoom inside the mesh you can find bunch of yellow lines. It is the collision.
Part 5. Other[edit | edit source]
In NifSkope you can see three weird blocks. "1 BSInvMarker", "2 BSXFlags" and "3 NiStringExtraData". Move mouse over them.
Part 6. Exporting mesh to Creation Kit[edit | edit source]
1. Launch Creation Kit.
2. Open Skyrim.esm (File -> Data...)
3. Find MiscItem.
4. Right click somewhere on the list and select New.
5. Double click your object.
6. At model click Edit.
7. Edit...
8. Open your mesh and Press OK.
9. Open a cell named KatlasFarm.
10. Drag your mesh somewhere.
11. Save your mod.
Part 6. Skyrim[edit | edit source]
1. Start Skyrim.
2. Select your mod at Data Files.
3. At start menu open console and type "coc KatlasFarm".


