Учебник Bethesda Продвинутые диалоги
Продвинутые диалоги
 | На русском языке Требуется помощь переводчика |
| Продвинутые диалоги | |
|---|---|
| Серия: Продвинутое квестописания, глава 3 | |
| К другим учебникам | |
| Следующая статья | |
Краткий обзор
Эта глава расскажет больше о системе диалогов. Научит более гибко настраивать реплики персонажей, в том числе и в бою.
Ты узнаешь:
- Какие специальные темы существуют.
- Как использовать сброс таймеров.
- Как описать реплики в бою.
- Как заблокировать тему.
Специальные темы
Раньше мы писали только обычные диалоги, которые персонаж произносит при обращении к нему игрока. Это бесспорно очень важный аспект, однако для создания реалистичного живого мира, нужно наполнить диалогами окружение, бои, научить персонажей реагировать на появление игрока, и т.д.
После изучения главы о хвостах предыдущего учебника, у тебя уже появилось некоторое представление о специальных темах. Вместо того чтобы создавать отдельную тему в меню диалога, мы привязали монологи НИП к событиям взаимодействия. На вкладке Misc окна квеста (там, где мы создавали Приветствие и Прощание) ты можешь увидеть список всех событий, которые могут инициировать начало того или иного монолога.
Все подобные диалоги в игре подразделяются на типы по вызывающему событию. Каждому типу соответствует огромный банк данных, содержащий диалоги. Когда игра вызывает специальную тему, для того чтобы определить - что персонаж должен сказать, начинается перебор всех соответствующих данному типу монологов, определенных в запущенных квестах, связанных с говорящим. Движок помещает каждую найденную тему в стек, в порядке определенном приоритетом квеста (тема, определенная в квесте с приоритетом 70 всегда будет выше темы в квесте с приоритетом 50). После тогда, как создание стека будет завершено, начнется перебор тем сверху вниз до тех пор, пока не найдется первая из них, все условия которой истинны.
Если игра дойдет до основания стека, а тема, удовлетворяющая условиям найдена не будет, персонаж ничего не произнесет.
Reset Timers and One-Time Lines
The game provides some simple functionality for making sure a single line doesn't get said too often. (Still making arrow in the knee jokes? Fine, take your time.)
Along the middle of the Info window, there's a series of checkboxes, pulldowns, and text fields.
Say Once
As you might guess, checking this box means that the line of dialogue will only ever be said once. After that, it will never be considered again. Obviously you want to be careful not to put any plot-crucial dialogue in a Say Once info, since the player might miss it. This is best used for lines that a character uses for introduction.
Hours until reset
Once this line has been said, it will be considered invalid until this many in-game hours have passed. This helps limit the repetition a bit, but keeps us from having to write substantially more dialogue. Note that this number cannot be longer than 24 hours; any longer duration entered will be reset to 24 hours by the Creation Kit.
Random
Imagine the case of a hello stack written for a particular actor -- we don't want them to constantly repeat it in the same order, since it would make them seem slightly robotic. So we can't just use reset timers to drive this behavior. Instead, we can mark these lines as Random, and the game will deliver all valid lines in an unpredictable order.
Of course, if these hellos are specific to a particular stage of a quest, we don't want to fall through to generic dialogue after they're exhausted. So we can mark a line at the bottom of the stack as "Random End" to keep the info selection system from dropping below this particular set.
If this is confusing, there's an example below.
How to Use All of This
Open up our venerable GSQ01 quest and navigate to its Misc tab. Open the GSQ01Hellos topic that we made earlier. You can note that we've set up Bendu to only ever say "I can't thank you enough for helping me" when we've completed the quest. That kind of makes him a little... silly. So let's let him vary it up.
First, open up the "I can't thank you..." info, and mark it as random, then give it a reset time of 0.5 hours. Close it, then right-click and select "Copy" to duplicate the line. Do this twice more, so we have a total of four lines. Edit the three new lines as follows:
- "I can only imagine how thrilling the fight with that thief was!"
- "A beautiful piece, isn't it? I'm thrilled to have it back."
- "Oh, something else?"
Now open that last line and mark it as "Random End." Note that this line intentionally is a bit non-committal and uninteresting -- it signals to the player that this NPC doesn't really have anything else to say in the way of hellos. Now he will deliver the first three lines randomly, and when when they've been exhausted, he will only say the last line until the reset timers have completed.
Combat Lines
"Like the bite of a flea!"
There's also a "Combat" tab in the quest window, where topics for events related to combat live. You can construct these just like you would a Hello, and the game will spit them out using the same kind of logic. Reset timers, stacks, quest priorities, etc. all work the same way.
Creation Kit systems can seem a little indirected and complex at first, but once you understand them, they tend to apply across lots of contexts (as we're seeing with conditions and info stacks).
Other Dialogue Topics
By default, when we make a new topic in a Dialogue View, it's set as a "Top-Level" topic. This means that if its designated starting topic is valid, it will appear as a choice in the Actor's dialogue menu when the player first clicks on them.
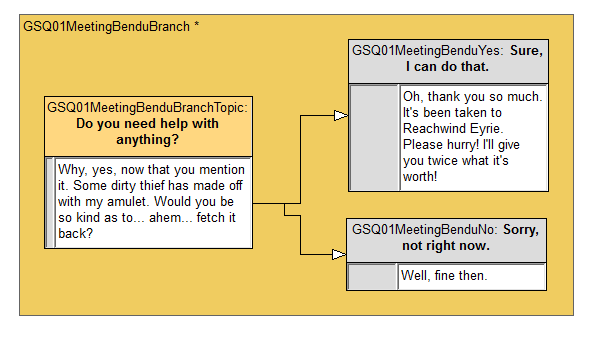
In this figure, the orange color of the topic border indicates that it's a top-level topic. Double click on the border to open the Dialogue Branch window. There are two other options:
- Normal: This branch will not show up in the topic list unless it is explicitly linked from another branch. This can be useful for organizational purposes, or for branches which are triggered from ForceGreet packages.
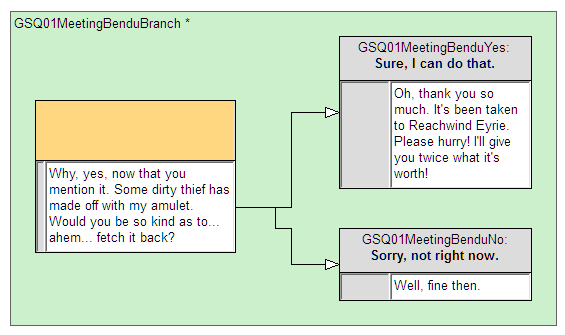
- Blocking: When the starting topic of a blocking branch qualifies, that is the only thing that actor will be able to talk about. The starting topic becomes their Hello, and the top-level choice list is replaced by whatever is connected from that starting topic.
Blocking topics are useful for contexts where a character has something very important to say and we don't want the player to have access to their normal dialogue topics until they hear this. (So make sure that you change something at the end of the branch to make the starting topic invalid!)
Blocking branches show up a kind of pale green in the editor.
| К другим учебникам | Следующая статья | ||
| Language: | English • français • русский |
|---|


