Archive.exe
Archive.exe, the Alternative to Using the CK Archive Function[edit | edit source]
The CK auto-archiving function is geared toward uploading mods to Steam Workshop. There are issues with using it. It will not automatically gather up all the files that are needed to make a mod work. Careful thought and manual addition and subtraction of files are required to make it work. The interface may be hard to use for some people. The process often derails and you may have to go back to square one. There are reports that it just does not work on particular computers for unexplained reasons.
There are issues with uploading mods to Steam Workshop. It seems that it will only accept mods that do not have .esm files, multiple .esp files, multiple text documents, or image files included. This means that many mods cannot be uploaded to Steam Workshop because of how the system is designed.
So because of these issues, it is good to be able to package your files using a different program. Archive.exe will work even if the CK is just giving out error messages. Archive.exe can help you package any mod, no matter how complicated it is and no matter how many pieces it comes in. So you could use it to pack up mods to upload to Steam Workshop as well as mods to upload to various Skyrim mod sites.
Why Not Just Pack Up the Loose Files and Not Even Have a .bsa File?[edit | edit source]
Mods that use .bsa files instead of loose files are easy to install. Gamers will not install them wrong so frequently and complain to the mod maker about the mod not working because of their own mistakes.
But more importantly, mods that use .bsa files are easy to uninstall permanently or temporarily. Skyrim uses external scripts. If lots of mods with loose file scripts are used, the game can soon be a big mess and nobody will be able to figure out which mod caused a problem by editing which script. With a .bsa file, just remove it, and the problem script will cause no more trouble. No need to go digging through lists of scripts to delete, move, or reinstall one.
Some gamers like to use different mods when they are playing different characters. Perhaps a certain gamer would have a bunch of stealth mods to be used only when playing as a thief. Mods with .bsa files are easy to temporarily remove and then install again when it is time to play a different character.
Using .bsa files for .esp dependent mesh and texture replacer mods can also save a lot of headaches when things start to go wrong with how things look in the game.
So packing mods with a .bsa file instead of with loose files is considered to be following best practices for Skyrim modding.
Where to Find Archive.exe on the Computer[edit | edit source]
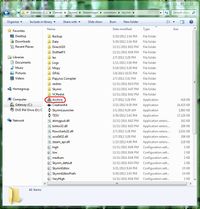
Different people install Skyrim in different places, but the directory will be like this:
-Installation Directory-\Steam\steamapps\common\skyrim\Archive.exe
Look for the building blocks icon.
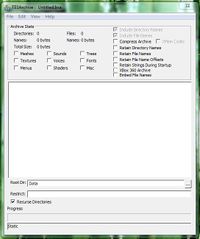
The Opening Screen[edit | edit source]
This is what you see after opening Archive.exe.
What Boxes to Check[edit | edit source]
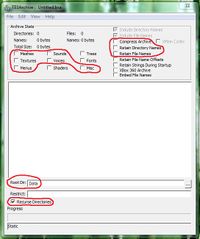
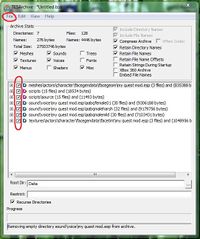
The different content type boxes must checked depending on what is being put into the .bsa file. The circled boxes are what would be included in the average medium to large mod. A person can't go wrong by checking too many content type boxes, but he or she could go wrong by checking too few.
Compressing the archive will reduce the size of the file for easier uploading and downloading. It seems to be good to retain names.
The root directory should read "Data" which is likely the default setting that will be encountered.
"Recurse Directories" is good for dropping entire folders into the archive rather than having to go clear down to the lowest level and selecting actual files like mesh files rather than being able to select a folder containing mesh files.
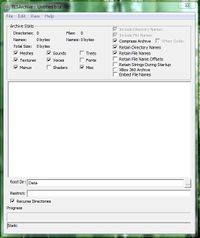
The Boxes Checked and Ready to Go[edit | edit source]
The boxes should be set like this for most projects.
How to Add Compiled Script Files to the .bsa[edit | edit source]
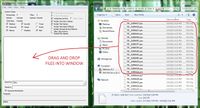
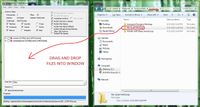
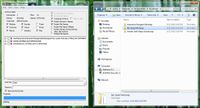
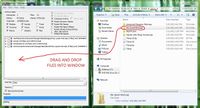
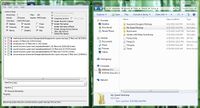
Open Windows explorer and put the window alongside the Archive.exe window. Select the .pex script files needed by the mod and drag and drop them into the Archive.exe window.
To figure out what scripts are needed, there are a couple of tricks that can be helpful:
- Open the CK archive function to see what scripts and source scripts it can find. Beware! The CK can't see all the scripts that are needed and won't list them all. Vanilla Skyrim scripts that are edited by a mod seem to be its big blind spot.
- Go into the quests in the mod and compile all scripts. This will change the date stamp on the .pex files (but not the .psc files.) Go into scripts placed on objects that the mod attaches scripts to. re-save them. This will change their date stamp. In the scripts folder in Windows Explorer, sort the scripts by date. The scripts that go with the mod will have today's date. (This won't work as well if more than one mod have been worked on on the packaging and upload day.)
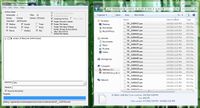
The Scripts Added to the List[edit | edit source]
The compiled script files are now part of the list of things that will be made into a .bsa when the command is given.
How to Add Source Scripts to the .bsa[edit | edit source]
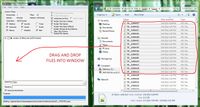
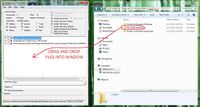
Select the .psc script files associated with the mod and drag and drop them into the Archive.exe window.
And why are these even needed? The gamer does not need them. Skyrim will play just fine without them. But modders will not be able to open the mod and figure out exactly how things work. They will not be able to study the skillful way the mod was built and learn from it. They will not be able to tweak it to make it suit the way they like to play.
The worst thing is that they will not be able to troubleshoot it. It could be that they will figure out a solution to a bad problem. They will share this information, and a better version of the mod can be uploaded with very little effort on the original author's part. a wise modder would not want to forgo this valuable information. A generous modder would not want to give people a mod they could not admire in the CK, learn from, and tweak to their taste. Open source is a good thing. Skyrim would not be so fun if it was closed source and no modding was possible. So it is good to share this ability with other modders just as Bethesda shared a moddable Skyrim with the Elder Scrolls fans.
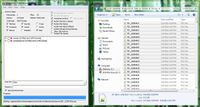
The Source Scripts Added to the List[edit | edit source]
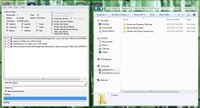
The source script files are now part of the list of things that will be made into a .bsa when the command is given.
How to Add Meshes to the .bsa[edit | edit source]
In this example the meshes are the facegen data created to work around the Dark Face Bug. Just because a mod has no new swords and armor does not mean that no meshes need to be packaged. If the mod contains new NPCs or vanilla Skyrim NPCs with edited faces, then facegen data needs to be generated, packaged, and uploaded with the rest of the mod.
With textures, a whole folder can often be dragged and dropped because "Recurse Directories" is checked.
The Meshes Added to the List[edit | edit source]
The mesh files are now part of the list of things that will be made into a .bsa when the command is given.
How to Add Textures to the .bsa[edit | edit source]
In this example the textures are the facegen data created to work around the Dark Face Bug. Just because a mod has no new clothing or recolored creatures does not mean that no textures need to be packaged. If the mod contains new NPCs or vanilla Skyrim NPCs with edited faces, then facegen data needs to be generated, packaged, and uploaded with the rest of the mod.
With textures, a whole folder can often be dragged and dropped because "Recurse Directories" is checked.
The Textures Added to the List[edit | edit source]
The texture files are now part of the list of things that will be made into a .bsa when the command is given.
How to Add Sound Files to the .bsa[edit | edit source]
In this example voiced dialog is being added to the .bsa. Voiced dialog is easy to add to the list because the dialog is in a folder named after the mod. (Which is why the voiced dialog gets broken if an .esp is renamed by a gamer who does not like the original name.) The whole folder can be dragged and dropped because "Recurse Directories" is checked.
The voiced dialog files in a mod should be refuzed into .fuz files rather than left as .wav and .lip files. Unfuzer may be downloaded here: http://skyrim.nexusmods.com/downloads/file.php?id=9797 There is a common problem where the voiced dialog will not play on a measurable minority of random computers if the dialog is left in .wav + .lip format rather than .fuz format. There seems to be no way to predict which mods will not work on which computers. So it is safest to refuz the voiced dialog files before uploading
Another advantage of .fuz files is that they are tiny. When building a mod with voiced dialog, it can quickly become too huge for easy uploading and downloading. Using .fuz file helps greatly with file size.
The Sound Files Added to the List[edit | edit source]
The sound files are now part of the list of things that will be made into a .bsa when the command is given.
How to Make the .bsa Once All the Files Are Gathered[edit | edit source]
When it is decided that everything has been gathered up and nothing has been left out, it is time to turn the files on the list into a .bsa.
Click on "File."
Select "Save As"
How to Name the .bsa File[edit | edit source]
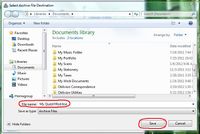
Name the file with the same name as the mod only with a .bsa file extension. For example:
My Quest Mod.esp (Plug-in)
My Quest Mod.bsa (Archive)
When you have finished typing in the name click "Save."
What to do With the Files Created[edit | edit source]
Find where the computer put the new .bsa file. In this example, the new files were placed by the computer in Documents.
Delete the .bsl file. It is not needed. It is assumed to be something to do with uploading a file to Steam Workshop. But if this .bsa is just being created to upload to Steam Workshop with the CK, then this .bsl file still is not needed because another one will be created. (And then it is not known if that .bsl file is good for anything while maintaining and updating a mod hosted by Steam Workshop.)
Open the .bsa file and examine it to make sure that it contains everything it is supposed to be there. Bear in mind that a .bsa file is NOT supposed to contain the .esp, .esm, or readme file. The .esp and .esm are supposed to be in the same folder as the .bsa so they can be dropped into Skyrim\Data together when installing the mod. The readme goes one level higher. It usually is not even decompressed. It can be read while in the 7-Zip or .rar package that it came in. If the mod contains additional documents or image files, they go with the readme, not with the .esp.
Copy or else cut and paste the .bsa file into the folders that are being prepared for the upload.
Placing the .bsa in the Folder With the Other Files for Upload[edit | edit source]
To figure out how to package a mod, it might be handy to look at one that has been downloaded and played. One that is known to be packaged right because it works properly. Here is how the sample mod, "My Quest Mod" is packaged. It is shown in three views from top to bottom. The folder that will be compressed with 7-Zip is the one named "My Quest Mod 1_0" Note that this is where the version number is placed along with in the file description in the .esp and in the readme. It is very important to give mods version numbers. There is always one more bug somewhere. It is only a matter of time until it is found. Conscientious modders will fix these bugs and release new versions.
A gamers may say, "Yur mod sux! it brkn an it dusnt wurk! plz hlp me!!!" The modder can calmly ask which version number the gamer is using, and upon receiving the answer, can say, "That problem was fixed in version 1_4, but you are using version 1_2. All you need to do is download the new version and your problem will go away."
It can also be helpful to have version numbers or other identifiers on mods if there are different current versions with different features tailored to the tastes of different kinds of players. It can also prevent mistakes where modders grab the wrong version of the mod and start expanding or tweaking it, only to discover the work has been wasted on an obsolete version rather than the current version of the mod
Before actually packaging the mod, The .bsa should be installed and tested. Disable or remove all the scripts, meshes, textures, and sounds that were packed into the .bsa. Don't delete them yet, just move them or rename them so that the game cannot find them and has to refer to the .bsa instead of the looses files. See if the dialog works. See if the scripts work, see if the meshes and textures work. (This could be done while testing the voiced dialog, just see if the NPCs have the Dark Face Bug or not.)
If all of this checks out okay, then it is time to compress the mod with 7-Zip or Winrar. It seems that 7-Zip compresses the files smaller, but more users seem to own Winrar than 7-Zip. Just don't use the old fashioned .zip files. They take way more space that .7z or .rar files.
Hopefully the file has a good descriptive name. Examples of bad names would be things like:
- Latest Version
- File
- The File
- BSA Version
- Final Version
- HK36557
- My Mod
Examples of good file names would be like:
- Swords by Skiberine 1_7
- Dark Dungeon V 2 1
- Follower Suzy 1 0
- SwimsuitsForCombat9
- TheSearchForTheHolyGobletQuest 2_5
- Glarthirs Blacksmithing Tweaks 37
- Retextured Swamp Mushrooms V3
Uploading the File[edit | edit source]
There are many different mod hosting websites where you can upload your creation. There can be benefits to uploading your mod to multiple sites (increased visibility, increased availabilty if one of the hosts experienced downtime) as well as drawbacks (more time spent uploading the latest version across multiple sites, more user bases that may need to be monitored for support). Different sites have different rules; be sure to read and understand the terms and conditions of use before uploading to a site. For Skyrim mods, some popular hosting sites are the Skyrim Nexus, the Steam Workshop, TES Alliance, Dark Creations, and Holds of Skyrim.
When uploading the file, set it to hidden (if the host allows this) until you have all pieces uploaded and the file is truly open for business. Upload screenshots, if applicable, to show off the mod. Have a good mod description written and ready before you upload, stating what the mod does and how to start using it. (This can often be taken from the readme file.) Upload the readme file in some form or other so that it can be viewed without downloading the entire mod first, if possible.
It would be good to run the readme file and mod description through a spell checker, because many potential downloaders are turned off by bad spelling. They react a similar way to a missing file that has not been uploaded yet. (The file is in the process of being uploaded but the modder failed to set the file to hidden.) Potential downloaders also react badly to mods with no screenshots. ("No pic, no click!") If the mod description is so vague that the potential downloaders can't tell what the mod is supposed to do, it is also quite harmful to the download count.
Package the mod properly so that it works on computers besides your own, and advertize and present it well at the download point, and the mod will get lots of downloads. The gamers will be happy, and will leave positive comments and endorsements.
Scripting Archive.exe[edit | edit source]
Archive.exe includes the ability to process simple scripts to build BSAs, useful if you often need to re-archive the same set of files, or a large set with only a few changes. Note that this functionality is still being investigated; make back-ups, proceed with caution, and test extensively before publicly releasing any archives done with this method.
In the same directory as Archive.exe, you'll want a script file with a .txt extension (say "mymodpackerscript.txt") that looks something like this:
Log: Logs\Archives\MyModArchiveLog.txt
New Archive
Set File Group Root: Data\
Add File Group: mymodfiles.txt
Save Archive: Data\MyMod.bsa
Then in the same directory, create a file called "mymodfiles.txt" that lists the files you want to include in the BSA:
Sound\Voice\MyMod.esp\femalecommander\MyMod_MyModCoreDialo_0000F063_1.fuz
Sound\Voice\MyMod.esp\femalecommander\MyMod_MyModCoreDialo_0000D562_1.fuz
Scripts\MyModCoreDialogueScript.pex
etc.
(Make sure both files have Windows-style line endings.)
Then you can either run your script through the GUI, or on the command line enter archive mymodpackerscript.txt
The GUI will pop-up, build the archive, and then close. If MyMod.bsa already existed in the save location, it will be renamed MyMod.bak.
Checkboxes can be checked using a script by using the Check: function (see Discussion tab for more details):
Check: Misc
Other Guides on How to Pack Up a .bsa File[edit | edit source]
http://creationkitadventures.wordpress.com/2012/02/25/how-to-package-a-bsa-archive-for-skyrim/
