Difference between revisions of "Bethesda Tutorial Customizing Weapons & Armor"
imported>TomBrightblade m (→Armor Properties: broken link) |
imported>TomBrightblade m (→Customizing a Weapon: links) |
||
| Line 37: | Line 37: | ||
===Weapon Properties=== | ===Weapon Properties=== | ||
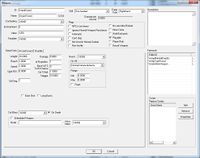
[[Image:Tutorial-Customizing-2.jpg|thumb|200px|right|The Weapon Form.]] | [[Image:Tutorial-Customizing-2.jpg|thumb|200px|right|The Weapon Form.]] | ||
The [[Weapon Form]] has a lot of properties. Let’s take a quick look at a few of the most important ones: | The [[Weapons|Weapon Form]] has a lot of properties. Let’s take a quick look at a few of the most important ones: | ||
* '''ID''' is the name of the weapon as it appears in the editor. | * '''ID''' is the name of the weapon as it appears in the editor. | ||
* '''Name''' is the name of the weapon as it appears in game. | * '''Name''' is the name of the weapon as it appears in game. | ||
* '''Enchanting''' is the weapon's enchantment, if any. | * '''Enchanting''' is the weapon's [[enchantment]], if any. | ||
* '''Enchantment''' is the weapon's enchantment charge capacity. | * '''Enchantment''' is the weapon's enchantment charge capacity. | ||
* '''Value''' is the weapon's base gold value. The value of the enchantment, if any, is added to this value. | * '''Value''' is the weapon's base gold value. The value of the enchantment, if any, is added to this value. | ||
| Line 66: | Line 66: | ||
Make sure to save your plugin. Then give it a try: | Make sure to save your plugin. Then give it a try: | ||
* Start the game with your plugin loaded. | * Start the game with your plugin loaded. | ||
* Once in-game, press ~ to bring up the [[Developer Console]], then enter '''player.EquipItem VorpalSword 1''' | * Once in-game, press ~ to bring up the [[Console Commands|Developer Console]], then enter '''player.EquipItem VorpalSword 1''' | ||
* Draw your weapon, and the sword will be in your hand. Go find something to kill! | * Draw your weapon, and the sword will be in your hand. Go find something to kill! | ||
<br> | <br> | ||
| Line 106: | Line 106: | ||
<br> | <br> | ||
To find out how many charges the enchantment uses per hit, we need to look at the enchantment itself. Double-Right-Click on the enchantment in the Enchanting dropdown to open the enchantment form. The cost per use is listed in the lower-right corner of the Enchantment form-- 109. Close the enchantment form and go back to the weapon. | To find out how many charges the enchantment uses per hit, we need to look at the enchantment itself. Double-Right-Click on the enchantment in the Enchanting dropdown to open the [[enchantment|enchantment form]]. The cost per use is listed in the lower-right corner of the Enchantment form-- 109. Close the enchantment form and go back to the weapon. | ||
<br> | <br> | ||
Revision as of 17:46, 1 March 2012
Overview
This chapter will guide you through the process of creating and customizing your own weapons and armor.
You will learn:
- How to create and customize a new weapon.
- How to create and customize a new piece of armor.
- How to apply enchantments to weapons and armor.
- How to set up crafting recipes for weapons and armor.
- How to set up a leveled item list.
Weapons
Creating a New Weapon
When creating a new item, it’s always best to begin by duplicating an existing item of the same type, then modifying it to meet your needs. This makes sure that all of the art, audio, and gameplay settings have good default values you can build on.
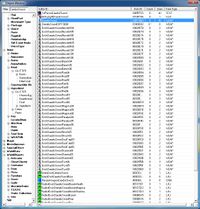
Let’s start with a Daedric Sword. In the Object Window, click in the Filter box and type in 'DaedricSword'. Then select the All entry in the Filter Tree. A list with a few dozen objects should appear.
Right-click on the 'DaedricSword' form in the Object Window window and select Duplicate. It looks like nothing has happened, but the Object Window just hasn’t updated yet. To see the duplicate object, click in the Filter box again, type a space after 'DaedricSword', and then delete it. You should now see our new duplicate sword, 'DaedricSwordCOPY000'.
Double-click on the new sword to open the Weapon form and begin editing it.
Customizing a Weapon
Weapon Properties
The Weapon Form has a lot of properties. Let’s take a quick look at a few of the most important ones:
- ID is the name of the weapon as it appears in the editor.
- Name is the name of the weapon as it appears in game.
- Enchanting is the weapon's enchantment, if any.
- Enchantment is the weapon's enchantment charge capacity.
- Value is the weapon's base gold value. The value of the enchantment, if any, is added to this value.
- Template is another weapon this item should inherit its statistics from, if any.
- Weight is the item's weight in your inventory.
- Speed is how fast the attack animation plays (a multiplier). This typically ranges from 1.3 (daggers, fastest) to 0.6 (warhammers, slowest); swords are 1.0.
- Damage is the item’s base damage value. Your skills, perks, and other enchantments add to this.
- Stagger represents the force of the weapon; its ability to stagger foes when it hits.
Example 1: The Vorpal Sword
Let's make a 'Vorpal Sword'-- a high-damage sword that will kill most enemies in a single hit. This is actually a really useful weapon for testing purposes, as it allows you to quickly speed through events without having to resort to console commands.
To make this sword, let's change the following:
- ID = VorpalSword
- Name = Vorpal Sword
- Damage = 10000
- Stagger = 10
Click OK, and the editor will warn you that the Weapon ID has changed and ask if you want to create a new form. Click 'No' to rename the current weapon. The editor will then ask for confirmation; click 'Yes'.
Make sure to save your plugin. Then give it a try:
- Start the game with your plugin loaded.
- Once in-game, press ~ to bring up the Developer Console, then enter player.EquipItem VorpalSword 1
- Draw your weapon, and the sword will be in your hand. Go find something to kill!
Example 2: The Lifestealer
Let's make a variant on the Vorpal Sword that uses the Absorb Health enchantment. To get started:
- Find the Vorpal Sword in the Object Window and duplicate it.
- Double-click on the duplicate to open the weapon form and begin editing.
In the weapon form, let's change:
- ID = Lifestealer
- Name = Lifestealer
We plan to add an enchantment to this item, but not to modify its other properties. So let's Template the Lifestealer to the Vorpal Sword. Any Weapon or piece of Armor can be Templated to another object of the same type. Templated items inherit the properties and crafting recipes of the object they're based on-- essentially, everything except the base item's ID, Name, Enchanting, Enchantment, and Value fields. It's always good idea to template items where you can, because that means changes you make to the base item will automatically be reflected on the items templated to it. So if you were to change the damage on the Vorpal Sword, the damage on Lifestealer would change as well.
To template the Lifestealer to the Vorpal Sword, click in the Template dropdown and begin typing 'VorpalSword'. Select it from the dropdown list. You'll notice that all of the properties on this tab (damage, stagger, etc.) are now greyed out, and can't be changed directly.
Now for the enchantment. Click on the Enchanting dropdown and scroll through the list until you find 'EnchWeaponAbsorbHealth06'.
What does that name mean? Well let's break it down briefly:
- EnchWeapon - This is a standard weapon enchantment.
- AbsorbHealth - This is the Absorb Health enchantment.
- 06 - Most standard enchantments have a 'power rating' of 01-06, with 06 being the strongest version of the enchantment.
Just selecting the enchantment isn't enough. Like all weapon enchantments, the Absorb Health enchantment consumes charges, so we need to make sure our weapon has enough.
To find out how many charges the enchantment uses per hit, we need to look at the enchantment itself. Double-Right-Click on the enchantment in the Enchanting dropdown to open the enchantment form. The cost per use is listed in the lower-right corner of the Enchantment form-- 109. Close the enchantment form and go back to the weapon.
Below the Enchanting dropdown is another field, called Enchantment, which represents the charge capacity of the weapon. Whenever an enchanted weapon strikes a target, its cost is subtracted from this pool. Currently, the Enchantment value is 0, so the enchantment could never be used.
What should it be set to? There are two basic ways to decide:
- Search in the Object Window for another weapon with the AbsorbHealth06 Enchantment and see what value it uses. For example, the Daedric Mace with this enchantment (EnchDaedricMaceAbsorbH06) has an Enchantment of 3000. That's [3000/109=27 charges].
- Or, you could determine the number of charges you want to get out of it (say, 50) and then calculate the value you need to achieve that [50x109=5450].
Let's go ahead and set the Enchantment value to 3000. Click OK, close the form (selecting 'No', then 'Yes', to confirm the ID change), save, and give it a try!
Armor
Creating New Armor
As with weapons, it’s best to begin by duplicating an existing piece of armor, and then modifying it.
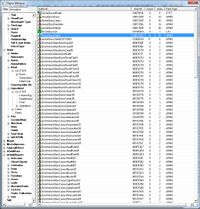
Let’s start with a Glass Shield. In the Object Brower window, click in the Filter box and type in 'ArmorGlass'. Then select the All entry in the Filter Tree. The list here is fairly long, but the item we’re looking for, ArmorGlassShield, should be near the top.
Right-click on the 'ArmorGlassShield' form and select Duplicate. To see the duplicate object, click in the Filter box again, type a space after 'ArmorGlass', and delete it. You should now see the duplicate armor piece, 'ArmorGlassShieldCOPY000'.
Double-click on the new item to open the Armor form and begin editing it.
Customizing Armor
Armor Properties
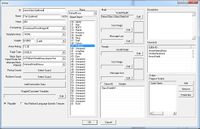
The Armor Form isn’t quite as intimidating, but let's focus on a few key properties:
- ID is the name of the armor as it appears in the editor.
- Name is the name of the as it appears in game.
- Enchanting is the weapon's enchantment, if any.
- You'll notice that there isn’t an 'Enchantment' field for armor, like there is for weapons. That's because armor enchantments don't use charges.
- Weight is its weight in your inventory.
- Type (the unlabeled box next to Weight) indicates whether the item is Heavy Armor, Light Armor, or neither. This determines which skills and perks affect the item.
- By convention, Shields always have the same type as their associated armor (so this shield is marked 'Light' because Glass Armor is Light Armor). This is just a convention; it doesn't have any functional effect in game.
- Armor Rating is the item's base defensive bonus. Your skills, perks, and other enchantments add to this.
Example: The Spellward
Let's make a shield with a lower armor rating than a standard Glass Shield, but a stronger Resist Magic enchantment.
To make this shield, let’s change the following:
- ID = ArmorGlassSpellward
- Name = The Spellward
- Armor Rating = 13
- As you might have noticed, Glass Shields typically have an Armor Rating of 27, so this shield is now only half as strong.
- Enchanting = EnchArmorResistMagic06
- If you scroll through the Object Window and look at the other Glass`playe Shields (EnchArmorGlassShield*), you'll notice that the best Resist Magic Enchantment they normally get is the 05 version, so giving this shield 06 makes it a step stronger than usual.
Click OK and close the form (selecting 'No', then 'Yes', to confirm the ID change). Make sure to save your plugin. Then give it a try:
- Start the game with your plugin loaded.
- Once in-game, press ~ to bring up the Developer Console, then enter:
- player.EquipItem ArmorGlassSpellward 1
- player.AddItem ArmorGlassShield 1
- Draw your weapon, and the shield will be in your hand. Compare the two-- you should be able to notice the difference!
Weapons, Armor, and Smithing
You might notice that you can't smith any of the items we've created so far. Both Forging and Improving items require Recipes that identify the materials needed to create the new or upgraded item. Let's set these up now.
Example 1: The Vorpal Sword
Vorpal Sword: Forging Recipe
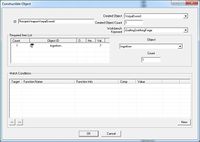
Once again, it's best to start with an existing recipe and begin from there. Search for 'RecipeWeaponDaedricSword' in the Object Window, duplicate it, and open it up.
All of the properties here are important, so let's step through them one at a time.
- ID - As usual, this is the form's Editor ID.
- Created Object - This is the item produced by the recipe.
- Created Object Count - How many of the objects are produced by the recipe.
- Workbench Keyword - Which Workbench uses this recipe.
- Required Item List - These are the components that go into the recipe, in both type and number.
- Match Conditions - All of the conditions in this list must be satisfied in order for you to be able to craft the item at all.
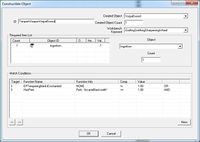
For our Vorpal Sword recipe, let's make a couple of changes:
- ID = RecipeWeaponVorpalSword
- Created Object = VorpalSword
- Required Item List - Since this is just an example, let's make this a little easier...
- Delete all of the items in this list (click on each and press the Delete key)
- Right-click in the list and select New. Click on the resulting item.
- In the Object dropdown list to the right, select IngotIron. This allows us to make the Vorpal Sword for just one Iron Ingot.
- Match Conditions - Currently, we can't make the Vorpal Sword without the Daedric Smithing Perk. Let's remove that requirement-- click on the HasPerk condition and delete it.
Click OK, confirm the ID change, and save.
Vorpal Sword: Tempering Recipe
We also need to create an Improvement recipe for the sword. Search for 'TemperWeaponDaedricSword' in the Object Window, duplicate it, and open it up.
You'll notice that this form is identical to the one for the Smithing Recipe. The only real differences are that:
- This recipe is for the Grindstone (CraftingSmithingSharpeningWheel) instead of the Forge.
- Because of that, the Created Object is the input instead of the output.
Let's make a couple of changes here:
- ID = TemperWeaponVorpalSword
- Created Object = VorpalSword
- Required Item List - Delete IngotEbony, and replace it with IngotIron.
- Match Conditions - This list is fine, but it's worth noting the conditions themselves: you can only temper this item if (1) It isn't enchanted, or (2) You have the Arcane Blacksmith Perk.
Click OK, confirm the ID change, and save. To test this out, visit your favorite smithy (or 'coc Riverwood'), craft, and sharpen your insanely powerful sword.
Example 2: The Lifestealer
So, do we need to repeat the same process to set up recipes for the Lifestealer? No. Remember that we templated the Lifestealer to the Vorpal Sword, so it automatically uses all of the Vorpal Sword's recipes.
However, if you try to forge or improve it in game, you'll probably notice that you can't. There are two reasons for this:
- You can't forge it because it's an enchanted item. Items with enchantments can never be forged directly.
- You can't sharpen it because it's an enchanted item, and you (most likely) don't have the Arcane Blacksmith perk.
- To test this out, give yourself the perk ('player.addperk ArcaneBlacksmith'), and you'll notice that it now appears in the grindstone's menu.
Example 3: The Spellward
To set up smithing recipes for The Spellward, just repeat the steps above, using the Glass Shield's recipes as a base. The only difference is that armor is tempered on a Workbench (CraftingSmithingArmorTable) instead of on a Grindstone (CraftingSmithingSharpeningWheel).
Leveled Items
When the game generates a Leveled Item, it consults a list of items and selects one appropriate to the player's level. In setting up a leveled item, we need to:
- Create the items for the list.
- Assemble the list.
- Decide how the selection will be made.
- Place the item in the world.
Creating the Items
As usual, let's find an existing example to get started. In the Object Window, search for 'LItemEnchArmorLightShield' and open it. Observe that there are four basic types of shields in this list: Hide, Elven, Glass, and Dragonscale. So let's create four shields to cover the same basic range of levels.
We created the Glass version of this shield above. Follow the same steps to create the Hide, Elven, and Dragonscale variants. Remember that the theme for this shield is half the usual armor rating, and magic resistance one step better than normal. So you should end up with:
- ArmorHideSpellward - Armor Rating 7, ResistMagic04
- ArmorElvenSpellward - Armor Rating 10, ResistMagic05
- ArmorGlassSpellward - Armor Rating 13, ResistMagic06
- ArmorDragonscaleSpellward - Armor Rating 15, ResistMagic06
- The Dragonscale Shield gets ResistMagic06 normally, so this isn't really an improvement. If you've completed the Spells and Enchanting Tutorial, try making your own ResistMagic07 Enchantment!
Since these are new, non-templated objects, don't forget to set up their Smithing Recipes!
Assembling the List
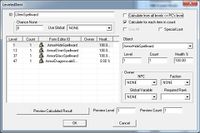
Once you've created the shields, it's time to assemble the leveled list. Duplicate the 'LItemEnchArmorLightShield' list and open it.
Most of this form is taken up by the list itself; we'll focus on that for the moment. Briefly note the levels at which the different enchanted shields begin to appear (13 for Elven, 37 for Glass, 47 for Dragonscale), then delete everything in the existing list.
Now to add our shields. There are two ways you can do this:
- Right-click in the list, select 'New', and select the shield from the Object Dropdown at right.
- Drag each of the four shields from the Object Window into the list.
Once all four Shields have been added to the list, we need to set their levels:
- Leave ArmorHideSpellward at Level 1. This ensures the list always produces something, even for a Level-1 player.
- Click on ArmorElvenSpellward and change its level to 13.
- Click on ArmorGlassSpellward and change its level to 37.
- Click on ArmorDragonscaleSpellward and change its level to 47.
Setting the Selection Criteria
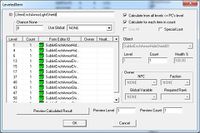
Let's take a step back and look at the properties of the Leveled Item Form:
- ID is the name of the list as it appears in the editor.
- Chance None is a random chance that this list will return no item.
- Use Global allows you to use a global variable for this chance instead of a fixed value.
- Calculate from all levels < PC's Level:
- If this box is unchecked, the list always returns the highest-level item that is less than or equal to the player's level.
- If this box is checked, the list will randomly return one of the items less than or equal to the player's level.
- Calculate for each item in count:
- If this box is unchecked, and the game requests five items from this list, the list will be checked once, and the game will return five duplicates of the result.
- If this box is checked, and the game requests five items from this list, the list will be checked five times, and the game will return the five results.
- Preview Level and Preview Count are used by Preview Calculated Result to allow you to test the output of the list.
Let's change:
- ID = LItemSpellward
- Uncheck Calculate from all levels..., which will guarantee we always get the most rewarding item for our level.
When you're done, click OK, confirm the ID change, and save.
Placing the Item
The easiest way to place the leveled item into the world is by using a Dummy Item, as discussed in the Clutter Tutorial. See that page for details.
