Scripting tutorial lever
Lever Scripting Tutorial
In this tutorial, we will be scripting a lever to open one of three doors. This is my first tutorial, and practically first time editing a wiki, so it's probably not as good as it could be.
Lever Design
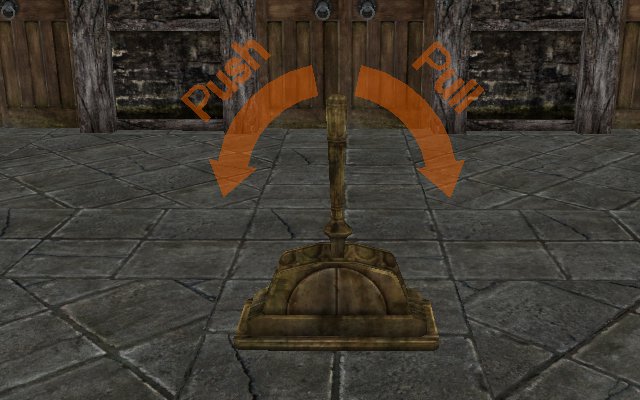
All levers in the game are basically the same. Let's take a look at the Dwemer Lever 01.
In the render window, it's shown with the lever in a central position pointing straight up. However, once it's loaded in the game, the default position is actually pulled down, all the way to the right. Levers have animations, and these animations can be called by using the scripting functions PlayAnimation or PlayAnimation. From what I can tell, levers have six animations:
- PushDown
- PushUp
- FullPush
- PullDown
- PullUp
- FullPull
And two animation events:
- FullPushedUp
- FullPulledDown
The animation events occur when the lever is pulled all the way to the right, or pushed all the way to the left. The animation "PushDown" is used to move the lever from the middle position to the left position. "PushUp" for moving from left to middle, and "FullPush" for moving from left to right. "PullDown" is used to move from middle to right, "PullUp" for moving from right to middle, and "FullPull" for moving from right to left.
Now that we know how the animation for a lever works, we can begin writing a script for it.
Starting Your Script
If you haven't already, please read the Hello World tutorial, because I don't intend to explain basics such as how to attach a script.
When you start your script, you want it to extend ObjectReference, because a lever is an activator, and activators are object references. So for the first line, you should have something like this:
Scriptname fg109TutorialLeverScript extends ObjectReferenceI put my name in there, because it makes it easier to filter through all the scripts in the scripts folder in order to find my own. I suggest you do the same.
You can also put in a comment between curly braces to describe what the script is used for. Comments in curly braces show up when you hover your mouse over the script in the Creation Kit.
Scriptname fg109TutorialLeverScript extends ObjectReference
{A script that will activate one of three doors, depending on the position of the lever.}
Properties and Variables
Next you should declare your properties and variables. Although it's not necessary to declare these at the beginning of your script, I like to put mine there and I think that's the normal way of doing things.
Properties
Like the script name, you can also put comments in curly braces for properties so that they show up when you mouse over the said property in the Creation Kit. These are the properties we will put in our script:
ObjectReference property Door01 auto
{One of the doors we can activate.}

ObjectReference property Door02 auto
{Another of the doors we can activate.}

ObjectReference property Door03 auto
{The last of the doors we can activate.}
Obviously, the properties here are to reference the doors that we want to be able to open. The reason we declared these as properties is because in Papyrus, we aren't allowed to reference anything directly. Instead, we use properties as placeholders for the things that we actually want to manipulate, and then afterwards we set the values of these properties outside of the script. This is to make it possible to reuse the same script for multiple items and purposes.
Variables
After the properties, we can declare our variables:
Int LeverPosition = 1
;The current position of the lever.

Int LeverPositionOld
;The previous position of the lever.
Note that comments in curly braces are only allowed for properties and the first line of the script. For comments in the rest of a script, you need to use semicolons. We will be using these variables to keep track of the position of the lever. You might notice that the declaration for the variable "LeverPosition" is different than for "LeverPositionOld".
What we have done is assign a default value to "LeverPosition". This means that even before anything has happened, the value of "LeverPosition" has already been changed to 1, instead of the default of 0. The reason for this is because of what I said in the previous section on levers.
Levers have a default position of being pulled all the way to the right. So we need to reflect that in our script, and have the initial value of LeverPosition be 1. In our script, we will be changing the values of these two variables to -1, 0, or 1 many times. A value of 1 will mean the pulled (right) position, 0 will mean the middle position, and -1 is the pushed (left) position.
That is it for the properties and variables. Now we move onto the actual work of the script.
Events and Functions
Usually, I put in events and functions in a random order, but for the purpose of this tutorial, I will try to keep it more organized.
Functions
Let's start by defining our functions. Our events are going to be calling on our functions, so I feel it's a better idea to put these first.
Function SetDefaultState()

	if (LeverPosition == 1)
		PlayAnimation("PullUp")
	elseif (LeverPosition == -1)
		PlayAnimation("PushUp")
	endif
	LeverPositionOld = LeverPosition
	LeverPosition = 0
	OpenDoor()

EndFunction
The function's name is "SetDefaultState" and we will be using it a lot. The purpose of the function is to move the lever into the middle position. The line
if (LeverPosition == 1)is used to check whether or not the lever is in position 1 (pulled to the right). If it is, the line
PlayAnimation("PullUp")tells the lever to move itself back to the middle position. Similarly, the lines
	elseif (LeverPosition == -1)
		PlayAnimation("PushUp")
	endif
check to see if the lever is in position -1 (pushed to the left) and returns it to the middle position if so. The OpenDoor is calling a function that we're going to put into the script further down.
If you want to learn scripting, you must understand the structure of if-elseif-endif statements. Basically, you start with "if" to check if a condition is true. If it is true, then every line after it is executed until you come to either an "elseif" or "endif". The "elseif" conditional is optional. It is useful if you want to check for a new condition when you know the previous condition(s) were not true. Like "if", if the "elseif" condition is true, all the lines after it are executed until you come to another "elseif" or "endif". The "endif" is used to wrap up all if-elseif-endif structures. For every "if", you must have an "endif" or else the script won't compile.
This is our next function:
Function DisableDoors()

	Door01.BlockActivation()
	Door02.BlockActivation()
	Door03.BlockActivation()

EndFunction
The DisableDoors function is used when we want to disable the doors from normal activation. Using BlockActivation will stop you from opening the door, even though you will still see the open door prompt. There are other commands we could have used to even disable the activation prompt, but we are trying to keep this as simple as possible.
Function CloseDoors()

	if (Door01.GetOpenState() != 3)
		Door01.SetOpen(false)
	endif
	if (Door02.GetOpenState() != 3)
		Door02.SetOpen(false)
	endif
	if (Door03.GetOpenState() != 3)
		Door03.SetOpen(false)
	endif

EndFunction
The CloseDoors function is used when we want to make sure that all the doors are closed. In this line
if (Door01.GetOpenState() != 3)we are checking if Door01 is not closed (therefore open) by using GetOpenState. In the next line
Door01.SetOpen(false)we close the door by using SetOpen. We do the same thing for the other two doors.
Function OpenDoor()

	if (LeverPosition == -1)
		Door01.SetOpen()
	elseif (LeverPosition == 0)
		Door02.SetOpen()
	else
		Door03.SetOpen()
	endif

EndFunction
The OpenDoor function is to open the correct door based on the current lever position. If the lever is in position -1 (pushed left) it will open Door01. If it's in the middle position, Door02. And if it's not in either of those positions, it will open Door03.
Events
Events are things that happen in the game. When an event occurs, the script will receive news of it, and if there is code written in the script dealing with the event, it will be carried out.
Event OnReset()
	SetDefaultState()
	DisableDoors()
EndEvent
Here we are seeing the code for an OnReset event. It is received when the object that the script is attached to, or the cell that said object is in, is reset. When this event is received, the script executes two of the functions we created earlier, SetDefaultState and DisableDoors.
Event OnLoad()
	SetDefaultState()
	DisableDoors()
EndEvent
The next event we are looking out for is the OnLoad event. It is received when the 3D model of the object that the script is attached to gets redrawn in by the graphics engine. We tell it to do the same thing as the OnReset event.
Auto State Inactive

	Event OnActivate(ObjectReference akActivateRef)

		GoToState("Active")
		CloseDoors()
		if (LeverPosition != 0)
			SetDefaultState()
		else
			if (LeverPositionOld == 1)
				PlayAnimation("PushDown")
				LeverPosition = -1
			else
				PlayAnimation("PullDown")
				LeverPosition = 1
			endif
			LeverPositionOld = 0
			OpenDoor()
		endif
		Utility.Wait(1)
		GoToState("Inactive")

	EndEvent

EndState


State Active
EndState
And now we have come to the final part of our script, the OnActivate event. This event is received when someone tries to activate our lever.
You might be wondering what are these states that you see. I'm not sure I can accurately describe them, so it's probably best to check the [[1]] page. Simply put, all scripts/objects have a state. If there are no states defined in the script, then the object is in the "null" state.
In our script, we had
Auto State Inactive
;stuff
EndState
The auto here means that our object is automatically put into the "Inactive" state when the object is loaded. The "stuff" in between the two lines are only executed when the lever is in the Inactive state.
So you can see that if the lever is in the "Active" state, trying to activate it does nothing. Note that all functions and events that are not in the "Active" or "Inactive" states (ie they're in the null state) are accessible from whichever state you are in.
Now let's take a look at the code for the OnActivate event. This line
GoToState("Active")tells the lever that it is now in the "Active" state as soon as we activate it. That doesn't mean that the script will stop processing the rest of the code in the "Inactive" state, it just means that subsequent activations don't trigger the code.
CloseDoors()
if (LeverPosition != 0)
	SetDefaultState()
If you've followed what's been going on so far, this should be easy. We call the CloseDoors function to make sure all the doors have closed. If the lever is not in the middle position, we change it to the middle position.
else
	if (LeverPositionOld == 1)
		PlayAnimation("PushDown")
		LeverPosition = -1
	else
		PlayAnimation("PullDown")
		LeverPosition = 1
	endif
	LeverPositionOld = 0
	OpenDoor()
endif
Otherwise, the lever must have been in the middle position. This is where we check our LeverPositionOld variable to figure out what was the previous position. Obviously, we don't want to go from right, to middle, back to right. So if the old lever position was 1 (right), then we now go to the left position. If the old position was -1 (left), we now go to the right position.
Then we set the value of LeverPositionOld to 0, and call the OpenDoor function. We didn't have these two lines after
if (LeverPosition != 0)because they're already part of the SetDefaultState function. And our final bit of code
Utility.Wait(1)
GoToState("Inactive")
is telling our script to stop processing anything for 1 second (in order to let the animations play out) and then go back to the "Inactive" state (so that activating the lever again will do something).
So put all that together, and your script should look something like this:
Scriptname fg109TutorialLeverScript extends ObjectReference
{A script that will activate one of three doors, depending on the position of the lever.}

;;;;;;;;;;;;;;;;
;; Properties ;;
;;;;;;;;;;;;;;;;

ObjectReference property Door01 auto
{One of the doors we can activate.}

ObjectReference property Door02 auto
{Another of the doors we can activate.}

ObjectReference property Door03 auto
{The last of the doors we can activate.}


;;;;;;;;;;;;;;;
;; Variables ;;
;;;;;;;;;;;;;;;

Int LeverPosition = 1
;The current position of the lever.  Here we set it to a default of 1.

Int LeverPositionOld
;The previous position of the lever.


;;;;;;;;;;;;;;;
;; Functions ;;
;;;;;;;;;;;;;;;

Function SetDefaultState()

	if (LeverPosition == 1)
		PlayAnimation("PullUp")
	elseif (LeverPosition == -1)
		PlayAnimation("PushUp")
	endif
	LeverPositionOld = LeverPosition
	LeverPosition = 0
	OpenDoor()

EndFunction


Function DisableDoors()

	Door01.BlockActivation()
	Door02.BlockActivation()
	Door03.BlockActivation()

EndFunction


Function CloseDoors()

	if (Door01.GetOpenState() != 3)
		Door01.SetOpen(false)
	endif
	if (Door02.GetOpenState() != 3)
		Door02.SetOpen(false)
	endif
	if (Door03.GetOpenState() != 3)
		Door03.SetOpen(false)
	endif

EndFunction


Function OpenDoor()

	if (LeverPosition == -1)
		Door01.SetOpen()
	elseif (LeverPosition == 0)
		Door02.SetOpen()
	else
		Door03.SetOpen()
	endif

EndFunction


;;;;;;;;;;;;
;; Events ;;
;;;;;;;;;;;;

Event OnReset()
	SetDefaultState()
	DisableDoors()
EndEvent


Event OnLoad()
	SetDefaultState()
	DisableDoors()
EndEvent


Auto State Inactive

	Event OnActivate(ObjectReference akActivateRef)

		GoToState("Active")
		CloseDoors()
		if (LeverPosition != 0)
			SetDefaultState()
		else
			if (LeverPositionOld == 1)
				PlayAnimation("PushDown")
				LeverPosition = -1
			else
				PlayAnimation("PullDown")
				LeverPosition = 1
			endif
			LeverPositionOld = 0
			OpenDoor()
		endif
		Utility.Wait(1)
		GoToState("Inactive")

	EndEvent

EndState


State Active
EndState
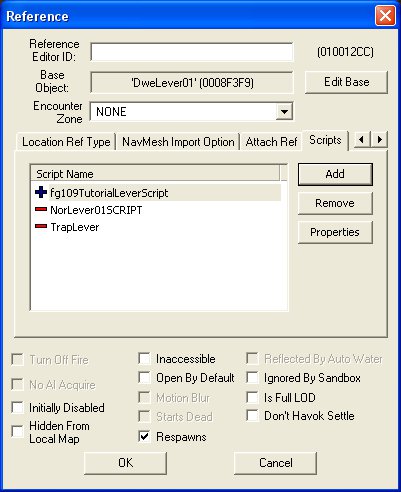
So save your script and it should compile successfully. Then you can try it out by putting down a lever somewhere, double-clicking it to edit it, and go to its right-most tab. You should remove the two scripts that are already on it and replace them with the script you just wrote. It should look like this:
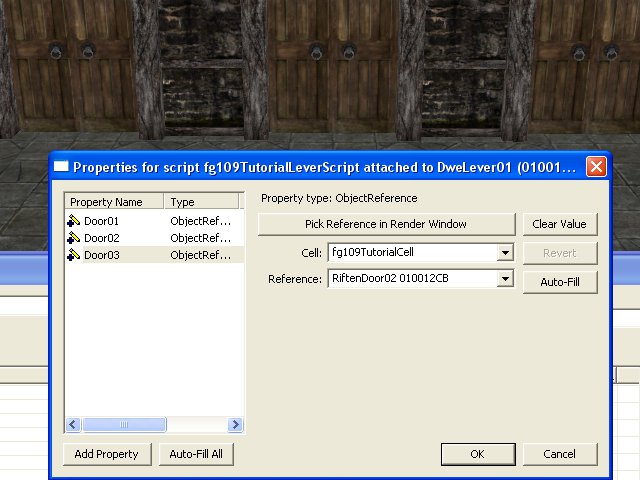
After adding your script, click OK to close the window and now put down three doors. After you've done that, go back to the lever and its script tab again. Right-click the script, and select properties. Now you just set the values to Door01, Door02, and Door03 to the doors you want to open/close.
That's it! Save your mod and try it out in the game.


