World Menu
Overview
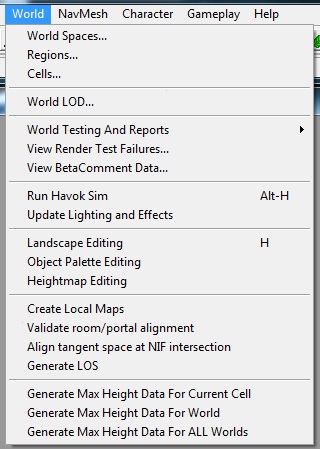
The World menu is located in the upper left hand corner of the main Construction Set window and is used for managing various types of data associated with worldspaces used in the game.
Worldspaces
Main Article: World Spaces
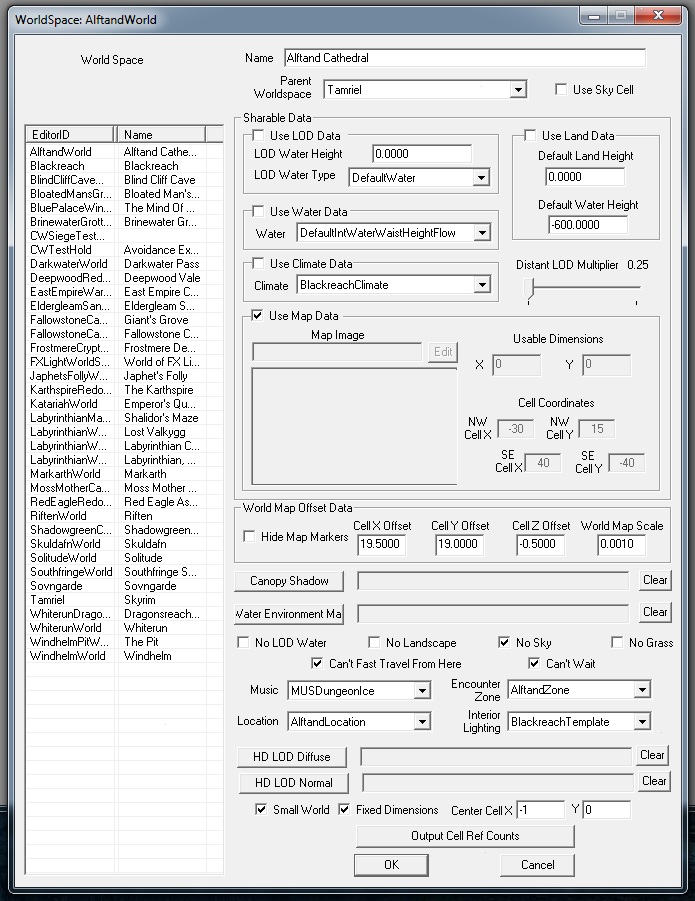
- Name: Editor ID of the worldspace
- Parent Worldspace: If you select NONE, the worldspace will have its own, editable landscape. Otherwise, this worldspace will use the landscape of its parent.
Sharable Data - The following fields are only available if this worldspace has no Parent.
- Use LOD Data: If checked, LOD Data is enabled for World Space
- LOD Water Height: Elevation that LOD water appears
- LOD Water Type: Editor ID of water type
- Use Image Space Data: If checked, specified IS data will be enabled for World Space
- Image Space:
- Use Water Data: If checked, specified IS data will be enabled for World Space
- Water: Select the WaterType used in this worldspace.
- Use Climate Data: If checked, specified climate data will be enabled for World Space
- Climate: Select the Climate for this worldspace.
- Use Land Data: If checked, land data will be enabled for World Space
- Default Land Height: Specifies land elevation value
- Default Water Height: Specifies default water elevation value
Use Map Data: If you want a custom world map, select the DDS file here.
- Map Image:
- Usable Dimensions: Set the limits of the playable area of the worldspace (NW corner to SE corner).
- Cell Coordinates:
World Map Offset Data
- Cell X Offset:
- Cell Y Offset:
- World Map Scale:
- Canopy Shadow: Unused
- Water Environment Map: Allows for the selection of a texture to be used as water reflection in a worldspace without a sky enabled
- Can't Fast Travel From Here: No Fast Travel from this worldspace
- Can't Wait: No waiting in this worldspace
- No LOD Water: Disable LOD water (for worldspaces where there is no water or where the view is restricted)
- Small World: Mark this as a small worldspace (speeds up certain processing for small worldspaces)
- Music: Default music type used in this worldspace
- Encounter Zone: Specify an Encounter Zone for the entire worldspace
- Location: Specify a Location for the entire worldspace
- Interior Lighting: Choose an interior lighting template for this worldspace
- HD LOD Diffuse: Set a texture to be used for HD LOD Diffuse Lighting
- HD LOD Normal: Set a texture to be used for HD LOD Normal lighting
- Output Cell Ref Counts: Generates a tab delimited text file with reference counts for the cells in this worldspace
Regions
Cells
World LOD
Used for Generating LOD models for Worldspaces.
- Meshes
- Distant Terrain/Water: Terrain generation now utilizes all processor cores, allowing for much faster mesh creation. This is a huge improvement over Fallout 3's GECK, as it would only use two cores and could take weeks to generate a single worldspace.
- Background: Generates LOD using much less processing power, allowing you to continue using your computer without much lag. The downside is that it takes longer to generate meshes versus if you choose high priority.
- High Priority: Generates LOD using quite a bit of processing power, which causes LOD generation to go by very quickly. I was able to generate a full world of terrain meshes (a 128x128 cell world) in under 16 minutes, a huge improvement over previous editors.
- Static Objects:
- Trees:
- Distant Terrain/Water: Terrain generation now utilizes all processor cores, allowing for much faster mesh creation. This is a huge improvement over Fallout 3's GECK, as it would only use two cores and could take weeks to generate a single worldspace.
- Textures
- Generate Diffuse Textures:
- Generate Normal Textures:
- Source Textures Only:
- Source and compressed textures:
- Tools
- Examine a mesh...:
- Clear Scratch Files:
- Export Terrain Mesh:
- Re-Import Terrain Mesh:
- Debug
- Build Specific Chunk:
- Stats
- LOD Object Stats:
- Precompute Occlusion
- From/To Cell:
- Use Region:
- Compute:
- Batch precomputed occulsion:
- Generate: generate LOD meshes for the world space with the selected settings
- Disable Screen Saver: Appears to simply disable the screensaver (and therefore sleep) functions of your computer by moving your mouse by tiny amounts. This can be useful when generating terrain meshes, as they can occasionally take a while.
World Testing and Reports
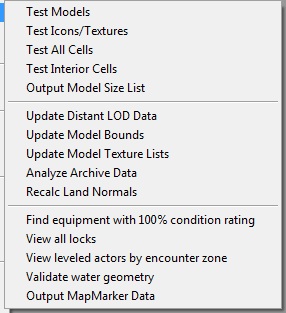
Brings up the World Testing sub-menu
- Test Models:
- Test Icons/Textures:
- Test All Cells:
- Test Interior Cells:
- Output Model Size List:
- Update Distant LOD Data:
- Update Model Bounds:
- Update Model Texture Lists:
- Analyze Archive Data:
- Recalc Land Normals:
- Find Equipment with 100% condition rating:
- View all locks:
- View leveled actors by encounter zone:
- Validate water geometry:
- Output MapMarker Data:
View Render Test Failures
View Betacomment Data
Run Havok Sim
Toggles Havok physics, lighting, and vfx simulation in the Render window.
Some notes and tips:
- If you want the lighting and vfx simulations, but not the physics simulation (because you don't want objects to accidentally settle, etc.), use Update Lighting and Effects instead.
- The physics simulation will only run on the objects that are currently selected; everything else will be frozen.
- Objects marked 'Don't Havok Settle' on their reference will not be simulated.
- Actors marked 'Starts Dead' will be simulated (ragdoll).
- If you Alt-Drag on a joint (such as a corpse's wrist), you can move that joint to fine-tune the position of the corpse. Note that the corpse will still re-settle in game, so you may not be able to achieve a very specific pose.
Update Lighting and Effects
Toggles Havok lighting and vfx simulation only. Unlike Run Havok Sim, objects and actors will not settle while this mode is on.
Landscape Editing
Used to edit the local landscape in the render window.
To access this window, use the "H" hotkey from the Render Window. Only useful in exterior cells.
- Height
- Edit Radius: Controls size of your editing brush.
- Edit Falloff %: Not used in current version.
- Flatten Vertices: When checked; Brush will flatten terrain.
- Soften Vertices: When checked; Brush will soften terrain variation.
- Show Edit Radius: When checked; Brush Radius appears in the Render Window.
- Texture
- Texture List: List of available Textures by ID and Filename
To add or change textures, go the the Object Window. Textures are under Miscellaneous/Land Texture. - Selected Texture: Preview of Currently Selected Texture.
- Max Opacity: Controls Strength of brush when painting texture.
- Applying Textures: Right click on the terrain to apply the selected texture.
- Texture List: List of available Textures by ID and Filename
- Vertex Color:
- RGB: Manual entry of Left/Right-click Shading colors.
- Select Color: Select shading shading colors from palette menu.
- Rows of color Swatches: Two rows of swatches to store custom colors.
Object Palette Editing
Main article: Object Palette Editing
Heightmap Editing
Allows for the selection of a Worldspace, which then opens the Heightmap Editing window.
Create Local Maps
This allows you to export local maps from the Creation Kit. It is not used in creating the local maps seen in game (which are automatically generated based on level geometry), and cannot be used to import a map in place of the generated map.
The exported maps will be in .DDS format, and will be placed in your [GAME_DIRECTORY]\Data\Textures\Maps\ folder.
Tips:
- You can export multiple Interior Cells by using CTRL-Click or SHIFT-Click to select multiple entries in the list.
- When exporting a Worldspace, you can choose to export the entire Worldspace or just a range of cells.
- Unless the area you are working on takes up almost the entire Worldspace, it is highly recommended that you deselect "All Cells" and instead enter the coordinates of your space, to avoid generating a large number of empty cells.


