Bethesda Tutorial Quest Objectives/ru
Ориентиры
 | На русском языке Требуется помощь переводчика |
| Ориентиры | |
|---|---|
| Серия: Основы квестописания, глава 6 | |
| К другим учебникам | |
| Следующая статья | |
Кратки обзор
В этой главе ты научишься задавать цели задания и пользоваться маркерами, ведя беспомощных игроков по огромному миру игры. Заодно, разберешься что делать после завершения квеста, чтобы он не висел в списке текущих заданий до конца времен.
Ты узнаешь:
- Как создавать цели задания и что такое псевдонимы
- Как изменять активность целей
- Как завершить квест
- Как создать дополнительные стадии квеста
Ориентиры
В процессе выполнения заданий, игроки могут заглянуть в журнал квестов, чтобы сориентироваться, куда им нужно идти и что сделать, чтобы завершить текущую стадию задания.
И первым шагом на пути к созданию подобного ориентира, будет определение цели и погружение в удивительный мир Псевдонимов.
Псевдонимы
Псевдонимы - это своего рода участники нашей истории. Различные существа, места, предметы, которые будут играть какую-либо роль в задании. Каждый псевдоним указывает на конкретную ссылку или место в игровом мире. В нашем случае, своими псевдонимами обзаведутся: квестодатель Бенду, вор и амулет.
Вернемся к нашем заданию. Открой окно квеста и перейди на вкладку Quest Aliases (en). Посередине ты увидишь большую таблицу. Щелкни ПКМ по ней и выбери "New Reference Alias", чтобы открыть еще большее окошко. К счастью, большая часть элементов этого окна нас не интересует. О ней ты прочитаешь позже, в посвященном псевдонимам учебнике).
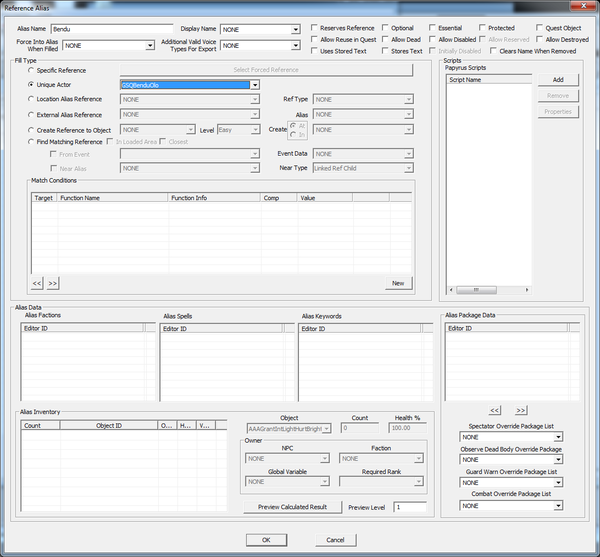
Напечатай в поле "Alias Name" имя "Bendu". Ниже, в группе Fill Type, выбери "Unique Actor" и из списка - "GSQBenduOlo". В итоге окно должно выглядеть так:
Щелкни по кнопке "ОК", чтобы закрыть окно. Теперь добавь псевдоним вору, назови его "Thief". Вор не является уникальным персонажем (поскольку создан по шаблону), поэтому используй тип Specific Reference. Щелкни по большой кнопке "Select Forced Reference" справа от выбранного режима. Есть два способа указать на ссылку:
- Выбрать "ReachwindEyrie01" в списке ячеек (Cell) и "GSQThief" в списке ссылок (Ref).
- Или, если Reachwind Eyrie загружен и отображается в окне визуализации, ты можешь щелкнуть по кнопке "Select Reference in Render Window". В этом случае курсор примет форму мишени. После чего дважды щелкни ЛКМ по зеленой букве M, обозначающей нашего вора, чтобы выбрать его (или ПКМ для отмены).
Каким бы путем ты не пошел, в итоге нажми кнопку "ОК" в этом окне и окне псевдонимов.
Мы добрались до третьего псевдонима (для амулета), но тут есть свои особенности. Уникальными могут быть только персонажи. А Unique Actor конечно же не будет работать с предметами. И воспользоваться прямыми ссылками мы не можем, так как единственный экземпляр амулета находится в рюкзаке у вора. Так что попросим псевдоним самостоятельно создать ссылку на объект.
Как и прежде создай новый псевдоним. Назови его "Amulet" и измени тип на "Create Reference to Object". Идем слева направо:
- Выбираем "GSQAmulet" из списка - базовый объект нашего амулета.
- Уровень сложности оставляем без изменений (поскольку мы имеем дело с предметом, а не персонажем, он ни на что не повлияет).
- Изменяем режим на "Create In"
- Выбираем Thief из последнего списка.
Как ты можешь догадаться, мы создали новую ссылку на амулет и поместили ее в инвентарь вора... Правильно, там теперь два амулета. Открываем GSQThief и удаляем амулет из инвентаря.
Creating Objectives
Now move over to the Quest Objectives tab in your quest window. This is where we'll actually set up the objectives as the player sees them.
Each objective has an index (a number we'll use to refer to it), text that will be displayed to the player, and a list of targets that will get arrows placed on them in the player's map and in-game interface.
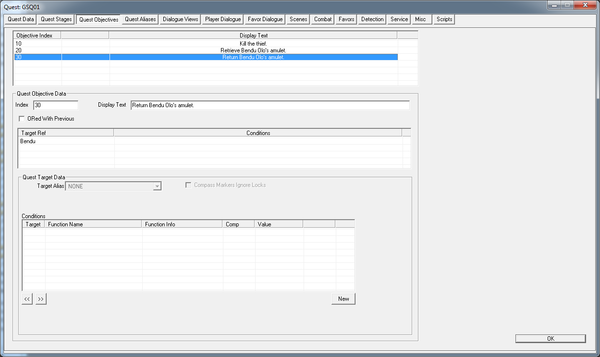
To make a new objective, right-click in the table at the top of the window and select "New" from the menu. In the "Objective Data" area below there, change the Index value to "10" and make the Display Text say "Kill the thief."
Finally, in the table below the Index and Display Text fields, right-click and select "New" to create a new quest target. This creates a big scary "NO TARGET" until you select something from the "Target Alias" pulldown below. In this list, you'll see all the aliases we defined earlier. Choose "Thief," and we can move on. (The "NO TARGET" will remain until we click away on something else.)
Now make another objective:
- Index: 20
- Display Text: Retrieve Bendu Olo's amulet.
- Target Alias: Amulet
And one more:
- Index: 30
- Display Text: Return Bendu Olo's amulet.
- Target Alias: Bendu
Your window should look something like this when we're done.
Now we have our objectives made, we just have to tell the game when to show them.
Setting Objectives
Remember all of those SetObjectiveDisplayed()'s I told you ignore? This is where they come into play. Should the following NOT work for some odd reason, those are a safety net. They will do what this is supposed to do. I suggest doing both to have all the bases covered.
Go back to the Quest Stages tab. We're going to add some logic in here as the quest advances.
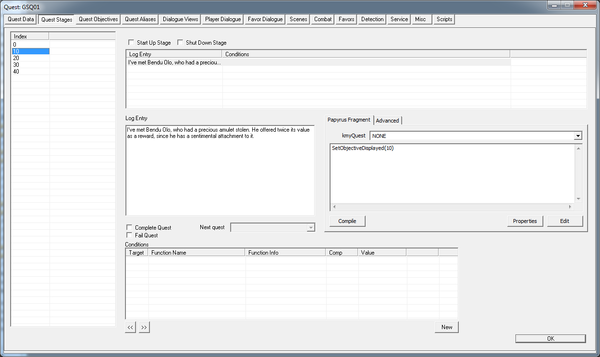
Click on stage 10 in the list on the left. In order to add script logic or a log entry to a quest stage, it needs to have at least one "quest stage item", so right-click in the table that says "Log Entry" at the top and select "New."
Log entries are the bits of text that will appear in the player's journal. Only the most recent log entry will be visible, so you can use this to update the story of the quest as it changes. Down in the "Log Entry" area, put the following:
I've met Bendu Olo, who had a precious amulet stolen. He offered twice its value as a reward, since he has a sentimental attachment to it.
Click over to the text field on the right (in the Papyrus fragment tab). Doing so will pop up the spell-check window, complaining that "Bendu" and "Olo" are not proper words. Ignore both "mistakes" and we'll add the script logic.
In the Papyrus area, put: SetObjectiveDisplayed(10). Press the "Compile" button to make sure you did it right. As you might guess, this set the quest's current objective to 10, and give the player the appropriate quest targets. Because it's the first objective shown for this quest, it will also cause the "STARTED" banner to be shown to the player.
Now select stage 20 from the list on the left, and create a new stage item for it. Remember, stage 20 is after we've killed the thief but before we've gotten the amulet. We have two things to do here -- tell the player that the previous objective (to kill the thief) has been accomplished, and set their next goal. We do that with two lines of script:
SetObjectiveCompleted(10)
SetObjectiveDisplayed(20)We can leave the journal entry here blank, because the overall story of the quest hasn't changed.
Do the same thing for stage 30, except this time your logic should be completing objective 20 and displaying objective 30.
Finally, in stage 40, we just need to complete objective 30. You should also check the "Complete Quest" checkbox below the Log Entry text field, so that the "COMPLETED" banner will be shown when stage 40 is set. (This will also move the quest to the inactive portion of the player's journal, keeping it somewhat tidy.)
The final journal entry should sum up what happened in the quest, since it's now in the past. For example:
I met Bendu Olo and was rewarded handsomely for retrieving his stolen amulet.
Trying it out
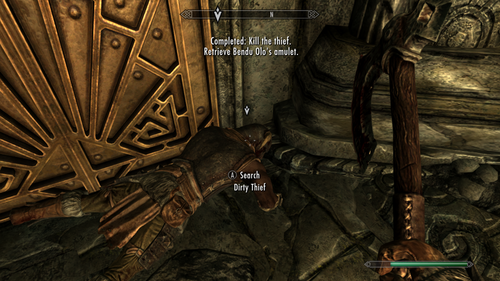
Now when you progress through the quest, your progress will be visible in your journal and you will have quest targets to the various plot points.
| К другим учебникам | Следующая статья | ||
| Language: | English • français • русский |
|---|


