Bethesda Tutorial Quest Loose Ends/ru
Bethesda Tutorial Quest Loose Ends
 | На русском языке Требуется помощь переводчика |
| Bethesda Tutorial Quest Loose Ends | |
|---|---|
| Серия: Основы квестописания, глава 7 | |
| К другим учебникам | |
| Следующая статья | |
Краткий обзор
Эта глава посвящена "работе напильником" над эпической историей Бенду Оло и его пропавшего амулета.
Она завершает данную серию уроков. Предполагается, что ты всему необходимое ты уже освоил ранее. За руку тебя водить уже никто не будет. Если ты что-то забыл - обратись к предыдущим главам.
Итак, что ты узнаешь:
- Что мы сделали неверно.
- Как это исправить.
Проблемы
Вот список недоработок, которые приходят на ум:
- Бэнду может... скоропостижно скончаться... после того, как квест будет принят. Сдать амулет, конечно же. будет уже некому.
- Бэнду рассказал о том, где может скрывать вор, однако место на карте мы не отметили.
- Добыть амулет можно и не убивая вора, просто пошарив у него в карманах. Квест выполнить будет можно, но одна из целей так и будет висеть незавершенной.
- Вор мог быть найден и убит\обворован до встречи с Бэнду.
- В финале квест завершается, но амулет Бэнду не забирает.
- Амулет может быть выброшен и утерян. Игрок, конечно, сам виноват, но наш долг этого не допустить.
- После отказа от выполнения задания, при следующей встречи, Бэнду будет говорить так, словно впервые видит игрока.
- У Бэнду в наличии лишь обезличенный стандартный набор приветственных и прощальных фраз.
Будем исправлять их по порядку. Некоторые из них имеют несколько решений, со своими плюсами и минусами.
Смерть квестодателя
У нас есть два варианта: мы можем либо отменить квест и убрать подальше от глаз, если Бэнду умрет, или же сделать его бессмертным. Оба варианта имеют свои достоинства и недостатки. Если квестодатель еще обязательно понадобится нам в будущем, то выбор очевиден.
Обработка смерти
Ранее ты уже узнал, как пометить квест завершенным. Теперь предстоит сделать тоже самое, только вместо пометки "Выполнен", нужно будет использовать "Провален".
Создай новую стадию квеста с индексом 200. Создай запись в журнале с нижеследующим текстом:
Мне не удалось вернуть Бэнду Оло украденный у него амулет.
Внизу отметь флажком "Fail Quest".
Теперь нужно изменить стадию квеста на 200, если Бэнду погибнет. Добавь ему скрипт (точно также, как проделал это с вором). Назови его GSQBenduOloScript. Текст скрипта следующий:
Quest Property GSQ01 auto

Event OnDeath(Actor akKiller)
	if (!GSQ01.IsCompleted())
		GSQ01.SetStage(200)
	endif
EndEvent
Примечание: мы ввели проверку на то, что квест еще не завершен. Было бы нелогично засчитать проваленным однажды выполненный квест.
You can auto-fill the GSQ01 property,
Бессмертный Бэнду
Альтернатива - сделать Бэнду неубиваемым. Если его здоровье опустится до 0, он не умрет, а упадет без чувств, но очнется, когда бой будет закончен.
Сделать это очень просто. Открой окно персонажа GSQBenduOlo, и поставь флажок "Essential" (существенный). ("Protected" (защищенный) - это похожая опция, которая позволяет убить персонажа только игроку и никому больше.)
Маркер на карте
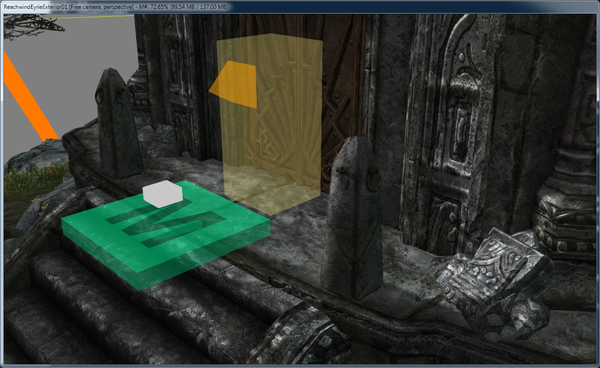
Обычно, когда игроку становится о каком-нибудь месте в игре, на карту добавляется маркер, который позволяет легче сориентироваться и добраться до цели. Перейди к ячейке ReachwindEyrieExterior01 в пространстве Tamriel. (Для этого достаточно дважды щелкнуть по желтому маркеру двери в ReachwindEyrie01. [по которому не так-то просто попасть - прим. переводчика]) Прямо под дверью ты увидишь сине-зеленый прямоугольник с большой буквой М.
Открой 10ую стадию квеста и и добавь в скрипт свойство типа ObjectReference. Назови его "DungeonMarker". Выбери маркер на карте, в качестве цели для этого свойства.
Затем измени скрипт:
SetObjectiveDisplayed(10)

DungeonMarker.AddToMap()
Карманные кражи
Взгляни еще раз на скрипт амулета, который призван продвинуть вперед сюжетную линию:
Quest Property GSQ01  Auto

Event OnContainerChanged(ObjectReference newContainer, ObjectReference oldContainer)
	if (newContainer == Game.GetPlayer())
		GSQ01.SetStage(30)
	endif
EndEvent
Не сложно заметить, что когда игрок подберет амулет, квест перейдет в 30ую стадию. Вне зависимости от того был убит вор или нет. А значит, если амулет будет украден, 20ая стадия квеста так и останется незавершенной.
Исправить это не сложно. Достаточно немного подкорректировать наш старый скрипт. Выглядел он так:
SetObjectiveCompleted(20)
SetObjectiveDisplayed(30)
А теперь мы его подредактируем:
if (!GetStageDone(20))
	SetObjectiveDisplayed(10, False)
endif

SetObjectiveCompleted(20)
SetObjectiveDisplayed(30)
Вторая строчка НЕ отобразит новую цель, а наоборот - уберет старую из журнала.
(Конечно, можно было бы и вовсе убрать стадию "Убить вора" и просто попросить игрока вернуть амулет. С определенной точки зрения это даже правильнее, так как не навязывает игроку какой-либо стиль игры.)
Если игрок убьет вора после кражи амулета, он получит дополнительный ориентир. В результате у нас появится две активные задачи. Эта проблема также легко решается правкой скрипта вора.
Event OnDeath(Actor killer)
	if (TutorialQuest.GetStage() < 30)
		TutorialQuest.SetStage(20)
	endif
EndEvent
Мы добавили проверку, что стадия квеста меньше 30, прежде чем изменить ее на 20. Так что если игрок вначале завладеет амулетом, а затем убьет вора, стадия задания от этого не изменится.
Не по порядку
Разумеется, большой проблемой станет посещение Reachwind Eyrie до знакомства с Bendu. В результате будет завершена стадия 20 (но игрок этого не увидит) и отображена 30, с предложением вернуть амулет Бэнду. Большие круглые глаза и недоуменное "А это кто?" тебе гарантированы. И в журнале не появится никаких записей, пока квест не будет завершен.
И вновь есть несколько возможных решений проблемы:
- Вместо инвентаря вора создать предмет в каком-нибудь недоступном хранилище. Когда игрок примет квест, воскресить вора (если необходимо) и перенести в его инвентарь амулет.
- Сделать амулет трофеем (en) (в этом случае предмет не может быть украден и появится в инвентаре вора только после его смерти). При взятии квеста воскресить вора, если это необходимо.
- (The amulet would have to be set as a conditional death item, so it would only get placed there if we were at the appropriate quest stage.)
- Позволить игроку убить вора раньше времени и добавить соответствующую ветвь диалога Бэнду ("Здра... постой-ка! Это же мой амулет!") и завершить квест.
- Оставить всё как есть, но убрать подальше вора до наступления соответствующей стадии, тогда у игрока не будет возможности убить или обокрасть его раньше времени.
В нашем случае наиболее простым и логичным является последний вариант. Но, мы рассказали и о других возможностях, так как в различных ситуациях, это может тебе пригодится.
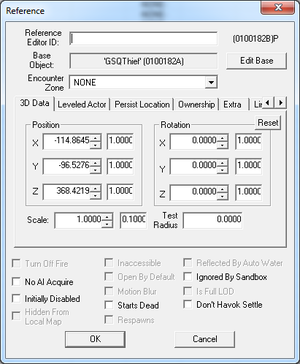
Что бы отключить вора, щелкни дважды по его экземпляру в ReachwindEyrie01. Откроется окно Reference Window.
Отметь флажком "Initially Disabled" и нажми "ОК". Теперь вор исчезнет из игры и не появится, пока мы не скомандуем (можешь проверить).
Но прежде чем двигаться дальше, подредактируй псевдоним Thief (на вкладке Quest Aliases квеста GSQ01). И отметь флажком "Allow Disabled", тем самым разрешив ему указывать на отключенные экземпляры объектов.
Теперь нужно вернуть вора на места в определенное время. Сделаем это в скрипте стадии 10. Измени его так:
SetObjectiveDisplayed(10)

Alias_Thief.GetReference().Enable()
Первая линия там уже была (должна была быть, во всяком случае), а вот вторую разберем подробнее:
Alias_Thief- Это свойство, которое редактор создал и заполнил для нас. Каждый раз, создавая псевдоним, игра создает свойство в квесте под именем Alias_<ИмяПсевдонима>. Если опустить символ подчеркивания, то это довольно удобно.GetReference()- Псевдоним - это отнюдь не ссылка, а объект, содержащий разнообразную информацию. Указывать он может на что угодно - существо, стену, часть тела или предмет. Для того чтобы получить ссылку на его объект, используется эта функция.- (Если тебе что-то не понятно, не отчаивайся - в будущем мы еще вернемся к псевдонимам и изучим их более полно. Можешь просто скопировать и вставить этот код. Ничего страшного.)
Enable()- Разрешает объект.
Теперь, пока игрок не примет квест Бэнду, он не сможет найти вора и добыть амулет.
Giving the Amulet to Bendu
Right now the player neither gives the amulet to Bendu nor receives any reward when completing the quest. Both of these are easily fixed.
Open up the stages tab again, and go to stage 40. Right now its script only contains SetObjectiveCompleted(30). We'll add additional logic below this.
The first line we'll put in is:
Alias_Bendu.GetReference().AddItem(Alias_Amulet.GetReference())Note that with AddItem, you can give it either a base object (in which case it will create a new instance of that object out of thin air in someone's inventory), or a reference (in which case it will move that reference from wherever it is). So this line will grab the amulet out of the player's inventory and put it into Bendu's. Neat!
Now there's the matter of the gold. We add gold the same way we add any item. But that means we have to make a property on the quest script that points to the gold. Click on the "Properties" button, and you'll see the automatically-created alias properties already in the list. Add a new property of type "MiscObject" and call it "Gold001" -- it will auto-fill, so you're good to go.
Now that we have that property, we just have to add this line:
Game.GetPlayer().AddItem(Gold001, 500)(Note that if you don't give AddItem a number, it assumes you're only adding one.)
Now, Bendu promised the player twice what the amulet was worth, and we're delivering that with the 500 gold. However, say we have to change the value of the amulet for lore, balance, or whimsical reasons. Then we would also have to remember to come back here and change the reward value. Or we could be slightly more clever about it.
Game.GetPlayer().AddItem(Gold001, Alias_Amulet.GetReference().GetGoldValue() * 2)Now it will automatically multiply the worth of amulet by two, and give that much gold to the player.
Dropping the Amulet
Players in Elder Scrolls games tend to be packrats. They pick up everything they can until they're overburdened, then they drop everything that doesn't look important. Or maybe they want to use the amulet to decorate their house. Or they throw it behind them hoping it will distract a giant as they run away. (Spoiler: it won't.) All sorts of reasons players drop items, but it can lead to problems when they go to finish this quest and don't know where the item is!
We could do all sorts of things to handle this (turning the objective to retrieve the amulet back on if they lose it, inserting a radiant reaction to have someone bring it back to you, etc.). For extra credit, you try to set up that first one; you have all the tools to do so now!
But the simplest and by far most foolproof solution to this problem is to simply make the amulet into a quest object. This means the player won't be able to drop it or sell it, and it will never leave her inventory until we take it out with the script to remove it.
We set this up with a flag on the alias, so open up the Amulet alias that we made long ago, and click the "Quest Object" checkbox in it.
Now the player will be stuck with this item until they finish the quest. (Luckily for her, quest objects don't count towards encumbrance, so it will never be a true burden.)
Coming Back Later
Then we have the issue of the player coming back to Bendu and him having no recollection of meeting the player previously. He'll give the whole sob story again. In this example, it's just a single line, so it isn't too bad, but if there was a whole line of questioning that led up to this, the player wouldn't want to traverse it again. So we'll add some handling for the player who said "no" and decided to come back.
The first thing we'll do is add another stage to the quest, stage 5. We won't have to add any journal entries or quest logic here -- this is purely for our own internal usage.
Then, if the player chooses the "No" option in dialogue, add a line of script to that info that sets the quest stage to 5. (Look at the "Yes" branch if you need to cheat and see how we set it to 10.)
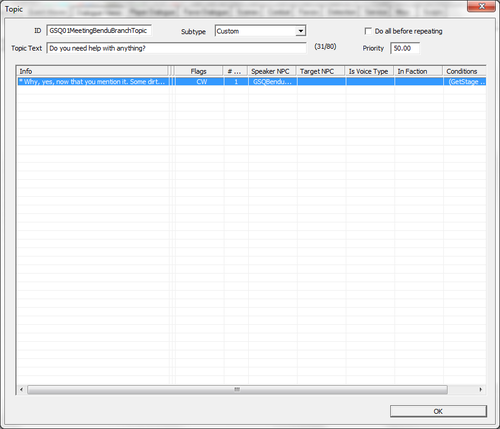
Now comes the fun part. Open the initial topic (not the info) GSQ01MeetingBenduBranchTopic. You should be looking at this window:
Right-click on the highlighted info in the table and select "Copy". This makes a full duplicate of that info -- if it had a script, the new info has its own script containing the code that the first one did (so you can change one without affecting the other); if the first one had connections, the new one will have the same connections; if the first one was flagged as Goodbye, this one will be too. And so on.
When the dialogue system comes to a topic (i.e., when the player chooses the "Do you need help with anything?" text from a topic list), it starts at the top of its list of infos and works its way down, looking for one that has valid conditions. This is how you could have multiple characters responding to the same topic differently (by using different GetIsID conditions), or, in our case, having a character say something different at various stages of the quest.
Open the top info, and change its GetStage condition from "< 10" to "== 5". Now the first time the player chooses that topic, the game will check the first info, see that it's invalid (because the quest stage is 0), and then move onto the next one, which will be valid.
Change the response text to be something suitably snarky about the player taking his sweet time in helping. Example: "I already told you about my amulet. Are you going to help me or not?"
We can also fill in the "Prompt" field at the top of the window. If this is filled in, the prompt will override the topic text. By using prompt overrides, you can get a more specific back-and-forth feeling to dialogue.
So fill in the prompt with "Didn't you need something?"
One final adjustment we'll make here -- in Skyrim, we introduce the ability for a player to dismiss themselves from a conversation at any time, without necessarily choosing an option in dialogue. For certain conversations, though, walking away is expressing a choice, and the NPC should respond to that. (It's very important when you're talking to a guard trying to arrest you, for instance.)
In our case, we'd want Bendu to treat the player walking away the same as he would if the player actively said "No."
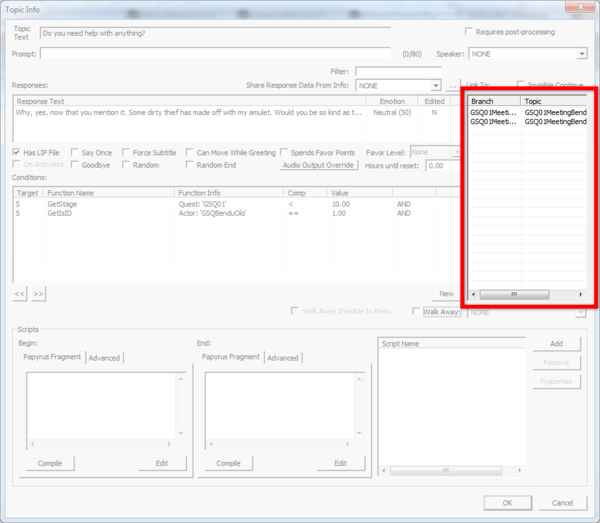
So open up the other info in this topic, the one where we didn't make a new prompt. Over at the right, you see a list of other topics that this one links to.
When you link something in a dialogue view, it shows up in here. (If you're old school, you can actually make the links from here, too!) Underneath, click the checkbox that says "Walk Away:" and select the GSQ01MeetingBenduNo link.
Now if you leave the dialogue while Bendu is talking, he'll react just as if you had chosen "Sorry, not right now."
Hellos/Goodbyes
Right now when you interact with Bendu, he'll start with one of:
- "Yes, sera?"
- "And what might you need? Hmmm?"
- "Yes?"
- "Hmm?"
- "Need something?"
These are the generic lines written for the MaleDarkElf voice type, and serve as reasonable introductions to any conversation. But they are very bland and repetitive. Plus, if you plan on recording voices for your mod, they will sound different than the other lines you have (unless you plan to bring Keith Szarabajka in to record for you).
So we can write some specific lines for Bendu that will reference what we've done in the quest so far.
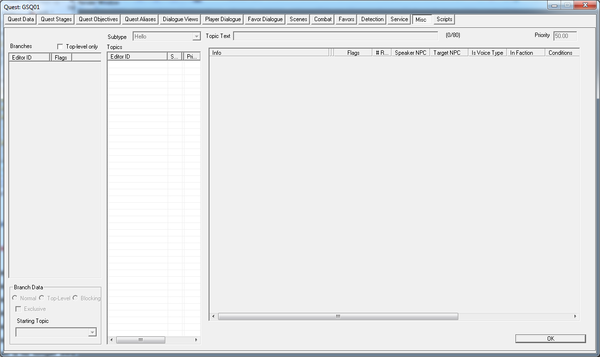
Open up the GSQ quest window, and go over the Misc tab.
Right click in the Topics table in the middle, and select "New." This opens up a list of special case topics that the game uses for specific cirumstances. Double-click on "Hello" to make a new topic of that type. When prompted to name it, go with "GSQ01Hellos".
This activates the table to the right, which is now functionally almost identical to the Info list we were dealing with when making dialogue. Only, in here, all these infos will be said by an actor when the player activates them. Just like with other infos, bad conditions in here can lead to everyone in the world having a new hello, so you need to be careful.
Right-click and make a new info. Something like "Oh, are you here to help?" Set its conditions to:
- GetIsID GSQBenduOlo == 1
- GetStage GSQ01 < 10
(If we wanted to, we could make a different hello for stage 5, but I'll leave that as an exercise.)
Make two more:
- "Have you got my amulet yet?"
- GetIsID GSQBenduOlo == 1
- GetStage GSQ01 >= 10
- GetStage GSQ01 < 40
- "I can't thank you enough for helping me."
- GetIsID GSQBenduOlo == 1
- GetQuestCompleted GSQ01 == 1
You can also make a Goodbye topic, which will get used whenever the player leaves a conversation.
Note that the hellos and goodbyes, as written, will completely override the generic ones, and will be the only hellos or goodbyes that Bendu uses. We'll show how to mix things up a bit in the advanced tutorials.
Loose Ends
This should give you an idea of the kind of handling that needs to be done for every moving part of a quest. Even in this very simple example, there were lots of little odds and ends to attend to so the quest would be a more solid experience for the player.
By thinking this way, you can help make your own quests flow more smoothly and be more fun for the player.
Next Steps
This is the end of the Quest Design Fundamentals series. There are more advanced topics like radiant story that are discussed elsewhere in this wiki. If you want to dive more deeply into making quests for Skyrim, you should start with Packages.
Good luck out there!
| К другим учебникам | Следующая статья | ||
| Language: | English • français • русский |
|---|
