Creating a Merchant
To create a Merchant, follow these steps:
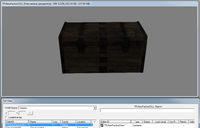
Create a Container
(and name it)
This is easier if you make a new instance (a custom copy) of an existing container, then remove everything from it (so you don't have to set up the model and sounds). Any of the chests starting with "Merchant..." are good ones to copy. For instance, if you want to create a blacksmith-specific merchant, it is easier to choose one with "blacksmith" in the name -- that way, the chest will probably already have a typical blacksmith merchandise selection for sale.
- Add any items you want the merchant to sell to the container if they aren't there.
- To give the merchant gold you can add one of the VendorGold<> leveled items to the merchant container.
Add the Container to the game
- It is a good idea to put this somewhere the player cannot get to it (for example, outside the building in an interior cell). You can create a new custom "room" in the Cell View "Interiors" list and, for instance, call it something like "aaRSMerchantRoom" where the "aa" ensures that the custom room will be at the top of your cell's list, the "RS" would be your initials, and "MerchantRoom" is where merchant containers are safely placed. Another alternative is to sink the chest under the ground of the cell. This is less desirable because a player using the tcl console command (on a PC) can get at the contents easily. Also, you might forget where you hid it!
- Place your custom container in the grey void of the MerchantRoom. If you have several merchants in the cell, their containers can go in the same room.
Create a Faction
(and name it)
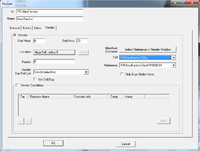
On the Vendor tab (under the Character group in the Object Window), start by editing any Faction and changing the name to your new Faction. For instance, you might call it "aaRSSmithMerchant" where "aa" ensures it will be at the top of the list, "RS" would be your initials, and "SmithMerchant" is your new faction. Save it and the game creates the new faction. Open your new faction and do the following:
- Check "Vendor"
- Enter your daily start and end hours for the merchant
- Select a location for the merchant to offer their goods (for example, the shop cell). You can select "Near Self" to make the merchant sell anywhere.
- Enter a Radius if the merchant needs to be within a certain distance of a reference.
- Select the container that you placed ingame as the Merchant Container.
- Select the type of goods the merchant will buy and sell from the Buy/Sell List drop-down menu (eg, VendorItemsApothecary or VendorItemsFletcher. These types are simple FormList objects containing keywords. You can also create your own. If you select "Not Buy/Sell", the type will be negated, and the merchant will buy and sell only items not matching the type. This can be useful, for example, if you are creating a merchant that will buy almost anything - just use VendorItemsMisc and check Not Buy/Sell. This is the configuration used by the pawnbroker Belethor in Whiterun.
NOTE: Regardless of the contents of the container, the merchant will only sell items matching her configured type filter.
Create an Actor
(and name it, set up their clothes/race/etc the way you want them)
- Give the Actor a common voice type (such as FemaleNord or MaleDarkElf) - This is needed to give them dialogue to run a shop.
- Add the Faction "JobMerchantFaction" to the Actor's Faction list.
- Add the new faction you created to the Actor's Faction list.
Add the Actor to the game world, where you want them to be
If done correctly, your merchant should now sell the goods from the container when in the correct location at the correct time.
All that remains are any finishing touches you want to add to your merchant (AI Packages, extra dialogue, etc).


