Bethesda Tutorial Scenes
| Bethesda Tutorial Scenes | |
|---|---|
| Intermediate Quest Design Series, Chapter 4 | |
| Return to Tutorial Hub | |
| Next Tutorial | |
Overview[edit | edit source]
This chapter will describe the new Scene functionality in the Creation Kit. Scenes are a major new feature from older versions of Bethesda engines, and provide a high degree of control for multiple actors performing coordinating actions. They're useful for dialogue scenes, set pieces, and any time you need an actor to do something more complex than a single package can accomplish.
The reader will learn:
- How to create a new scene.
- Adding dialogue, timers, and actions to the scene.
- Running scripts during the scene.
Introducing Scenes[edit | edit source]
So far we've learned how to make Bendu perform simple actions with the package system, and how to make him speak, both to the player and in general using the dialogue systems. This is sufficient until we need a more complicated behavior. Say we wanted him to have a conversation with Gilfre (who also lives at Mixwater Mill), and then go chop wood for a bit -- that would require a complicated set of scripts to handle positioning, speech, timing, conditions, etc.
Or, we could simply write all the desired actions out as a scene.
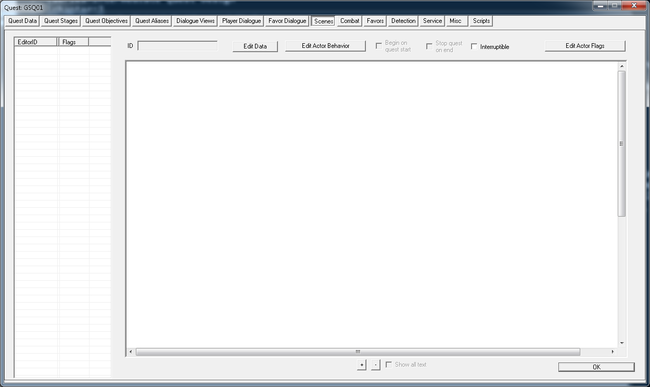
Open up the GSQ01 quest and go to the Scenes tab. It should look like this:
It's similar to the Dialogue Views tab in that we can see a list of our scenes on the left side of the window, but the actual content will live in the big canvas to the right.
Right-click in the left table and select "New" to create a new scene. Call it "GSQ01BenduGilfreScene". Make sure to click on it so it's highlighted.
Casting the Scene[edit | edit source]
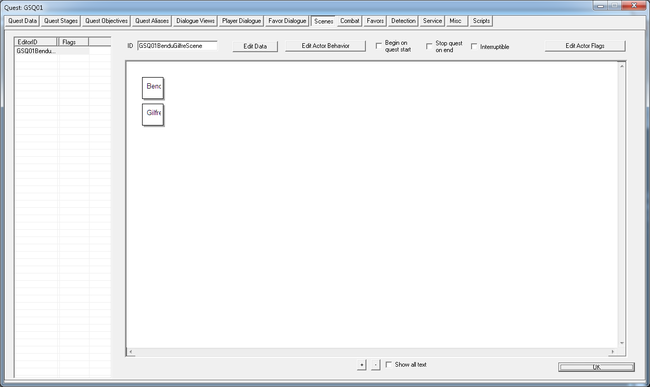
Right-click in the canvas and select "New Actor." This will bring up a list of all the Reference Aliases that have been created in this quest. Double-click on Bendu to add him to the scene as one of our performers. We don't have Gilfre as an alias in this quest, though -- do you remember how to create an alias and point it to a specific actor? (Aliases Tab, New Reference Alias, Name it "Gilfre", Unique Actor, Gilfre from the pulldown.)
Once you've made that new alias, return to the scenes tab, select our scene, then right-click and select New Actor to put Gilfre in the scene as well. The scene should now look like this:
We've now told the game which actors will be participating in the scene, but not what they'll be doing.
Phases[edit | edit source]
In the Creation Kit, a scene is broken down into Phases, which parcel out the activity into discrete chunks so the game can process them. Right-click in the scene area and select "Add Phase at End" to create our phase. (We're adding this phase to the "end" of the scene, but since there are no other phases, it's just the first phase created. Sometimes menu options have silly names.)
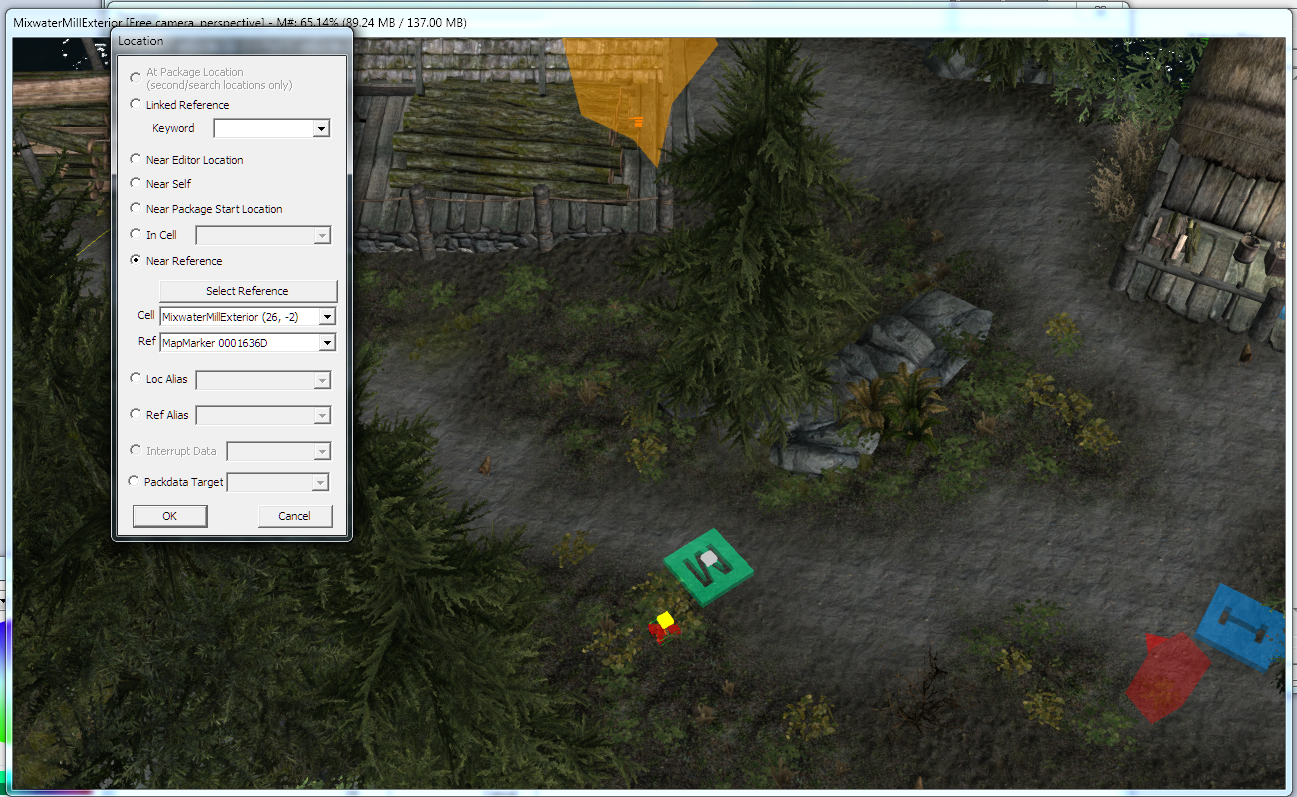
The first thing we're going to want Bendu and Gilfre to do is get somewhere near each other. There are lots of choices for this, but let's have them meet up near the MapMarker for Mixwater Mill. We make them move the same way we make any actor move: with a package.
Package Actions[edit | edit source]
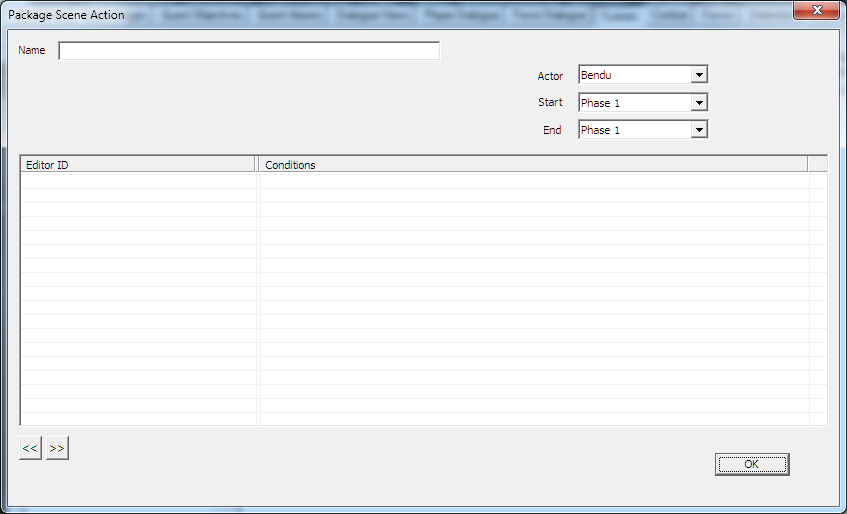
Right click on the square labeled "Bendu" in the scene, and select "New Action -> Package" from the context-menu. This will open up the Package Scene Action window.
The big table taking up most of this window represents yet another package stack that we can place on top of the actor that is in this alias. So if you're keeping track from the previous tutorial on Packages, we have scene packages sitting on top of alias packages sitting on top of base packages. Because the game considers packages from top to bottom, the scene packages will always take precedence (assuming they are valid).
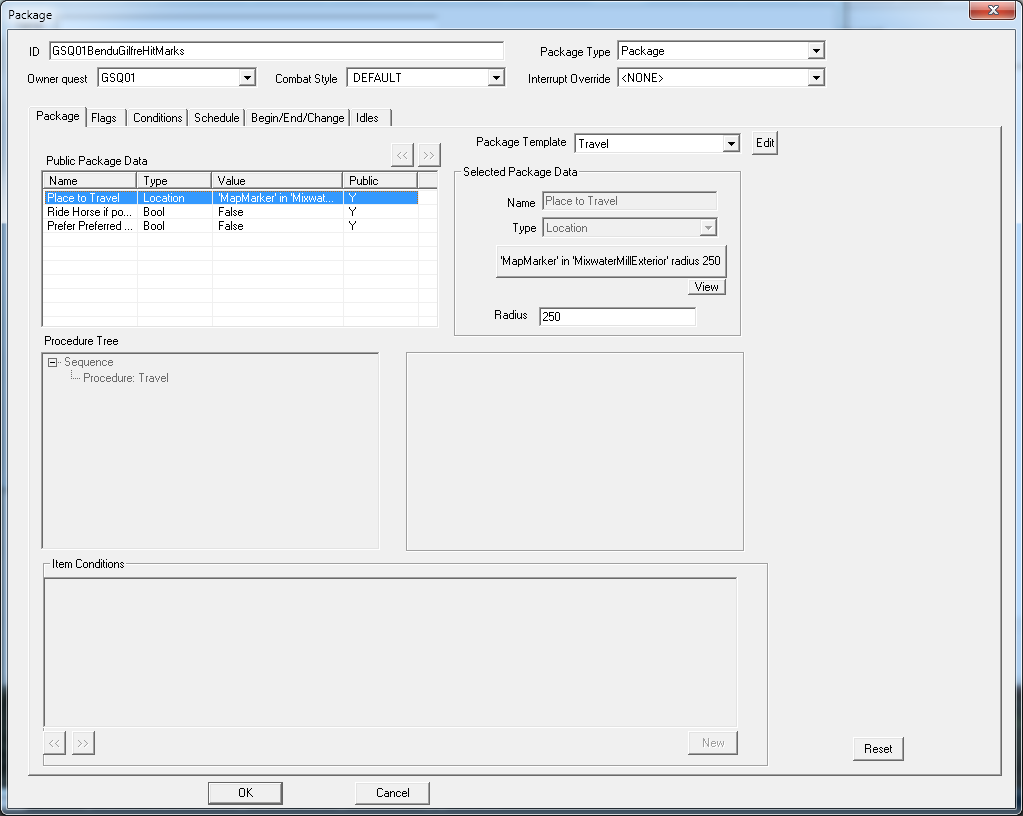
Right-click in the package list and select "New" to create a new package. We'll be creating a wholly new action just for this moment of this scene; it may seem like overkill, but since scenes tend to be very specific, it can be hard to use more generic packages. In any case, name this package "GSQ01BenduGilfreHitMarks." The default package template is "Travel" -- keep that, and select the Mixwater Mill map marker as the target. Give it a reasonable radius like 250.
Press OK in the package window, then OK again in the Package Scene Action window to return to the scene proper. You can see that Bendu now has a package listed under him for this scene.
Right-click on Gilfre to add a package action to her as well. This time, though, instead of right-clicking and selecting "New" to make a new package, we'll re-use the package we just made by choosing "Add" from the context menu. This brings up a list of every package in the game. Use the filter at the top to quickly find "GSQ01BenduGilfreHitMarks" and double-click to add it to the scene.
When the scene begins, it will start at this first phase, place these packages atop the alias's stacks, and force them to re-evaluate their package (in this case, choosing the package we just made). The phase will consider itself complete when all its actions are done, which in the case of travel packages mean when the actor has reached the target.
This bears repeating: a scene will not progress until all the actions in a phase are complete. There are some package types (like Follow) that technically never complete, so be careful that your scenes don't get stuck forever!
We don't want our scene to end when the two of them reach each other, though, so lets add some more content.
The Second Phase[edit | edit source]
Right-click in the scene area again, and again select "Add Phase at End" to add a new, empty phase. Right-click to make a new action, but this time choose "Dialogue" instead of "Package."
Dialogue Actions[edit | edit source]
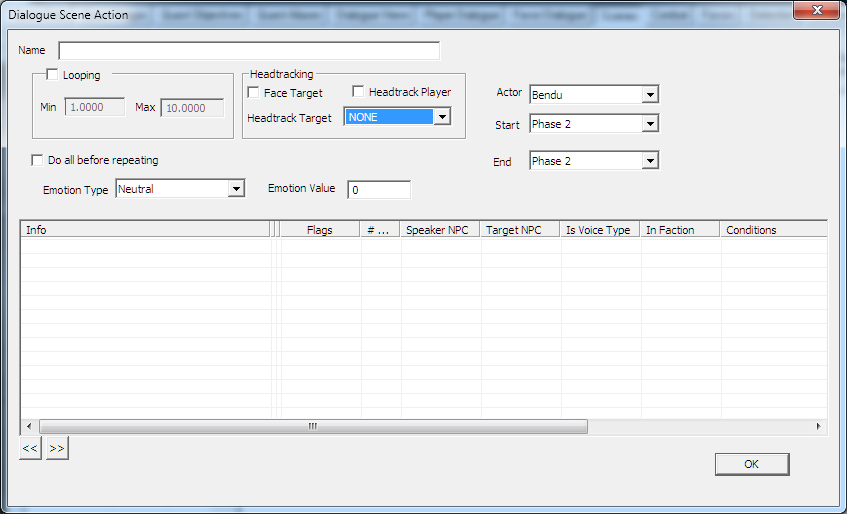
The large table at the bottom represents a stack of infos, just like you would have when editing a topic for "normal" dialogue. Double-click in there to create our first line. Make it "Oh, um. Hello."
(I'm assuming that Bendu has a slight crush on Gilfre, of which she isn't aware. This is dramatic tension right here, folks.)
Since we're writing this dialogue for a scene, we don't even have to bother setting conditions for it, since the game is smart enough to figure out the necessary voice types from the assigned Alias, AND will never be considered for any other dialogue opportunity. So once we write the line, we just click "OK" until we're back looking at the scene.
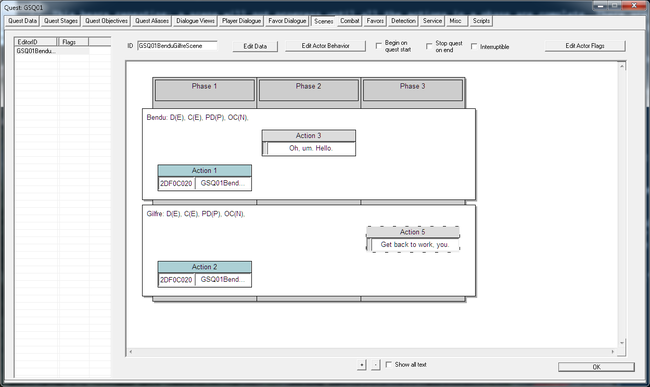
Add a new phase, and this time create a Dialogue action for Gilfre. Have her say "Get back to work, you." (Poor, unappreciated Bendu.) Your scene should now look like this:
(The numbers of your scene actions may not match up with the picture; don't worry about it.)
Keeping the Actors Put[edit | edit source]
If you're especially observant, you may have noticed a problem -- we haven't put any packages on the additional phases, so when we get there, both actors will fall back to their base packages. This makes the scene look... silly.
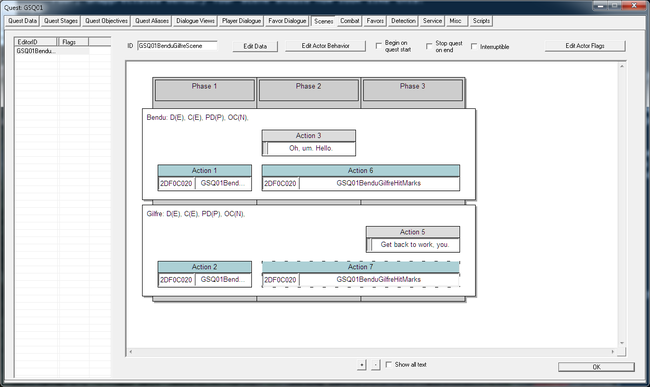
Right-click in Bendu's section of Phase 2 and add a Package Action to it. We can actually re-use the same package, here, since we want him to just hang around in this area. So select GSQ01BenduGilfreHitMarks again. Add the same package to Gilfre's phase two.
Because we want them to stay put for the rest of the scene, instead of adding additional actions to phase three, we can stretch these actions across the phases. If you hover over the right side of the action, a resize arrow will appear, allowing you to stretch the action. Stretch both of them to phase three. The scene should now look like this:
Remember how we had said that phases won't end until all their actions are done? Well, that only applies to actions that actually complete their duration within that phase, so our Phase 2 will complete the moment Bendu's dialogue is done. Nifty!
Facing[edit | edit source]
Because we don't know what haphazard path the actors took to get to this conversation, we can't even be sure that they are facing each other. That simply will not do. Thankfully, it's easy enough to open up the Dialogue Actions (double-click on the action's name, not the dialogue itself), and play with the values in the "Headtracking" section. In this case we want to assign Bendu a Headtrack target of "Gilfre" for his dialogue, and for Gilfre to have a headtrack target of "Bendu." Both of them should also be set to Face their target.
Timer Actions[edit | edit source]
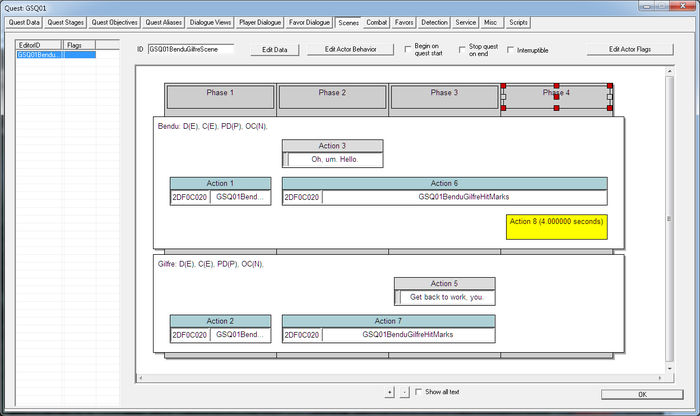
I think Bendu needs to be a little more forlorn about all this, so let's have him hang out wistfully for a bit after Gilfre resumes her normal package. Add one more phase at the end, and this time only stretch the package action for Bendu through it.
Right click in Bendu's section of Phase 4, and add a New Action -> Timer. This is exactly what you think it is -- a temporal spacer to let us pace scenes. In this case, it will keep Bendu in place for a time after Gilfre walks away from him. Set the timer for 4 seconds (or, as the game insists in its precision, 4.000000 seconds), and that should be enough time to sell the notion of a broken heart.
Our final scene looks like this:
Playing the Scene[edit | edit source]
We can either play a scene through script (by setting it as a property and calling Start() on it), or by checking the "Begin on quest start" box on the scene tab.
Addition by --Layam (talk) 14:27, 1 January 2013 (EST)
One nice way to get this scene going would be to create a new dialogue topic to encourage Bendu to admit his true feelings.
Go back to the Dialogue Views tab in GSQ01, select the view we've got there, then add a new branch called 'GSQ01BenduAdmitFeelings'. Open up the topic, add a response (maybe 'I've seen the way you look at her, you should admit how you feel to her.'). To get the scene to start we first need to create a property on the response info script.
The Topic Info may already have a script attached (if not, simply create one). Selecting that script in the bottom-right panel of the Topic Info, click Properties and create one of type 'Scene' called GSQBenduGilfreScene. Edit its value so it points to your previously created scene. Then, in the End Script fragment, add the following code:
GSQBenduGilfreScene.Start()
Note: If you encounter errors with your scene script, you may need to comment out (with a semi-colon) or otherwise remove all code, then close and re-open your Quest following the creation of your script. Afterwards, you may create / set properties and write code as normal.
Now you're good to test.
Note: If the quest has already been started in the save game you are testing with, You may find that the scene simply refuses to run. I believe that this is because the aliases are only filled when the quest starts and one of the actor aliases the scene uses is blank. A workaround for this is to stop and start the quest with the console:
StopQuest MSQ01
StartQuest MSQ01
Addition end
Alternative Addition by ----Lmstearn (talk) 2015-01-22T12:50:33 (EST) More in the spirit of the quest:
On acceptance of the amulet quest, Bendu says in a new phase added at the beginning after a 4 second timer for the Quest Objective message to clear: "Excuse me for now, as I have a meeting with my dear friend Gilfre."
As player exits the workers house, witness Bendu saying "Gilfre, Fling me into the ash pits of Malacath, but I did not take the amulet. I was robbed, but I vow by the Nine to retrieve it for you." She responds "You would? But I would be waiting for the dawning of the fifth era, Bendu!"
"As you wish, Gilfre, it would look rather becoming on a draugr!"
On returning the amulet to Bendu, a similar scene is triggered (it cannot be duplicated in the CK so TES5edit was used- see note below) where Gilfre is more conciliatory.
Alternative Addition end
Additional Functionality[edit | edit source]
New Phases can be added at the beginning or at any point during a scene as well as at end.
It's possible to add scripts to a scene's beginning or end by clicking "Edit Data" at the top of the tab. You can even double-click on a phase title and put scripts at the beginning and end of individual phases. As you might imagine, this opens up a lot of pretty complicated behavior and functionality. In fact, there are quests in Skyrim that are little more than scenes with scripts firing at appropriate phases.
Finally, the rule about "all actions must complete before a phase finishes" can even be broken. That is the default, but if you look in the scene window, you can see that it's also possible to set conditions which will end the particular phase. The IsSceneActionComplete condition function can be especially useful if some actions in a phase can complete and others can't.
Caveats[edit | edit source]
An actor can only be in one scene at a time, and if you try to start a scene with an actor who is busy in another one, that scene will pause until the first one finishes. This can lead to conflicts and strange behavior, so you need to use scenes carefully. When used properly, they are quite powerful, though.
Extra Credit[edit | edit source]
Can you make Bendu greet Gilfre with "Good morning," "Good afternoon," or "Good evening," depending on the time of day?
Notes[edit | edit source]
- If TESedit is used to duplicate scene records, take care not to delete any existing dialogues of phases in the copy as they refer to the original infos. Best practice is to remove phases without removing the linked forms and creating new phases with new action dialogue infos (unless the old dialogues are to be repeated)
| Return to Tutorial Hub | Next Tutorial | ||
