Creating a Stable
Welcome to the Modding Tutorial: Creating a Stable. In this tutorial we will be discussing how to create a functional stable where your custom NPCs can sell horses to players. We will briefly discuss NPC creation, custom creatures, and questbuilding, but this tutorial will not cover every aspect of these topics, only what is needed for this task. Coming into this tutorial, you should already possess the basic level design skills needed to create a custom stable and create new forms, if not, stop here and take a step back.
Part I: Preparation[edit | edit source]
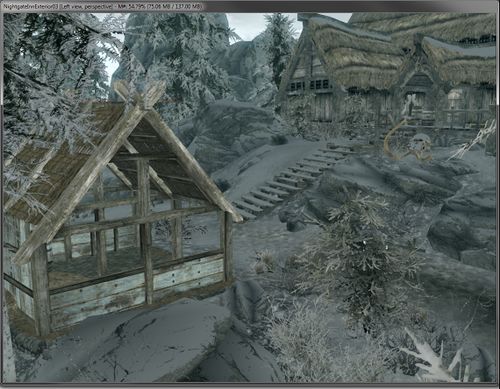
There are a few things you will need to have prepared in order to create your stable. Firstly, the stable itself. Select a location for your stable and add it in the CK. For this tutorial, I have added a small stable outside the Nightgate Inn. You can add a stable wherever you like, just remember to polish it properly, tweak the landscape, adjust the NavMesh, etc.
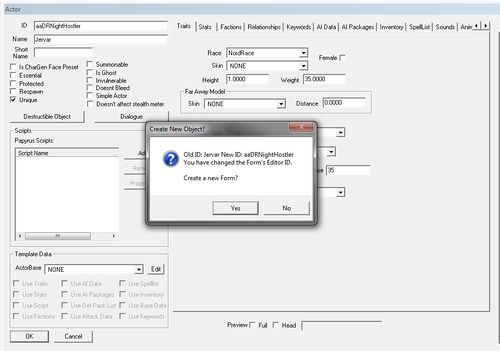
Secondly, you will need an NPC who will sell your horses. To do this simply, we’re going to duplicate an existing horse seller. In the Object Window, under Actors, find the NPC named Jervar and double click on him to open his base form edit box.
Once it’s open, change the ID to something unique to your mod and click OK. When the box opens asking if you wish to create a new form, say yes. Now you can find your new NPC in the Object Window and open his base form edit box and customize his, name, inventory and his facial features. When that’s done to your liking, save and set him aside for now, we’ll come back to this guy later.
The last bit we need to have prepared is our horse for sale. We’re going to break this down into two sections here Section A will involve using vanilla horses like the ones already for sale around Skyrim. Section B will involve adding a custom horse to be the for sale horse. Let’s get started:
Section A: Using a Vanilla Horse[edit | edit source]
Using a vanilla creature to be your horse for sale is as easy as duplicating any other object; you need to create a new form based on the vanilla player horse of your choosing. The IDs for the vanilla horses begin with the location name of their home stable, for example the black horse sold outside Whiterun is called WhiterunPlayerHorse. There are lots of horses in the object window, it’s important that the horse you duplicate from is one of the existing player horses. Double click on the horse in the Object Window to open its base form edit box. Change the ID to something unique to your mod, click OK and choose YES when it asks if you’d like to create a new form. That’s all there is to it.
If you are using a vanilla horse for your stable, set him aside now, and head to Part II: Staging :down:, if you are using a custom horse for your stable, set this guy aside for now and continue in Section B.
Section B: Using a Custom Horse[edit | edit source]
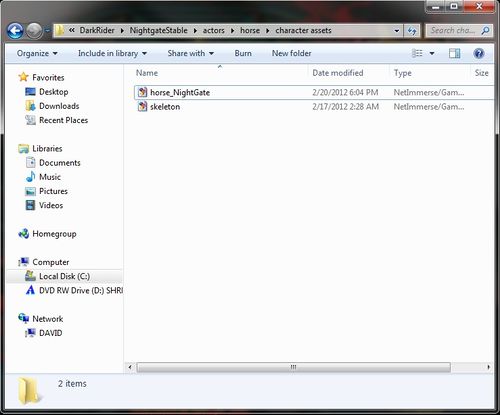
Step 01 The first step to creating a custom horse is to have your character assets ready to go in your Data folder. Under Skyrim>Data>Meshes>YourID>YourModName>actors>horse>characterassets you will need to have the mesh for your horse and the horse skeleton. You can extract these from the Skyrim Meshes BSA.
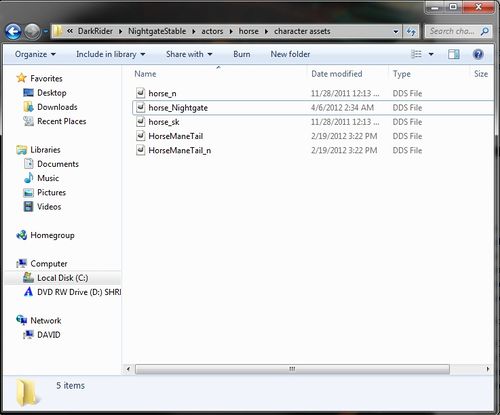
Under Skyrim>Data>Textures>YourID>YourModName>actors>horse>characterassets you will need to have your custom or retex horse texture (.dds) the normal map (_n.dds) and the skin mask texture (_sk.dds)
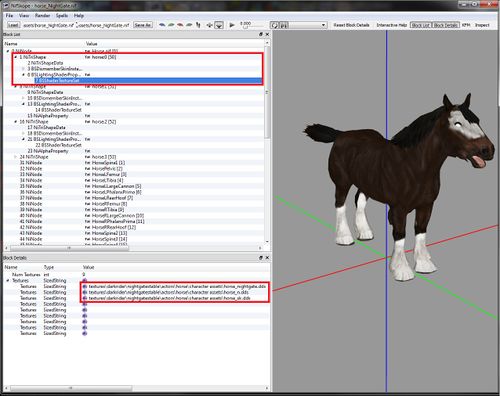
Once your meshes and textures are on their proper folders, you’ll need to open your mesh in NifSkope and assign the textures on the NiTriShapeData branches to point to those for your mod. Once all 3 NiTriShapes point to your textures, save and overwrite the mesh to make it stick.
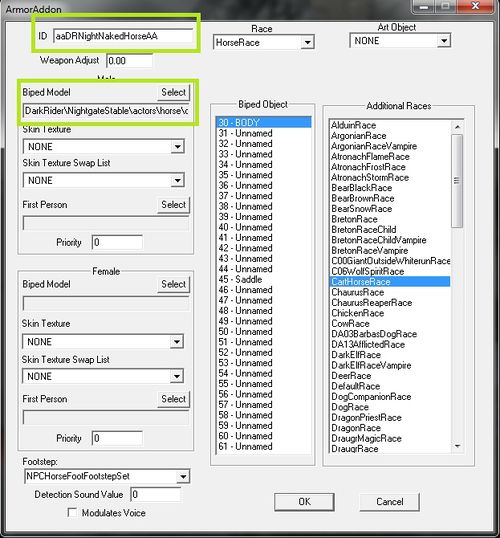
Step 02 For this step we’re going to go back to the Creation Kit. On the object window we want to go to Items>ArmorAddon, then in the list double click on NakedHorseAA to open its base form edit box. Change the ID to something unique for your mod; for reference later it’s best to retain part or all of the original ID, like aaDRNightNakedHorseAA. After changing the ID, click on the Select button where it says Biped Model. The Model Data box will open, click the Edit button and browse the folders for your horse mesh. When you’ve chosen your model, click OK to close this box. Don’t change anything else for the AddOn, click OK and select Yes when the CK asks you to create a new form.
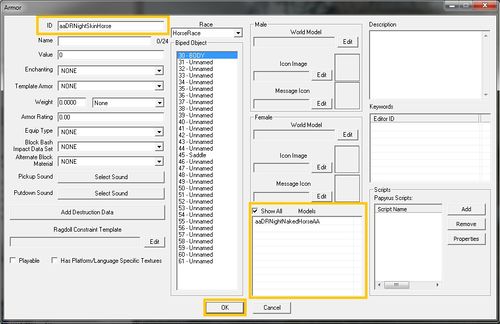
Step 03 Next step is to click on Items>Armor in the object window and find SkinHorse in the items list. Double click to open its base form edit box. Begin by changing the ID to something unique to your mod like we did with the Armor Addon. Then look at the small square pane on the lower center where it says “Models”. Check the flag that says “Show All” and then click delete all the models listed there. When the pane is empty, right-click>New and select your NakedHorse addon from the list that opens. Don’t change anything else for the Armor, click OK and select Yes when the CK asks you to create a new form.
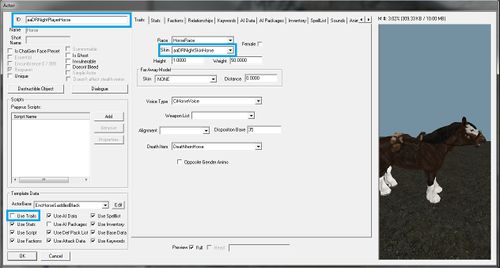
Step 04 Time to go back to the horse we cloned in Section A above :up: (if you skipped this step and with Section B, you can go back and do it now). Under Actors>Actor double click on your cloned horse to open its base form edit box. In the lower left hand corner you’ll see a panel titled Template Data. We want to uncheck the flag called “Use Traits” so that our horse will adopt the rest of its data from the vanilla horses, but we can change its physical appearance. Once that’s done, move on to the Traits Tab in the center and below the Race drop down box, click on the Skin drop down box and find your custom horse armor (skin) in the list. Click OK to finish.
Part II: Staging[edit | edit source]
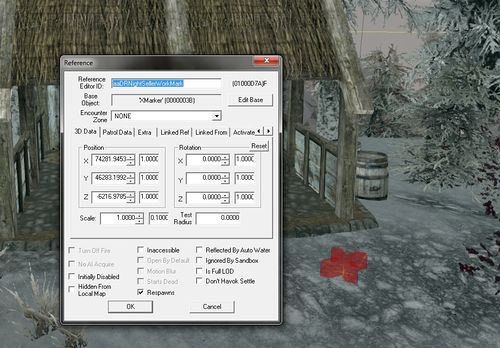
There are a few elements we need to have in place before we move into the questbuilding element. If you haven’t yet, load the cell your stable is located at in the Render Window. Then under Static, find xmarker and xmarkerheading. Drag an xmarker into the render window and place it around your stable somewhere near the stable but not necessarily inside it. Once in place double click on it and give it a Ref ID like aaDRNightSellerWorkMark. This will be the anchor point for your horse seller’s AI.
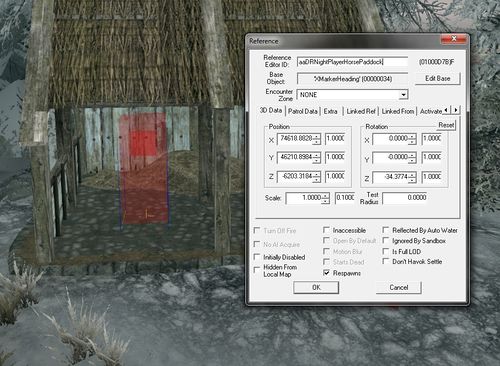
Next drag an XMarker heading into the stable and place it inside the main paddock. Once in place double click on it and give it a Ref ID like aaDRNightPlayerHorsePaddock. This will be the anchor point for your horse’s AI.
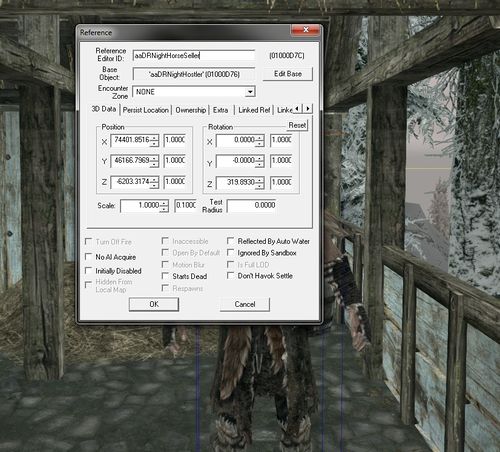
Next head back to actors and drag your horse seller into the stable area. Give him a Ref ID as well.
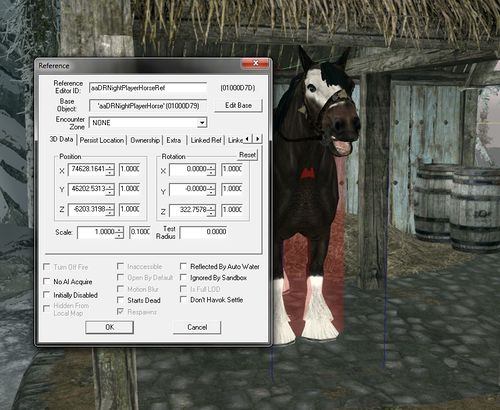
Then drag your horse into the paddock, position him right where the Xmarker heading is and give him a ref ID too.
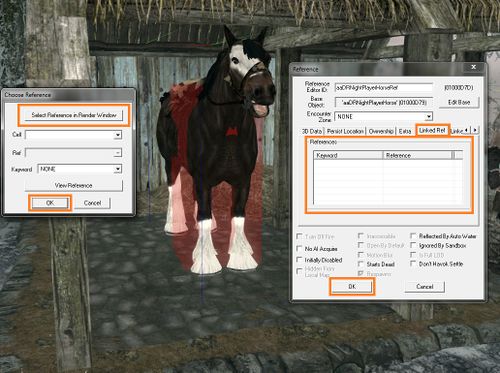
Once that’s done double click on your horse again to reopen his ref edit box. Click on the Linked Ref tab, and right-click>New in the empty pane to open the Choose Reference box. Click “Select Reference in Render Window” and a new cursor will come up allowing you to highlight something in the render window. Select the XMarkerheading for your horse’s paddock. Then click OK and OK again to close the ref edit box.
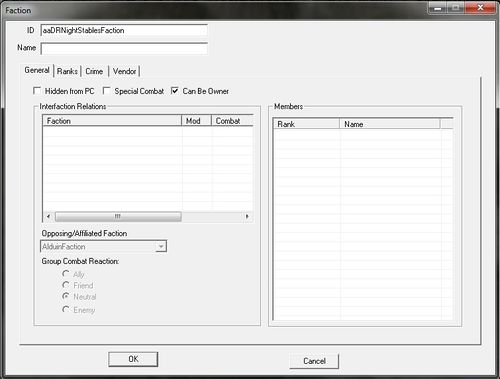
Next, under Character>Faction double click to open its base form edit box. Change the ID to something unique to your mod, then click OK and select Yes when the CK asks you to create a new form. "Can Be Owner" must be checked, or the faction will not show up in the factions ownership dropdown for the ownership of the horse (below).
The last bit of staging we’re going to do is to tweak our horse seller a bit. Double click on him in object window to open his base form edit box. On the Factions tab, delete all the factions listed there except for JobHostlerFaction and JobMerchantFaction, then rightclick>New to add the custom faction we just made for our stable. If your stable is near a town, or an establishment your seller might visit, add those factions to his list as well.
On the AI Packages tab, give your seller an AI package to work in the stables, it will be a sandbox type, scheduled at 8am for 12 hours, make your xmarker his location with a radius of 750. Add any additional packages you wish him to have, sleep, eat, wander, etc then close up by clicking OK.
Lastly, we want to go back to our horse in the render window, open his ref edit box again, and on the Ownership tab, give ownership to your stable faction.
Part III: The Quest Aliases[edit | edit source]
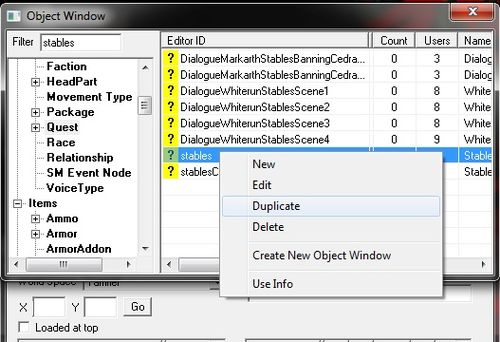
All this legwork up to this point will make this section go much faster. This is the last step to creating your functional stable. All NPC dialogue is run through the quest builder and the horse selling is no exception. Under Character>Quest find the quest called stables, and Right-click>Duplicate to clone this quest. Click on the clone once, after a pause once again and you’ll be able to rename the quest without opening it. Give it a unique ID, when you try to click on the list, a box will pop up asking if you want to create a new form, this time, say No. Our clone is already a new form.
Once renamed, double click on our cloned quest to open the quest builder. Click on the Quest Aliases tab and delete all the aliases there except Solitude Horse, SolitudeHostler, and PlayersHorse. Rightclick>Duplicate on the SolitudeHorse and SolitudeHostler Aliases, once copies have appeared, delete the originals.
Double-click on the SolitudeHorse000 clone to open its ref edit box. Change the Alias name to something unique for your mod like aaDRNightHorse. Under Fill Type there’s a button next to Specific Reference. Click it and point It to your horse ref in the stable. Then click OK. We need to close the quest editor now and then reopen it, then return to the Quest Alias tab and double click on your now renamed horse alias to reopen the ref edit box. We’re going to work in the right hand pane titled Papyrus Scripts. You’ll see two scripts listed there. The first CWDisableDuringSeigeALIAS is only applicable if your stable is near one of the warzones for the civil war conflicts like the major cities. Highlight it and click remove. Then Highlight the second script PlayerHorseScript and click Properties.
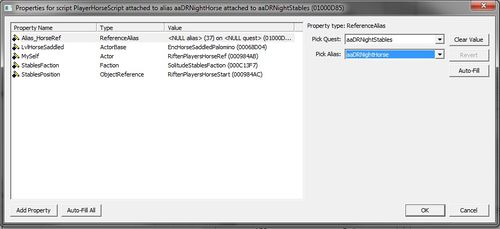
When the Properties for script box opens, you will see 5 properties attached to this particular script. One at a time, you need to change these properties to match your stable setup. For the first property, pick your quest, and pick your renamed horse alias. For the second property select the EncHorse object your horse is based on. Third property, select your horse ref in the render window. Fourth property, select our custom stables faction. And for the final property, select the XMarkerHeading object in your horse’s paddock. Click OK to close properties, and OK to close the horse alias.
Now double click on the SolitudeHostler000 alias we cloned earlier to open its ref edit box. Change the Alias name to something unique for your mod. And change the Unique Actor in the dropdown box to your custom horse seller NPC. Click OK to close.
Now double click on our last alias in the list, the only one left over from the quest we copied: PlayersHorse. We’re only going to change one thing, where it says Fill type, click the flag next to External Alias Reference. In the first drop down box for that filly type, select the vanilla “stables” quest, in the box next to that where it says “Alias” select PlayerHorse. Click OK to close. This essentially tells the quest to treat your PlayerHorse alias exactly like the vanilla one.
Part IV: Setting Up Dialogue[edit | edit source]
Now we need to get some dialogue set up. We’re going to start by creating a structure for our dialogue tree. Click on the Player Dialogue tab. In the far left pane titled “Branches” we’re going to right-click>New and make a branch to contain our dialogue. The Branch ID box will open, give your branch an ID like: aaYourIDStablesDialogue when you click ok, it will immediately open a Topic ID dialogue box; make your first topic ID aaYourIDStablesBuyHorse
Now we need to add a couple more topics. In the second pane titled “Topics” right-click>New Topic and create a topic called aaYourIDStablesAccept then make another called aaYourIDStablesReject. Then click on aaYourIDStablesBuyHorse, to the far right you’ll see a priority setting set at 50 by default, change this to 100. With this quest still open, go back to the object window, under Character>Quest, and open the vanilla stables quest. Be very careful not to make any changes to that quest during this process. What we’re going to do here is recycle horse seller dialogue. You can certainly write your own dialogue, voice it, lip synch it, but for this tutorial, we’re going to make use of what’s already there.
The following steps are going to be repeated for all 5 of the horse seller’s lines:
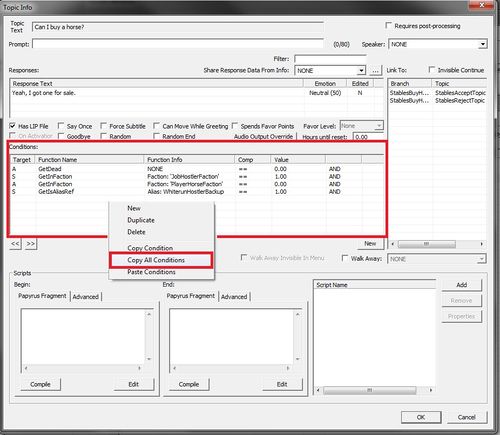
In the stables quest page, click on the Player Dialogue tab. Click on the StablesBuyHorse branch, then the StablesBuyHorseTopic. In the right hand pane you’ll see a list of all the available buy horse dialogues. Remember that NPC named Jervar we cloned to make our horse seller? He’s in this list as Alias: WhiterunHostlerBackup. His dialogue is the dialogue we want to copy. Starting with the line “Yeah I got one for sale” double click on the dialogue to open the Topic Info box. In the pane titled “Conditions” right-click>Copy All Conditions
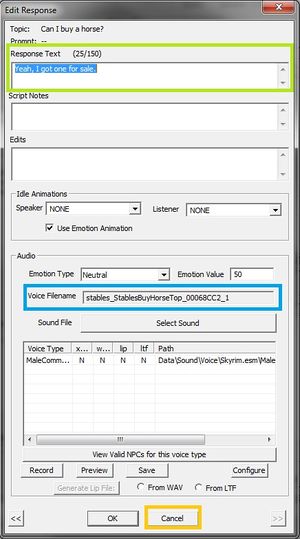
Then double click on the Response Text. When the Edit Response dialogue box opens, copy the Voice Filename and paste it into a text document for later (using Notepad for this is fine) then copy the response text itself and click cancel to close this dialogue. Then close the Topic Info box for that topic.
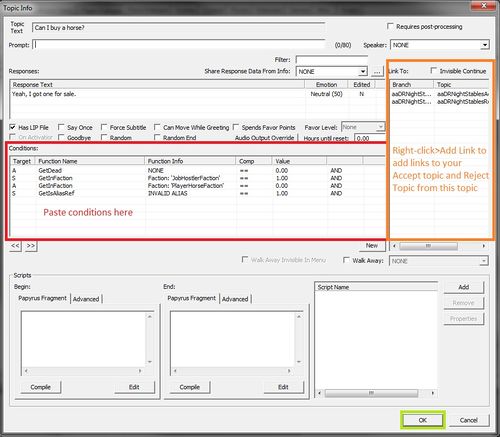
Heading back to our custom quest now, click on our custom BuyHorse branch and our BuyHorse topic. Where it says “Topic Text” Type “Can I buy a horse?”, this is the player’s dialogue choice for our conversation. Then right click>New in the info pane to open a New Response box, Rightclick>Paste your copied dialogue into the text Response field. When you click OK, a Topic info box will open for this new line. Rightclick>Paste Conditions in the conditions pane. Then in the far upper right pane title right-click>Add Link and choose your custom Accept topic from the list. Repeat to add your reject topic too.
Last thing we need to do for this line is adjust out copied conditions. Double click the GetDead condition. There’s a drop menu that says Run On Quest Alias, and the box next to that says NONE. Change NONE to your custom horse alias and click OK. Do the same for the condition GetInFaction ‘PlayerHorseFaction’. Last we need to change the GetIsAliasRef. Change this to GetIsID and set the ID as your Horseseller NPC. Remove the GetInFaction ‘JobHostlerFaction’ condition.
So the basic steps are, go to vanilla stables quest, open dialogue, copy conditions, copy filename to txt doc, copy text. Go to custom stables quest, create new line, paste text, paste conditions, tweak conditions.
Repeat this process on the second whiterunhostlerbackup line in the vanilla StablesBuyHorseTopic. The line is “You could if I had one. Sold my last available horse to someone that looked an awful lot like you.”
When you have two lines for this topic, head to the vanilla stables quest again and this time go to the Accept topic. There will be two lines here. Follow the steps as before to copy those two lines to your custom accept topic; check the goodbye flag when setting up your accept lines so the convo ends properly. Then do the same for the Reject topic. Don’t forget to copy over your conditions and the Topic Text for your Accept/Reject topics as well.
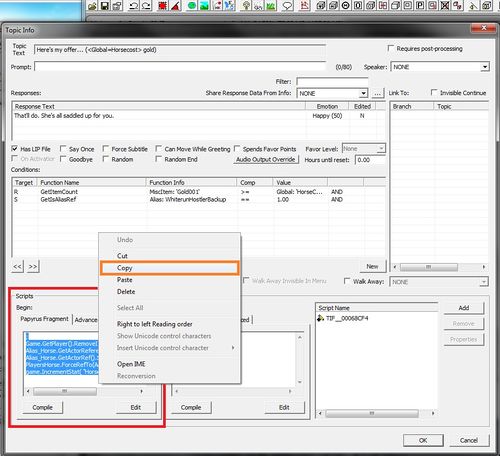
When you have successfully copied over all five lines and their conditions, close your quest and save. Then reopen the stables quest, open the first line of the Accept topic so we can copy the script over. In the lower left hand corner is a pane title “Begin” select and copy all of the code there. Then close the stables quest and open your custom quest. Paste the code into the Begin block of your first Accept line. This is the bit of code that does the actual selling magic. Once pasted, click OK to close the line and OK to close your quest, and then save again.
This part is a bit tricky; the CK really doesn’t like to populate this script properly, so it may take some finagling. Reopen your dialogue and to the right of your code bit you’ll see a script that likely begins with TIF_ and a bunch of numbers. Right click on this script and choose Open in External Editor. If you have your CK setup properly it should open the script in an external program like Notepad++, if not, you need to [url=”http://www.creationkit.com/Notepad%2B%2B_Setup”]Setup Notepad++[/url]
When your script opens, at the end of your code should be the following:
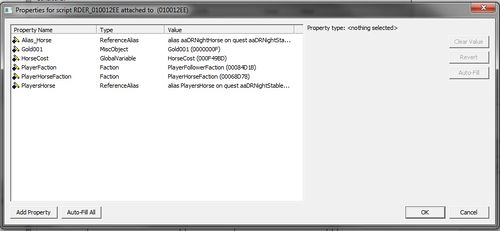
Faction Property PlayerHorseFaction  Auto
MiscObject Property Gold001  Auto
ReferenceAlias Property Alias_Horse  Auto
Faction Property PlayerFaction  Auto
ReferenceAlias Property PlayersHorse  Auto
GlobalVariable Property Horsecost  Auto
If any or all of these lines are missing from the end of your script, add them after the line END FRAGMENT CODE and save.
Now click on your script again, and select Properties. If you receive an error, try clicking on the advanced tab in the Begin block and click Regenerate, then try to open Properties. If you still get an error try closing the quest and reopening it. Once you manage to get the properties open you’ll have a pane with six properties to edit. Click each one in turn and click Edit Value to edit that property. First one is your custom horse alias. Second, you want Gold001. Third, horsecost. Fourth, PlayerFaction, Fifth PlayerHorseFaction, and last the PlayersHorse alias from the vanilla stables quest.
Part V: Recycling Sound Files[edit | edit source]
What we have at this point is a functional stables quest, but the dialogue lines will zip by very quickly in game because we don’t have any sounds files. There are two ways you can fulfill this need. You can re-record the dialogue yourself, generate lip files and name them to match your quest’s file names. OR you can recycle vanilla sound files since you used vanilla lines. For something small like this, I prefer the recycling option so that the voice matches all the way through the convo to the vanilla voice the NPC uses for general chat.
Here’s what you need:[edit | edit source]
- Fallout 3 Archive: This utility allows for extracting files from the vanilla BSA
- Unfuzzer: This utility allows for unpacking and repacking .FUZ files.
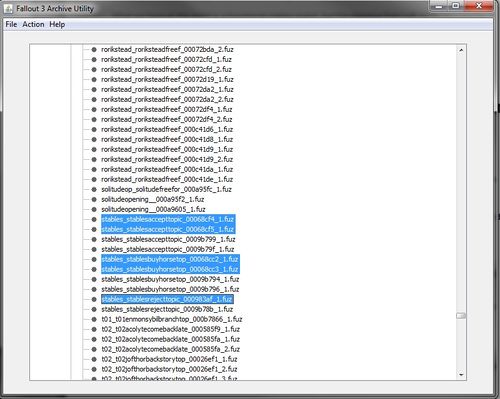
Begin by opening the Skyrim-Voices.BSA in FO3 Archive. Click the + sign to expand the tree and scroll down to find malecommoneraccented; click + to expand that tree. Scroll down to the lines containing stables. Remember those file names we saved to a text file? Look for those five file names in the list and highlight them. Use ctrl+click to highlight multiple files.
Use Extract Selected Files to extract these 5 FUZ files to a folder on your desktop and close Fallout 3 Archive.
Open Unfuzzer.
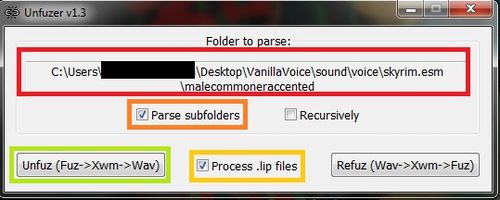
Click on the file line and browse to the folder on your desktop where you extracted the voice files; navigate all the way within the folder structure to the malecommoneraccented folder. Check “Parse Subfolders” check “Process .lip files” and then click Unfuz (Fuz->Xwm->Wav}
When you return to your folder you’ll see the vanilla FUZ files have been extracted to five wav files and five lip files. Each line of dialogue has a lip file and a wav file, they share a filename. Go ahead and delete the FUZ archives.
Now you need to get the file names for your custom lines. Open your quest and starting with the accept topic, double click on each line and then it’s response text to open the Edit Response box and copy the Voice Filename to your txt file.
When you have the file names for your custom lines, rename the extracted sound files on your desktop to match your custom filenames.
Be careful to give the right lines the right filenames and remember the wav file and its matching lip file will share the same filename.
When the sound files are all renamed to match your filenames, open Unfuzzer again. Same steps except this time, click Refuz. You’ll find 5 tidy FUZ files where your wavs and lips were. Now you just need to move those five FUZ files to Data/Sound/Voice/YourModName.esp/malecommoneraccented
When you test your mod now, your horse seller should have audio dialogue and lip files all the way through his conversation that match his vanilla voice. That’s the whole scenario in step by step form; it seems like a lot but really it goes quite fast once you get the system down. You should now be able to create a custom stable for your mods and even multiple stables at once! Happy Modding!
Part VI: Troubleshooting & F.A.Q.[edit | edit source]
Why does my Horse Seller say the wrong lines for the dialogue on screen?
- You renamed your sound files incorrectly. Go back, Unfuz those lines and if you need to, play the sound file before renaming it properly
Why won’t my Horse Seller won’t say anything but generic dialogue?
- Make sure your quest priority is at least 80 so it takes priority over vanilla quests
- Be sure to delete the GetInFaction ‘JobHostlerFaction’ condition from your BuyHorse topic
Why does my dialogue flash on screen too fast to read?
- You are missing sound and lip files to slow it down
Why is my custom horse is pink/purple?
- You need to apply textures to you mesh. When releasing mods, be sure your texture paths in NifSkope start with “textures” and not “C:/ProgramFiles”
Why does my horse seller says his lines but not take my money or sell the horse?
- You need to edit the properties on your Accept topic result script
How can I make my horse essential?
- From the object window, double click on your horse in the list to edit him. Check the “Invulnerable” flag, click OK, and save.
How can I make my horse to cost more?
- You need to create a new global variable. Under Miscellaneous>Global find horsecost. Give it a new ID like aaDRNightHorseCost and where it says value, change the 1000 to what you want to sell for. Then in the properties of your accept topic’s result script, set the horsecost property to your custom global.
How do I set up multiple stables?
- You just set up like the first stable, create a new horse alias and a new hostler alias for each of your stables and give them their own set of lines for the sale. Tweak the properties for each stable accordingly. You only need the one custom quest.
