Difference between revisions of "Adding Voice Intermediate Tutorial"
imported>SinderionsBones |
imported>SinderionsBones |
||
| Line 46: | Line 46: | ||
Realistically, you go over the dozen voice files I mentioned above before you even get through the Misc. section of the quest window, much less the combat tab if you need it. Wait.. what if you have a few different NPCs? With a couple different voice types? This could turn into a nightmare if they were randomly scattered through the built in directories. | Realistically, you go over the dozen voice files I mentioned above before you even get through the Misc. section of the quest window, much less the combat tab if you need it. Wait.. what if you have a few different NPCs? With a couple different voice types? This could turn into a nightmare if they were randomly scattered through the built in directories. | ||
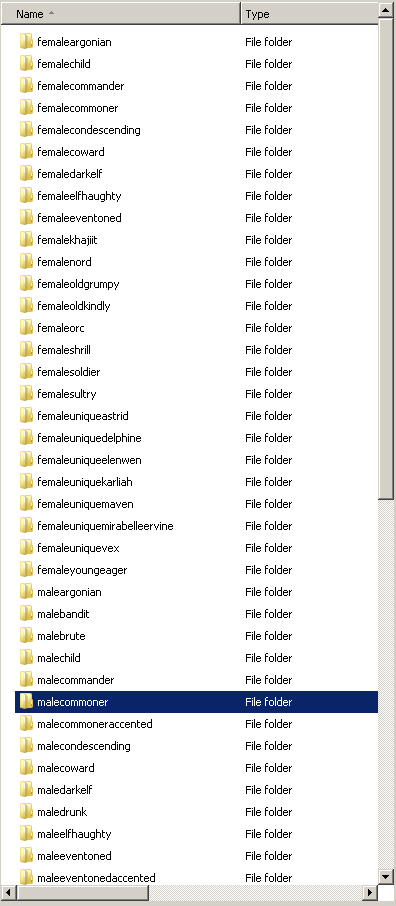
<br>This is a good mod I downloaded. Somehow, however, the author managed to get his voice files entangled into EVERY folder listed below, and many more. There are one or more voice files in each of those folders. This mod has ONE(1) custom voiced NPC. All of this could have been automaticlally put in one directory. If only he knew about voice types, any further working on this mod, compression for example, would have been many times simpler. | <br> | ||
This is a good mod I downloaded. Somehow, however, the author managed to get his voice files entangled into EVERY folder listed below, and many more. There are one or more voice files in each of those folders. This mod has ONE(1) custom voiced NPC. All of this could have been automaticlally put in one directory. If only he knew about voice types, any further working on this mod, compression for example, would have been many times simpler. | |||
[[File:ClubObosFileStructure.png]] | [[File:ClubObosFileStructure.png]] | ||
Revision as of 18:50, 26 February 2012
| Adding Voice Intermediate Tutorial | |
|---|---|
| Intermediate Quest Design Series, Chapter 7 | |
| Return to Tutorial Hub | |
| Next Tutorial | |
Overview
Disclaimer: This isn't a Bethesda written tutorial like the last few you've been reading. It does, however, belong exactly where it is. I am a modder, watching many other modders get stuck on this exact point. I wrote a tutorial on the nexus forums, and have been asked to put it in other places. Here it is, I hope I'm not out of place squeezing it into the tutorials.
This chapter will explain how to utilize the creation kit in creating more detailed, voiced quests. Since it's growing in popularity, this article will also cover adding NPC voices involving voice acting produced elsewhere.
The reader will learn:
- How the creation kit and skyrim handle your voice files. (From a modders perspective. Some designer insight might be awesome)
- How to create a custom voice type.
- How to apply that voice type to your NPCs
- Using the built in recorder intelligently. (Again, from an outsiders perspective.)
- Using what you know to bring in voice recorded elsewhere.
- Some places to go to look for volunteer voice acting, or offload the creative portions if you have a good NPC voice yourself and would rather not mod.
The Age of Voice Acting
Skyrim is a game with and of voiced, expressive NPCs. Quests have voice acting. NPcs talk to you. These are, or are at least becoming, recognized facts. If you give people silent NPCs and expect they will have the same experience they did with silent Morrowind NPCs you would be mistaken.
Making a quest with dialog you have to read is now the same as giving someone an iron greatsword and telling them it is the Great Legendary Dragon Wing Demon Evil Fire Blade of Apocalypse, then just raising it's damage really high. Sure it will get the job done, but... c'mon...
One small part of making an immersive quest is to not make the player have to do a double take every time you present something because you didn't make it mesh with the story and environment. All other NPC's talk in Skyrim. Why should anyone waste their time with your quest if yours dont?
All this ranting aside, the basics have been made available to us. If you have a dozen lines or less, you plan on using your own voice or that of a nearby friend, and you have no use for touching up the sound, the built in sound recorder is just fine. You can even touch up the sound afterwords, provided that you know exactly where those files are and that they're reasonably organized.
The NPC voice file system and why to stay out of it - Custom voice types
However the NPC voice files are organized, you can be sure of one thing: You don't want anything to do with it. Your custom NPCs will not sound like them, you cannot get these actors to do custom lines, so you need to do yours from scratch. The tool we use to facilitate this is the NPC Voice type. Note: Once you make a specific voice type, you must record the Misc. things they say like, hello, goodbye, how can I help you etc.. otherwise they will remain silent with nothing to say. This is good, because they will no longer speak with several different voices.
What this means to you is two-fold. First, it gives you the ability to save yourself some hastle later on and simply select your custom voice types on your NPC base objects.
Second, it puts your custom voice acting in a separate predictable folder.
\Data\Sound\voice\YourMod.esp\YourVoiceType
This becomes extremely helpful if you have a lot of voice acting to deal with.
Realistically, you go over the dozen voice files I mentioned above before you even get through the Misc. section of the quest window, much less the combat tab if you need it. Wait.. what if you have a few different NPCs? With a couple different voice types? This could turn into a nightmare if they were randomly scattered through the built in directories.
This is a good mod I downloaded. Somehow, however, the author managed to get his voice files entangled into EVERY folder listed below, and many more. There are one or more voice files in each of those folders. This mod has ONE(1) custom voiced NPC. All of this could have been automaticlally put in one directory. If only he knew about voice types, any further working on this mod, compression for example, would have been many times simpler.
The file names are static, so far as I can tell, saves memory I guess, unchanging, always something ridiculous but functional like:
YourQue_YourTopi_00002A82_1.wav (Eventually, hopefully, .xwm or .fuz)
At least they are in a predictable folder. From there you can touch up, compress, or even drop in new files(provided you name them right, see below) for the CK to recognize, and possibly make lipsync data for.
Creating a custom voice type
Creating a custom voice type couldn't be easier.
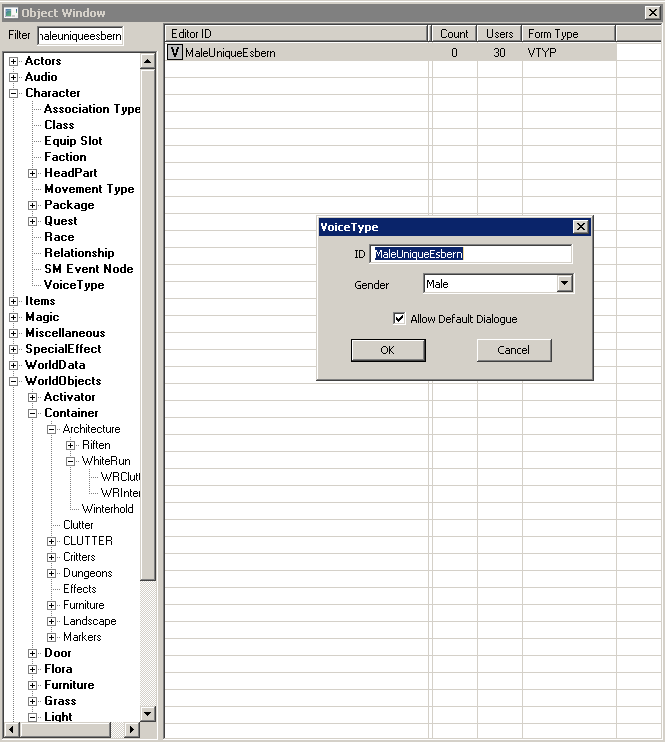
In the filter box, type in maleuniqueesbern.
Change the ID to something custom, I stick with the template, MaleUniqueYourNPC. You could do something like: FemaleMyModcustom, if maybe, you had several with the same voice for whatever reason. File:Chaningvoicetypename.png
Leave use default checked for NPCs.
Click Ok and Yes to create a new voice type. (Esbern has enough problems with messed up voice files.)
Now whenever you record voice for an NPC with this voice type, it will record it here.
Adding your custom voice type to your actors
This is it:
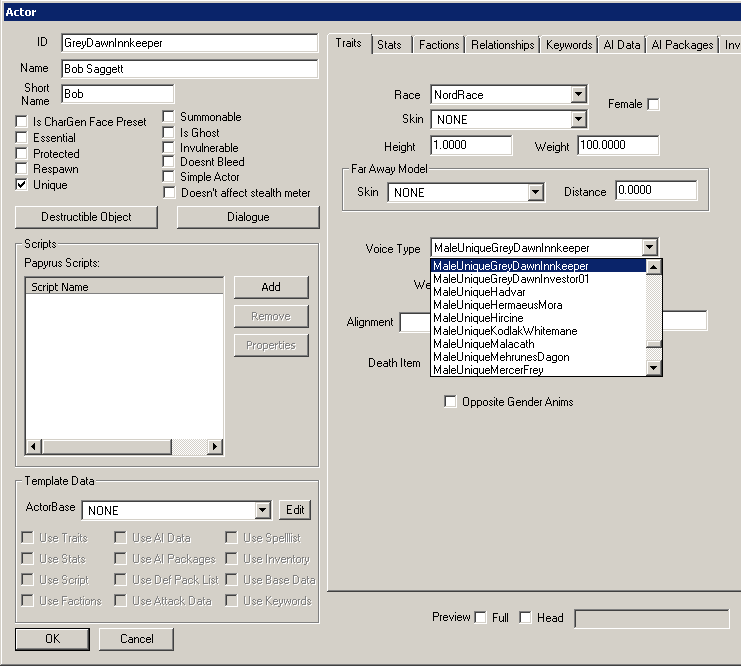
Go to the base object of your NPC, in the voice type dropdown, select the appropriate custom voicetype.
Using the built in recorder intelligently
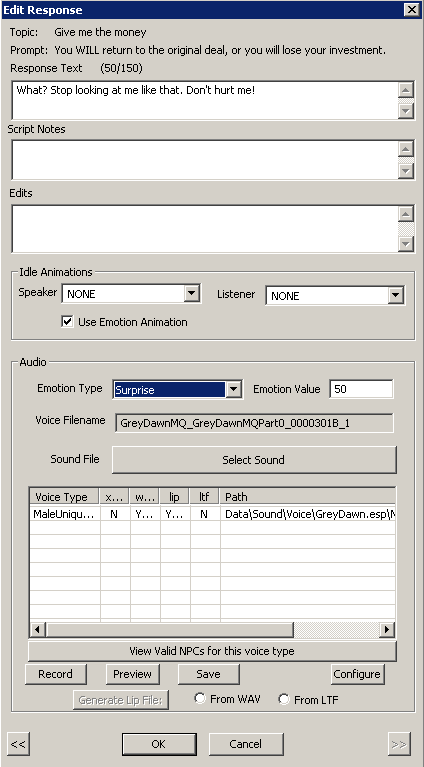
I could say a lot about the built in recorder for the creation kit. Most, however, would be mean spirited. I would rather focus on what we can get out of it, and when we should turn elsewhere. We will just call it a ... less developed feature of the creation kit. Here is a description of what exactly the little buttons do, so you can get a better idea of what exactly it is capable of.
There you have it.
1. A record button, if you are responsible with your dialog conditions, this will record to \data\sound\voice\temp.wav created when you first press it, only adding to the end on successive presses unless you press OK or Cancel on the response window.
2. A preview button, I may be doing something wrong, but this has never worked for custom recorded audio for me, or anyone I've heard from.
3. A Save button, this will copy temp.wav, to it's appropriate place, and rename it according to the list box above. Something like:
\Data\Sound\voice\YourMod.esp\YourVoiceType\YourQue_YourTopi_00002A82_1.wav
The file name is in a disable input box above the 'select sound' button.
4. A config button, that will give you a nice list of microphones available, then tease you with being able to select input formats, but generally show nothing. This is even if you have all sorts of fancy music software and drivers installed. I have no idea what this is for.
There is also:
5. Generate lip file button. This can be used if you place your own properly named file into the folder, you can select the 'from wave' radio button, and click this button. It will generate the necessary .lip file. Recording your own files and saving them will automatically generate a lipsync file.
What can it do for us?
Try it. It sounds pretty bad without any editing. I have a $250 condensing or something microphone of my brothers. With no polishing it still sounds like a random guy talking in a room with a computer(I even caught some chainsaws from down the street what will be behind your mods audio?). It doesn't sound like something I would want to hear from an NPC in game. Five minutes in Audacity, however, once you have your improvement steps(not covered here) down, and it's golden. If you ignore the recorder, you're fine. Just put the files in their appropriate places. You can even get a third party program to do the lipsync file creation and compression.
If you want use the recorder, and aren't satisfied with the resulting audio, these are the things it can conceivably do for you:
1. If it fits your workflow, you can record dialog, or at least placeholder dialog, right as you're inputting the text it into the creation kit. You can come back later with another program and polish/compress and replace if necessary. Remember to regenerate your lip files if you replace.
2. So far it's worked for me to record .wav files, place them in their directories, then, while already checking to make sure the creation kit knows they're there, select 'from .wav' and press Generate lip file. this saves having to batch do it in a separate step.
That recorder sounds like more trouble than it's worth.
Unfortunately I agree. Especially since there are quite a few utilities available to do everything it can do, except for the automatic copying, renaming, and dialog associating part. Turns out though.. this is the annoying part.
This tutorial will not cover how to make .lip files outside the editor, compress to .xwm, or edit your audio. This is far outside the scope of this tutorial and I'm no expert on the last one.
It is easy enough, with, say, less than 50 dialog lines, to just write down the file names and associated dialog lines in a notebook and just go from there. This is how I started.
Fortunately the creation kit does give us a few options when it comes to managing our dialog in terms of showing what voice filename goes with what dialog, regardless of the amount of dialog.
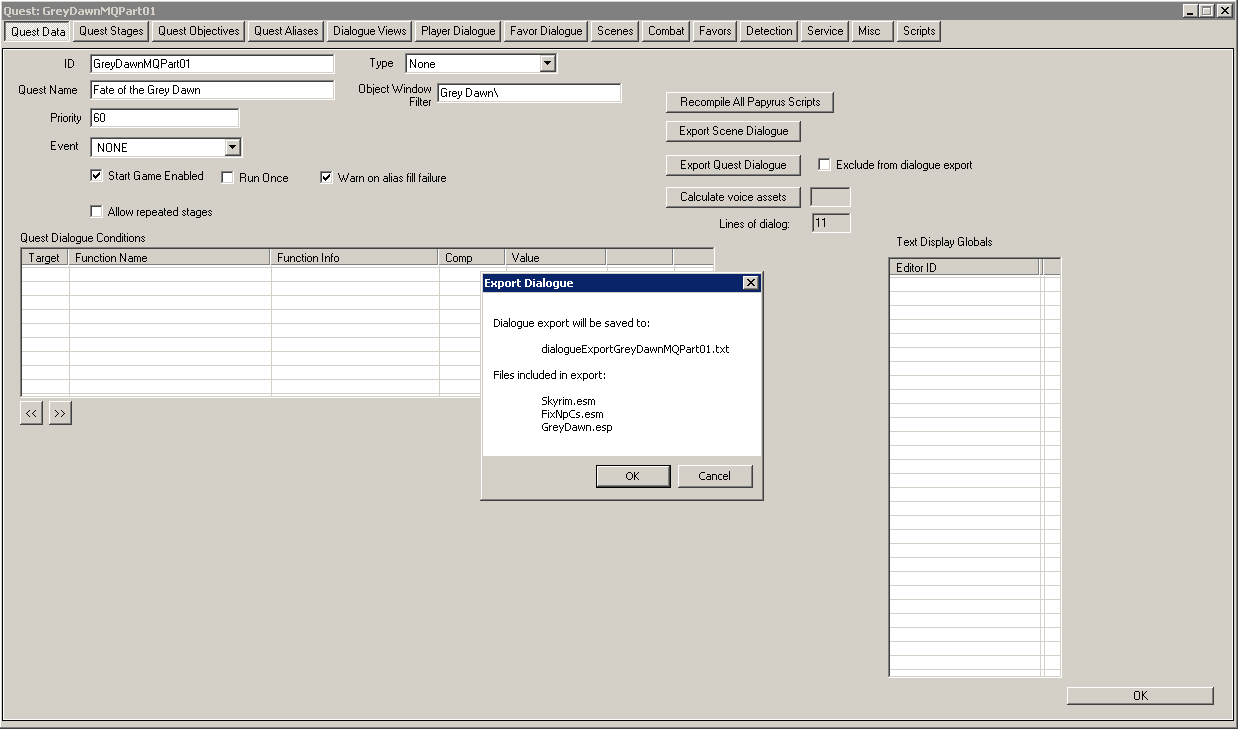
This will export a list of a bunch of stuff associated with your quest dialog. Most importantly for us, it will show us:
1. The line in question
2. The filename
3. Whether the editor found a file there or not (for when you're finishing up and making sure you got everything)
the file will be exported to Your base Steam\steamapps\common\skyrim folder named something like:
dialogExportMyquest.txt
If you open it in a spreadsheet program (you can just drag it into any excel window, and it will import and show it automatically) You can then delete the columns you dont care about for now and have a nice checklist of audio fix up. You can also theoretically just use notepad... but that would be much less efficient.
Didn't feel like working up a dummy file, so here's a sample export from one of the WIP quests in a mod I'm working on(most of the lines are placeholder lines... some are lame I know).
The columns you deleted can help immensely when you're finalizing your mod. For now, however, all we're interested in is the audio.
If you don't have excel, you can just google free alternatives, as well as a xwm compressor(10x file size reduction i.e. 750kb to 75kb etc.), an audio editor (Audacity is a favorite, and free), and a .lip file generator if you just want to completely leave the built in recorder behind.
Hint: Google xWMAEncoder.exe. It comes with a freely distributed microsoft development thing. There are several copies posted on the internet, along with simple directions. Only download the ~700kb file, not the big 300-500mb thing.
Putting it all together
Based on what we've covered this is a sample work flow for voicing your mod reasonably efficiently. Anything relating to the construction kit that you don't understand should be covered in previous Bethesda tutorials.
1. Create Custom voice type.
2. Apply appropriately to your npcs.
3. Create your dialog(dialog views, scenes, misc, combat, player dialog etc...), ignoring the recorded and voice portion if you so choose.
4. Export the dialog list. (Optional) Give list portions necessary to your volunteer voice actor(s).
5. Record the dialog in your audio software of choice. All in one go(one file) per voice type if you like. May be handy to print out the spreadsheet for use as a script. (Optional) Recieve dialog in one or more files. They may or may not have done some polishing of the sound themselves. This should be coordinated, especially if they are better than you at the audio software.
6. Section out and export polished dialog (after you clean it up of course) to appropriate files according to the exported dialog list.
7. Generate lip files in your preferred way. With an external program, or in the creation kit while you are double checking in the response windows.
8. Compress your voice files to xwm when getting ready to put file up for download (Do it! can turn a 100mb mod into a 10-12mb mod). This could possibly be done in step 6 in the export options so long as you are making .lip files with a separate program. I'm not sure if the editor will make them from .xwm files.
9. U Haz voiced mod.
Final Thoughts
There are voice actors out there, and modders in need of voice acting. My favorite site for such things is www.skyrimnexus.com and their forums you can just google what you're looking for though. chances are good that the top few results would be the nexus anyways. I don't want this to be a bottleneck to making good story based mods like I've been seeing. I originally posted this on the nexus forums, but there are still daily questions about voice acting, needing help with custom voice, and volunteers wanting voice acting 'work'. If this seems like a lot to go through, and you have your quest story inspiration in hand, forget about it, do it the easy way, that's why I covered it. Toss in custom voice types and it's just as easy as the developers intended. Do the voice yourself. If your quests and mod are good people won't think twice. The voice acting can even be added at a later time without touching the mod file. More voiced story mods!
Happy modding!
| Return to Tutorial Hub | Next Tutorial | ||
