Bethesda Tutorial Dialogue/ru
Диалоги
 | На русском языке Требуется помощь переводчика |
| Диалоги | |
|---|---|
| Серия: Основы квестописания, глава 3 | |
| К другим учебникам | |
| Следующая статья | |
Обзор
В этой главе мы будем создавать диалоги к тренировочному квесту "Единственная надежда Бенду Оло".
Ты узнаешь:
- Как писать диалоги для Skyrim в Creation Kit.
- Как привязать события к выбранным игроком пунктам диалога.
Представления диалогов
Creation Kit визуализирует весь процесс создания диалога, предоставляя удобный интерфейс взаимодействия.

Если ты писал диалоги для предыдущих игр серии TES или Fallout 3, то можешь воспользоваться родной вкладкой Player Dialogue (en) (на самом деле, система диалогов осталась прежней, просто прячется за новым интерфейсом).
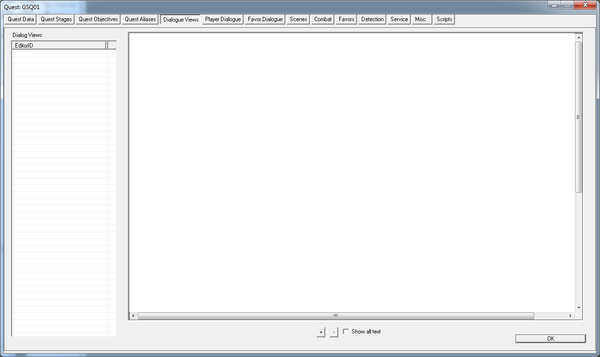
Для начала, дважды щелкни по своему заданию (в нашем случае GSQ01), чтобы открыть окно квеста. Перейди на вкладку Dialogue Views (en). Выглядеть это должно как-то так:
Чтобы создать новый диалог, щелкни ПКМ по таблице в левой части окна и выбери пункт "New." Тебе предложат указать ему ID, а ID квеста будет автоматически использован в качестве префикса. Дай ему имя: "GSQ01BenduView." Щелчком в таблице выбери его.
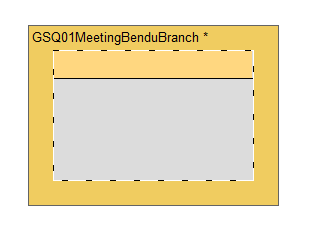
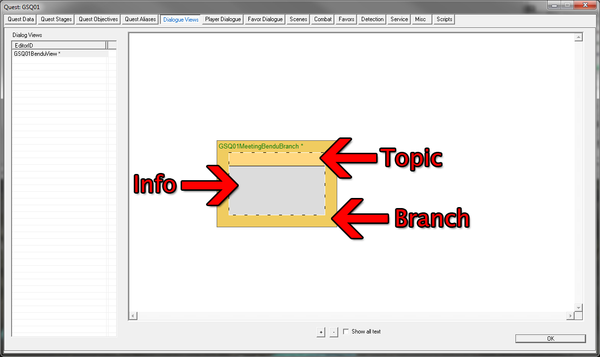
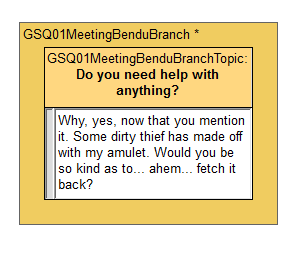
Справа ты видишь белый девственно чистый холст без единого намека на что-нибудь интересное. ПКМ по нему и выбирай "Create Branch" из меню. Да-да, и снова тебе нужно указать ID, на этот раз ветви диалога. Называй: "GSQ01MeetingBenduBranch"... и еще один ID для темы (впрочем, тут можешь оставить вариант по-умолчанию "GSQ01MeetingBenduBranchTopic"). Еще одно нажатие на Enter и пред тобой несколько прямоугольников мерзкого цвета, которые, наверняка, тебе ни о чем не говорят.
Перед тем как продолжить, давай разберемся с терминами:
- Ветвь (en): Набор связанных по смыслу тем.
- Тема (en): Выбираемая игроком тема диалога, на которую последует монолог персонажа.
- Монолог (en): Набор произносимых подряд фраз.
- Topic_Info/ru#The_Response_Form|Фраза: Одна строка монолога, произносимая NPC. Длина строки ограничена 150 символами. С ответом могут быть связаны эмоции и анимации, проигрываемые говорящим.
Итого ты создал ветвь диалога, содержащую одну тему, которая пока что не содержит монолога персонажа.
Темы
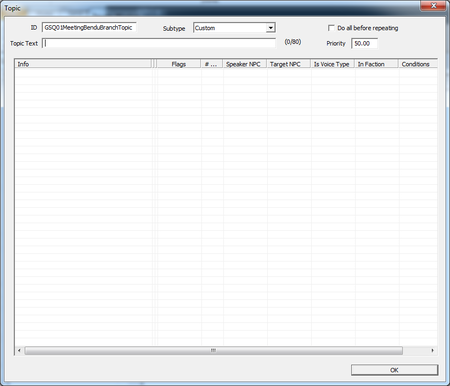
Двойной ЛКМ по теме (рыжей полоске над серым пространством) откроет окно темы (en).
Пока тебя интересует только поле "Topic Text". Его содержимое будет выведено игроку в качестве варианта диалога во время разговора с персонажем. Делаем из игрока стандартного героя-дурачка, готового помогать всем и каждому. Пишем: "Тебе чем-нибудь помочь?"
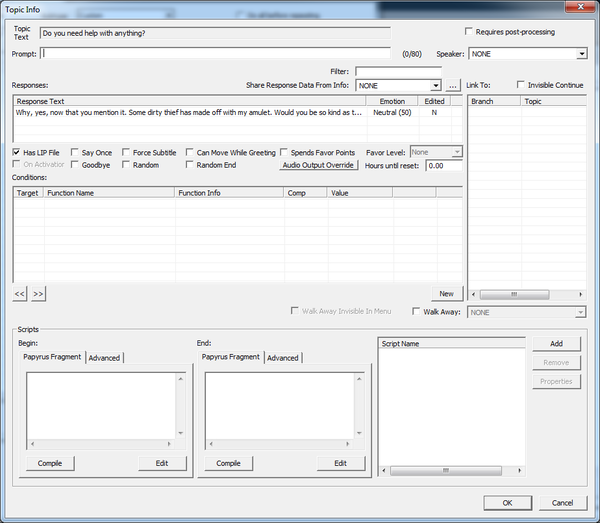
Ниже расположена таблица монолога. Дважды щелкни по ней, чтобы создать новую фразу.
В поле "Response Text" введи: "Странно, что вы спросили... Как раз недавно один грязный ворюга утащил мой амулет! Не могли бы вы... ммм... вернуть его?"
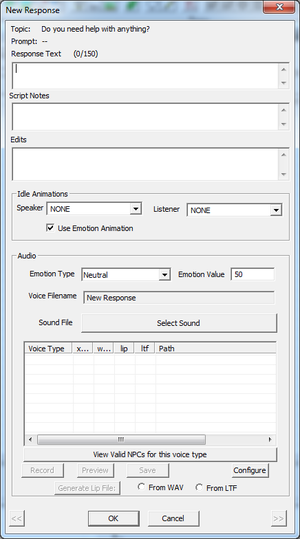
Теперь дважды щелкни по кнопке ОК внизу окна. Надеюсь, ты это сделал достаточно быстро и не успел заметить еще одно окошко с кучей настроек. В нем тебе еще предстоит разобраться, но все по порядку. Окно исчезло и ты вновь видишь окно темы, в котором появилась одна строчка монолога.
Монологи
В этом окне огромное количество всевозможных настроек, но тебя интересует лишь их малая часть. В первую очередь таблица условий (en) в центре. Условия описывают - у кого может появиться этот монолог. Если ты оставишь условия пустыми, то каждый персонаж во всем мире обзаведется темой "Тебе чем-нибудь помочь?"
ПКМ в таблице условий, выбираешь "New" для создания нового условия.
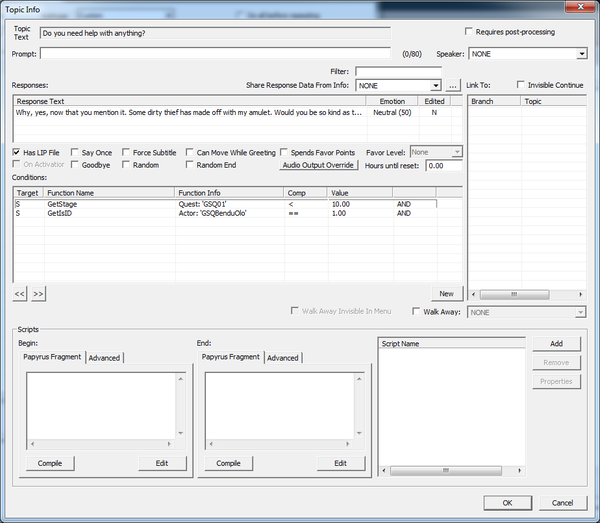
Каждое из условий может быть либо ложным (False) либо истинным (True). Если все условия в списке истинны, монолог проходит проверку и появляется у персонажа. Твое условие будет простым и не замысловатым - нужно задать одного единственного NPС, которому была предназначена тема. Нужная проверка "GetIsID" выбрана по-умолчанию, так-как является наиболее часто используемой ввиду большого количества личных диалогов, привязанных к конкретным персонажам. Щелкни по здоровой кнопке с надписью "INVALID" и выбери ID Бенду Оло: "GSQBenduOlo" (поле поддерживает быстрый поиск при вводе с клавиатуры). Затем нажми "ОК".
Вновь жми "OK" чтобы закрыть окно условий. Свежесозданное появится в списке. Теперь только Бенду сможет общаться на эту тему. Однако, ты ведь не хочешь, чтобы он делал это постоянно? Правильно, тема должна быть доступна только до момента взятия квеста. Добавляем еще одно условие. Уверен, ты запомнил, как это делается.
Ограничим тему диалога еще и стадией квеста. В списке проверочных функций (Condition Function) выбери "GetStage". Затем кликни по любимой кнопке "INVALID" и выбери квест с нужным ID ("GSQ01"). Функция знает, что в качестве первого параметра ей должны передать ID квеста, а не чего-либо еще, поэтому других объектов в списке параметров не будет, только квесты.
Теперь нужно задать метод сравнения результата функции с некоторым значением. Первым желанием может быть проверка на равенство ("==") и числа "0" (наша начальная стадия квеста). Но жесткое сравнение в программировании (а мы сейчас пишем своего рода программу) никогда не считалось хорошим тоном. Например, в последствии вы решите добавить еще одну стадию между "0" и "10", когда игрок еще не встретился с Бенду Оло, но, например, слышал слухи о том, что у бедняги украли амулет, и условие придется переписывать. Дабы этого избежать, и зная, что разговор Бенду Оло станет стадией квеста под номером "10", запишем условие так: если стадия меньше 10. То есть меняем метод сравнения на "<" и значение на "10".
Вот что должно получиться у тебя в итоге:
Кнопкой ОК подтверждаешь изменения и закрывать окно монолога. Еще раз по ОК, закрывая окно темы.
Связи
И вот пред тобою вновь представление диалогов! Теперь уже не пустое. Если тебе захочется увидеть весь текст, отметь флажок "Show All Text" в нижней части окна.
Теперь неплохо бы добавить игроку возможность ответить на просьбу Бенду о помощи. ПКМ в области ветви. Выбираешь "Add Topic." (Если "Add Topic" отсутствует, значит ты промахнулся и щелкнул не туда [см.картинку выше])
Откроется новое окно редактирования темы. И вновь тебе придется ввести ID. Вводишь: "GSQ01MeetingBenduYes", в переводе, если игрок скажет "Да" на просьбу Бенду. В качестве текста укажи: "Конечно я тебе помогу". Дважды щелкаешь по таблице монологов, чтобы добавить ответ, и собственно задаешь сам ответ: "О, спасибо, спасибо вам огромное! Он убежал в сторону Reachwind Eyrie. Пожалуйста, скорее! Я... я выкуплю его у тебя, за двойную цену!" Нажми "ОК".
Чтобы вернуться к редактированию дважды щелкни по ответу в списке Responses. Обрати внимание на список аудио-файлов в нижней части.
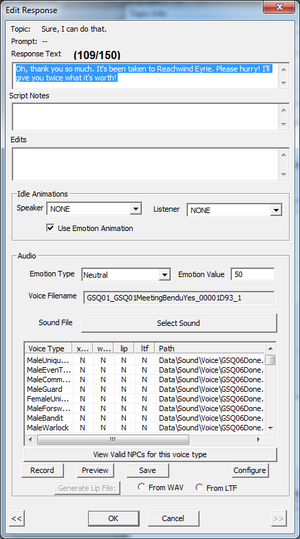
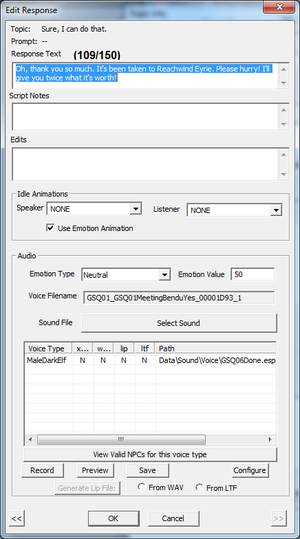
Поскольку, ты еще не задал ни одного условия, редактор отображает все доступные голоса, которыми может быть озвучена фраза. Это существенно увеличивает затраты дискового пространства (и времени, если собираешься записывать голос). Закрываем окно редактирования фразы и добавляем новое условие. Функция GetIsID, проверяющая, что ID говорящего GSQBenduOlo (как и в предыдущем случае). Если ты теперь вновь откроешь редактирование фразы, то увидишь, что в списке звуковых наборов остался только MaleDarkElf.
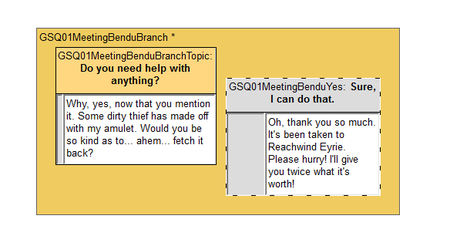
Нажимая ОК, возвращайся к окну с представлением диалогов. Область ветви расширилась, чтобы в ней поместилась новая тема.
The beauty of Dialogue Views is that we can arrange these topics however makes sense for us. At runtime, the game doesn't care about this positioning; it's purely for the designer's convenience. So grab the new topic by its top bar and drag it to a convenient spot.
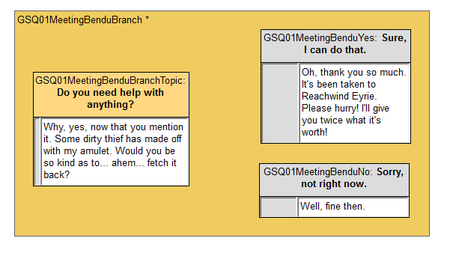
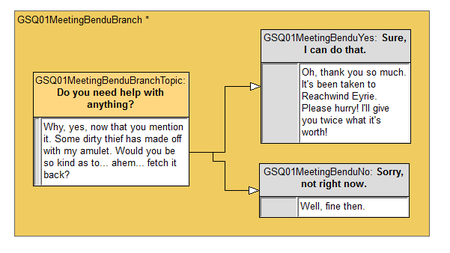
Make one more topic, this time with a Topic Text of "Sorry, not right now." Set Bendu's response to be "Well, fine then." Don't forget to put a GetIsID condition on the Topic Info. Once you've created those two, the Dialogue View should look something like this.
All these topics exist within the branch, but the game doesn't know anything about the flow between them. We have to link them together. Click on GSQ01MeetingBenduBranchTopic to make it active. Then click once more on the text of the line (you'll see the cursor turn into a little hand when you roll over it) and drag a line to the GSQ01MeetingBenduYes. Do the same thing, dragging a line from the initial topic to the GSQ01MeetingBenduNo topic.
Now, when the player selects the prompt "Do you need help with anything?", Bendu will say his line and then present the player with another list of choices based on the links from that topic. The choices will be listed in the order they were linked from that topic.
Scripting Dialogue
We're going to make our first foray into the scripting system here, but it will be very straightforward, so don't worry if that's not your cup of tea.
Right now we have a dialogue flow set up, but the game has no notion of what the various choices mean. When the player says, "Yes," we have to tell it that the player has accepted the quest and we're now at the next stage.
Double-click on the text "Oh, thank you..." under the GSQ01MeetingBenduYes topic. (Note that this brings us directly to the Info window without first bringing up the Topic window.)
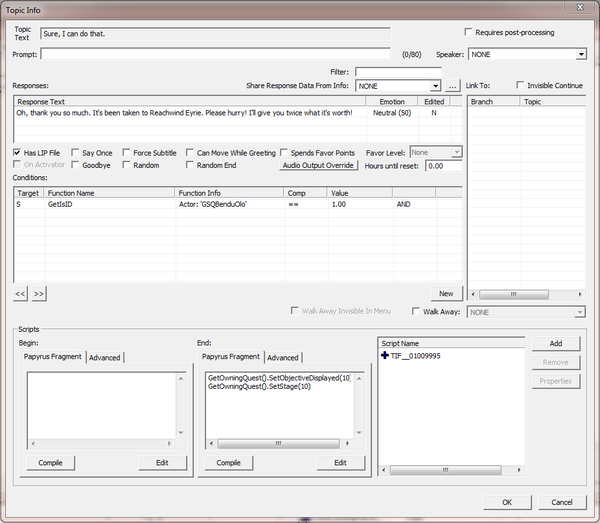
At the bottom of this window, you see fields for Scripts marked "Begin" and "End." The Begin script runs when the NPC starts saying the line, and the End script will run when he finishes. (In scripting terminology, these little pieces of script are called "script fragments" - see Topic Info Fragments for more details.)
In the End field, enter this script command:
GetOwningQuest().SetObjectiveDisplayed(10)

GetOwningQuest().SetStage(10)
You don't need to worry about the SetObjectiveDisplyed(10) part yet. It will be explained later on.
The SetStage(10) portion, as you might expect, sets a quest's current stage to 10. The GetOwningQuest() part just says that the quest we care about is the one that contains this dialogue. (Sometimes you might want a line in your quest to muck around in a different quest, so we have to be specific.)
If you press "Compile" you'll see some gobbledygook pop up under "Script Name" to the right. You can ignore that. (If you typed something wrong, though, the Editor will complain at you.)
When you're ready to close the window, it should look like this:
And that's it! Close the window, and you're good to go. You'll note that in the dialogue view, this info's text now has "[S]" at the front of it, so we can easily spot which bits of dialogue have game logic attached to them without having to open each one.
Branches and Conditions
What we've just done is craft a Branch of dialogue. By default it's a "Top-Level" branch (which is why it's colored orange in the view). You don't need to worry about the other branch types right now; just know that a top-level branch is available as one of the first things an actor is able to say to the player.
The topic that has a yellow-orange bar at the top of it has been flagged as the branch's Starting Topic. When an actor is determining what choices to offer the player, it looks for starting topics and displays the prompts for all of them which are valid. If you remember, we put a condition on our starting topic that the quest stage had to be less than 10. Once the player chooses to accept the quest, we set the quest stage to 10, which means that starting topic is no longer valid; it won't appear in the actor's topic list anymore.
Non-starting topics can have much smaller lists of conditions, since they are typically only accessed if the starting topic for their branch is valid. That's why we just limited them to a specific NPC so we wouldn't have extra voice files. From a gameplay perspective, it wouldn't have mattered.
Once the player chooses a topic with no links out of it, the game will again look for valid top-level topics to give the player choices. If none are valid, the NPC will release the player from dialogue.
Try It Out
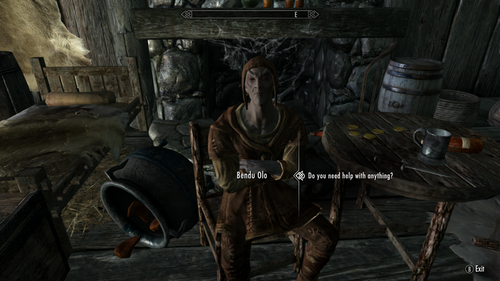
Load the game with your plugin and go meet Bendu. (Remember, you can hop right there with COC MixwaterMillWorkersHouse.) He should now have something to say to you.
There are a few problems with the dialogue as it currently stands:
- It flashes directly to the next choice list. (Since there's no audio, if you don't have captions on, you won't have any idea what he said. Even if you do, they probably flashed by so quickly you couldn't read.)
- If you refuse to help, he'll just go right back to the same top level topic, which feels odd.
Luckily these are easily addressed.
Recording a Temp Track
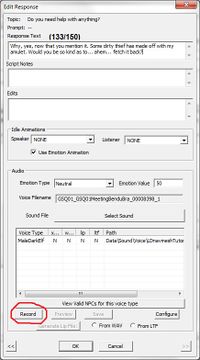
Open up the GSQ01MeetingBenduBranchTopic and navigate through to its Response window. At the bottom of the window, you'll see a "Record" button.
Press this button and, if you have a microphone hooked up to your computer, you can record a performance of the line yourself. If you don't (or you're self-conscious and don't like the sound of your own voice) you can just record a few seconds of silence, enough to give the captions time to be read. (Note: you MUST have a microphone to record anything. If no microphone was plugged in at the time you started the Creation Kit, the record button will not do anything) Hit the Save button to commit this file to disk.
Do the same thing for the other two topics we made. (While you're in there, consider setting the emotions for those lines, so that Bendu will show Disgust or Happiness depending on your choice.)
In the "No" topic, click the box that says "Goodbye." This will drop the player out of dialogue when it's selected, so you won't end up back at the topic list after the line is done. (You should also make the "Yes" topic a goodbye. Since Bendu only has one top-level topic right now, that's not necessary, because we know he'll have nothing else to say when he's done here. But if another quest had dialogue for him, it might be confusing to the player.)

Currently there is a rare bug: if you already got audio files (with correct file paths, (read table in "Edit Response" window)), but it does not work inside the Skyrim game (does not matter in Creation Kit, test just in the game itself), then you need to convert sound files from WAV to XWM, then XWM to FUZ, for more info and converter links visit http://forums.bethsoft.com/topic/1347417-dialogue-troubles/page__p__20346206#entry20346206
For some people it is the only way to make recorded tracks working in game.
Additional Dialogue
While we're here, let's also make the dialogue that will close out the quest when we come back with the amulet.
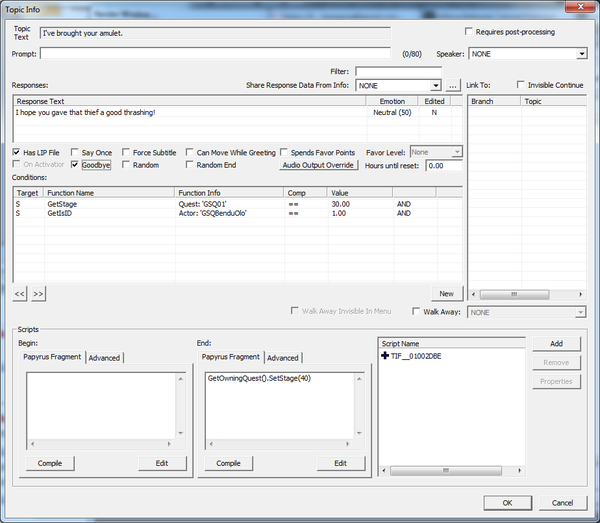
In the dialogue view, right-click to create a new branch, and call it "GSQ01BenduFinishBranch." Accept the default name for the starting topic, and make the topic text, "I've brought your amulet." Give him something good as a response (I went with "I hope you gave that thief a good thrashing!"). It will want two conditions; one that restricts it to Bendu, and another that limits it to stage 30 of the quest. Finally, set it to be a Goodbye, and set the quest to stage 40 when it's said.
You should be able to do all this by now. It will look like this when you're done.
We still haven't dealt with the amulet itself yet, and the quest has no way to proceed from stage 10 to 30, so we have work to do!
| К другим учебникам | Следующая статья | ||
| Language: | English • français • polski • русский |
|---|
