Bethesda Tutorial Dungeon Wrapup
| Bethesda Tutorial Dungeon Wrapup | |
|---|---|
| Level Design Series, Chapter 10 | |
| Return to Tutorial Hub | |
| Next Tutorial | |
| Example Plugins: | |
| Initial | Completed |
Overview[edit | edit source]
This chapter will show how to make an area ready to be used by radiant quests and to scale properly to the player's level. The reader will learn:
- What is a Location Reference Type?
- How can Radiant Story use our dungeon?
- How to create and assign a Location to a Cell
- Creating and configuring an Encounter Zone
- Setting the Music and audio space for a cell
Location Reference Types and Radiant Story[edit | edit source]

A Location Reference Type or LocRefType, as we more commonly refer to it, is a special type of flag that you can place on a Reference in your level that Radiant Story (our procedural quest generation system) uses to find the right objects. Essentially it lets you define for the quest system which actor is the "Boss" or which would be a good "Container" to place a quest item in, for example.
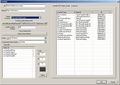
We can find the whole list of LocRefTypes under "WorldData > Location Ref Type" in the Object Window (Fig. 10.1). Beyond the most advanced modding, you probably won't need to ever add new LocRefTypes.
As you can see, there are quite a lot of different LocRefTypes but for our purposes we are only interested in a much, much smaller list that we will need to place in our level.
- Boss - Set the boss Actor of the dungeon (can be multiple)
- BossContainer - Set on the Boss Chest in the dungeon
- BossTreasureMarker - Set on an XMarker near the boss, where an important item may be
- CaptiveMarker - Set on an XMarkerHeading where a captive would be kept
- Container - Set on several containers in the dungeon
- FriendMarker - Set on an XMarkerHeading where a friendly actor might meet you
- InsideEntranceMarker- Set on an XMarkerHeading just inside the entrance
- LocationCenterMarker - Set on an XMarkerHeading in the center of the dungeon
- OutsideEntranceMarker - Set on an XMarkerHeading just outside the entrance to the dungeon
- LocationEdgeMarker - Set on an XMarkerHeading at the far edge of the exterior cell.

You don't have to place all of the LocRefTypes listed in your dungeon if they don't make sense for the area. For example it doesn't always make sense for Draugr to have a captive so that might not be needed.
Let's start by setting the Boss, which is one of the most commonly used LocRefTypes. Go back to the boss we placed in the Tutorial on Ambushes and open up the Object Info by double clicking on the LvlDraugrAmbushBossMale or LvlDraugrAmbushMelee1HMale. Go to the second to last tab, "Location Ref Type", and set the drop down to say "Boss" then hit okay.
It's as simple as that. Notice that a small rectangular box has now appeared hovering above our Actor Marker. This our indicator that this object is flagged as a LocRefType and is very helpful for remembering which objects not to delete. Due to the large amount of unique LocRefTypes, there is not a simple color scheme, but you'll get a feel for ones you place in your dungeons frequently.
Next, on that platform, let's set the BossContainer LocRefType to the TreasDrugrChestBoss in the same way (if you have a normal TreasDrugrChest, you can replace with TreasDrugrChestBoss, but be careful with the NavMesh). If a Radiant Quest wants to place a special treasure in the Boss's Chest, this is where it will go. Let's place an Xmarker on the ground next to that chest (filter *All for XMarker); this we will set to BossTreasureMarker. If a Radiant Quest wants to place an object near the Boss, but not in a container, this is where it will be placed. XMarkers are invisible and have no collision in game. They are used for positional data only.
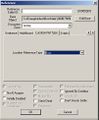
Fig. 10.2: Setting LvlDraugrAmbushBossMale to the Boss LocRefType.
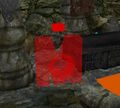
Fig. 10.3: Red Boss LocRefType marker over the Actor Marker.
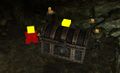
Fig. 10.4: BossContainer and BossTreasureMarker LocRefTypes.


Next we will place an XMarkerHeading for the LocationCenterMarker between the entrance and the boss. A good spot for this in Lokir's Tomb would be the second room. Make sure it is positioned on the generated Navmesh and set the LocRefType as LocationCenterMarker. An XMarkerHeading is different from a regular XMarker in that it also stores rotational data.
-
XMarkerHeadings are often used when you want to specify not only the position, but also the direction something should be facing, such as an actor. They are commonly used by LocRefTypes, Patrol Paths, and for positioning actors in Scenes.
We'll run through the rest of the interior LocRefTypes quickly. Set three Containers to the Container LocRefType; these can be anything from urns to chests, from dressers to barrels (Fig. 10.5). Next, lets place an XMarkerHeading down with the necromancer, making sure it is on the navmesh, and set it to the CaptiveMarker LocRefType (Fig. 10.6). Place another XMarkerHeading in the entrance room and mark it as InsideEntranceMarker (Fig. 10.7).
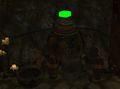
Fig. 10.5: Placement of a Container LocRefType.

Fig. 10.6: Placement of the CaptiveMarker LocRefType.
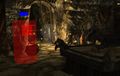
Fig. 10.7: Placement of the InsideEntrance LocRefType.


Now that you've placed those let's move to the exterior. The quickest way to do this is to double click on the Yellow Door Marker that we placed in the tutorial on Bethesda Tutorial World Hookup. This will bring up a dialogue box asking if we wish to move to the connected door on the other side of the teleport.
Now that we are in the exterior, make sure the Render Window is selected and press B to make sure that Cell Borders are displayed. We should be in the cell we renamed "LokirsTombExterior" in the previous tutorial.
Here we will place our last three markers, each of them XMarkerHeadings. The first is going to be the FriendMarker, which we will place next to the Door Marker, facing away from the door. The second will be the OutsideEntranceMarker, other side of the Door Marker (Fig. 10.8). Finally, place the LocationEdgeMarker at the far edge of the cell, out of sight if there is a convenient tree (Fig. 10.9). All of these Markers MUST be in the LokirsTombExterior cell.

Fig. 10.8: Placement of Friend and OutsideEntrance LocRefTypes
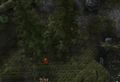
Fig. 10.9: Placement of the LocationEdge LocRefType.


It's all about Location[edit | edit source]
A Location is the main way that Radiant Story uses to get everything it needs to create a quest. Locations can be found under WorldData>Location. Let's have a look at the BleakFallsBarrowLocation. On the left side of the panel we find several pieces of data.
- ID - This is the ID used by the editor, this is never seen in game
- Name - This is the written name used in game
- Parent Location - This is Location that our location is a part of (usually the Hold)
- World Location Marker Ref - This is used to set a marker to check the distance (Usually the Map Marker)
- Keywords - This lets us tell the game what type of space it is.
There are a couple other pieces of data, but they aren't relevant to our needs right now. On the Right side of the window you will see three tabs marked Location Ref Types, Cells, and Actors. Once we have assigned a location to a cell, these will all be propagated automatically.

An Example of how Locations are used by Radiant Story - NPC Bob wants to give you a quest to save his wife Jane from bandits and to kill their leader.
- Radiant Quest finds a Location in the current Hold Location that has a Boss LocRefType and a CaptiveMarker LocRefType with the LocTypeBanditCamp Keyword
- Jane is moved to the XMarkerHeading with the CaptiveMarker LocRefType in this Location
- Quest targets are placed for Jane and the actor with the Boss LocRefType in this Location
We have all our Location RefTypes and are currently in the exterior cell, so let's go ahead and create a Location for Lokir's Tomb. With Location Selected in the Object Window Right-Click in the list of locations and choose New to create a New Location.
- Set the ID to "LokirsTombLocation"
- Set the Name to "Lokir's Tomb"
- Set the Parent Location to "WhiterunHoldLocation" (where our exterior cell is)
- Set the World Location Marker Ref to our Map Marker (choose in the Render Window)
- Right Click, then click Add, then add the following Keywords
- LocSetNordicRuin - the main architecture here
- LocTypeDraugrCrypt - what type of enemy is the boss
- LocTypeDungeon - Simply, this is a dungeon
- LocTypeClearable - This location can be marked "Cleared" on the map if all Boss LocRefTypes are dead
- Now hit "Ok"
-
Smaller dungeons such as caves will often have all the animals marked with the "Boss" LocRefType. This way the cave is only cleared when all the animals are dead.
Our new LokirsTombLocation.
Locations in the Object Window.
A view of the BleakFallsBarrowLocation.


We will go over assigning this location to cells after we create an Encounter Zone.
Encounter Zones & Level scaling[edit | edit source]
An Encounter Zone, or EncZone as it is often written, is used to set the level scaling for an area. They can be found under WorldData > Encounter Zone in the object window. Let's have a look at the EncZone for Bleak Falls Barrow.

There are pieces of data here we are interested
- ID - The ID used by the editor
- Min Level - The Minimum Level for this area
- Max Level - The Maximum Level for this area (only needed if you want to cap how difficult the area is)
- Never Resets - Sets this area not to reset after the 30 day reset period.
- Disable Combat Boundary - Actors in combat with the player only follow the player through load doors that lead to the same encounter zone. With this box checked, actors in combat with the player will ignore this rule and follow the player into a different encounter zone.
- Location - The location this EncZone is assigned to (see the Location Section of this tutorial)
- Analyze Loot - Once the area is assigned this EncZone, this can be used to check how much loot you could pull at any given level
- Ownership - Sets who owns everything in this area (Overridden if ownership is set on the reference)
The main points of data we are interested in are Min Level, Max Level, and Location. In Skyrim we scale the level to the player a bit differently than in previous games. Each space can have a Minimum and Maximum Level to which it will try to match the creatures. Once a location has been visited, however, that location is now locked at that level. The area will reset after 30 in game days at which point it will re-level to the player when they next visit. This allows us to have the game scale somewhat to the player's current abilities, while keeping areas you've recently visited feeling the same level of difficulty.
Here we've set up a new EncZone for LokirsTomb using the Min & Max parameters provided above.

-
The difficulty of an area is still subject to the LvlActors used there. Even if you set Min Level of a Dwarven dungeon to "0", the lowest level creature in the LvlActor is still around level 12. Likewise, the Max Level is often left to the default determined by the LvlActors present in the area.
Hooking up the Location and Encounter Zone[edit | edit source]
We've finished creating our Location and EncZone, but so far they aren't attached to anything. These two pieces of data are set on the Cells for our area, through the Cell Properties Window. This can be found under World>Cells... in the top bar. However, the easier way of using it is to Right-Click on the Cell you want to set the properties for and select Edit from the options that appear. This is the same Window used during the previous tutorial to set the name of our cell.

Exterior Cells[edit | edit source]
Let's start by editing the LokirsTombExterior cell, which will be found in the Tamriel. All we need to do here is set the Location to "LokirsTombLocation" and hit "Apply". It should look like this now.

Interior Cells[edit | edit source]
Next we will edit the Interior Cell, LokirsTomb either by changing the World Space dropdown in the Cell Properties Window to " Interiors", which is located at the very top of the list. Then we can scroll down until we find the LokirsTomb Cell. Or locate it from Cell View window.
On the Common Data tab we will set the Location to "LokirsTombLocation".

In the Interior Data tab, where we previously set the name, we will now set the Encounter Zone to LokirsTombZone.

It's as simple as that. Now our Dungeon can be picked and used by Radiant Story for quests to take place here!
Setting up Music and Audio Space[edit | edit source]
When you've run through the dungeon in game, you've probably noticed that it sounds very quiet. Let's go ahead and fix that while we are looking at the Cell Properties.
On the Common Data tab, set DefaultAcousticSpace to IntDungeonCatacombsAcousticSpace; this determines amount of echo in the space. Next set Music Type to MUSDungeon; this will set the music to use the right queues for a dungeon. The Cell properties for LokirsTomb should now look like the image below.

We only need to set this for interior cells, so now our work is complete.
| Return to Tutorial Hub | Next Tutorial | ||