Bethesda Tutorial Encounters
| Bethesda Tutorial Encounters | |
|---|---|
| Level Design Series, Chapter 5 | |
| Return to Tutorial Hub | |
| Next Tutorial | |
| Example Plugins: | |
| Initial | Completed |
| Companion Video Tutorial | |
Overview[edit | edit source]
This chapter will guide you through the basics of setting up an encounter involving a patrolling actor, and an actor that follows him.
The reader will learn:
- The basics of Leveled lists and Encounter Actors
- How to set up simple patrols with the help of the Default Master Package
- The difference between Ping-Pong Patrols, and Looping Patrols
- How to make one actor follow another.
Basic Encounters[edit | edit source]
The Creation Kit offers you the ability to create many kinds of gameplay - but combat encounters account for the preponderance of player activity, especially in dungeons. The Creation Kit offers tools to set up combat encounters quickly, allowing you to focus on making each encounter memorable rather than simply functional.
Leveled Lists and Encounter Actors (Lvl vs Enc)[edit | edit source]

There are two basic types of encounter NPCs at your disposal - ENC and LVL. You can find both actor types under the "Actors > Actor" section in the Object Window and then filtering for Enc or Lvl".
Leveled actors (Prefixed "Lvl") contain information telling the game what to spawn based on the players level. For example, LvlBanditMelee2H will spawn a Bandit with a 2-Handed weapon. You don't know if they will be male/female, or use a War Hammer, Battleaxe, or Great Sword. Those details are randomized.
Encounter actors (prefixed "Enc") are non-randomized characters and creatures that typically populate Leveled Lists (EncBandit01Melee1HImperialF01/02/03/etc...). For example, if you need a Skeever you'd just simply place an EncSkeever actor. You always know that this placed reference will spawn a Skeever when you enter the level. This is also the way you'd place something like a EncFox, EncDeer, or EncSabreCat.

Enc Actors with 'Template' in them (ex.EncBandit00Template) and anything that looks like it's part of a long list (ex. EncBandit01Melee1HImperialF) typically shouldn't be placed in your level. These types of Enc actors are used to form Leveled Lists and should instead be placed as such (ex. LvlBanditMelee1H, or LvlBanditMeleeAny).
Let's place our first encounter in Lokir's Tomb. Select a LvlWarlockFire and drag it into the second room. With that placed in your level, save your plugin and test it in-game. You'll notice a Warlock that uses Fire Spells. You may also notice (or not) that the Warlock will simply stand around until detecting an enemy. Let's do something about that.

Try to avoid placing enemies where they will attack the player as soon as he loads in. Bethesda calls this the "Sandwich Rule." It's best to assume that the player's attention will drift at every load screen - and may set the controller down, daydream, or go to get a sandwich. Observing the sandwich rule means that the player determines when to re-engage.
Linked-Refs and Patrols[edit | edit source]
The quickest way to breathe some life into your encounters is through the use of linked references to create patrols. This is a system set up entirely in the Creation Kit to make it easy to set up simple AI behaviors.
Default Master Package and Linked-Refs[edit | edit source]
The Default Master Package is a customized set of procedures that allows most Actors to path to patrol points, follow another actor, or guard a specific location.
One of the most basic things to do with an actor in a dungeon is to put it on a patrol. Like most lvl actors, LvlWarlock uses the Default Master Package, so setting up a patrol is trivial. If you don't already have a CraftingAlchemyWorkbench or CraftingAlchemyWorkbenchTabletop in this room, then go ahead and place one there now, or any other type of furniture you want - it doesn't have to be an Alchemy Table. We're going to set the Warlock up to use the furniture.
- Double-Click the Warlock and click on the Linked Ref tab. (Fig 5.2)
- Double-click the empty white area and a "Choose Reference" dialog box will appear. (Fig 5.3)
- Click the Select Reference in Render Window button then double-click on the Alchemy Table in the Render Window and hit the OK button, and then the OK button in the "Reference Window". A line should appear between your Warlock actor and the Alchemy Table. (Fig 5.4)
- Now just Double-Click on the Alchemy Table, click on the Patrol Data, then check the Patrol Data checkbox you will see you can now input a time in the Idle Time box.
- Put the number of seconds you want the actor to wait at this specific PatrolIdleMarker. Since you are linking the Warlock to the Alchemy Table only, and he needs to stay there indefinitely, you need to give the Alchemy Table an Idle Time of at least 1 second.
- If you don't put a time here the Warlock will simply walk up to the table, interact with it, then back out of it and just stand there. Giving a patrol time here ensures the Warlock will stay at the table in perpetuity since there are no other references in the patrol for now.
-
Link-Refs are ways of letting one reference know about another. This is a "dumb" connection, and carries no data beyond a simple association. This lets us assign whatever meaning we need to that association. In the case of this tutorial, they help the actor know what he can patrol to, because the Default Master Package looks for the association . They're also very powerful when it comes to referring to them in Papyrus Scripts.
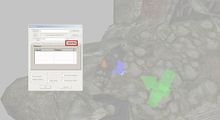
Fig. 5.2:
Linked Ref tab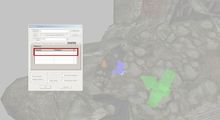
Fig. 5.3:
Double-click in the empty white area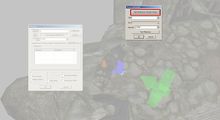
Fig. 5.4:
Choose Reference window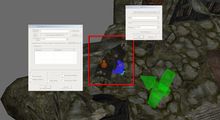
Fig. 5.5:
Select the Alchemy bench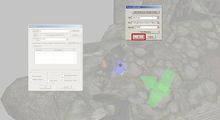
Fig. 5.6:
Select OK in Choose Reference window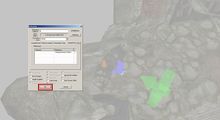
Fig. 5.7:
Select OK


"Ping-Pong" Patrols[edit | edit source]
You may not always want characters to stay in one spot, however. NPC movement through space creates a sense of life and adds variety to how the encounter can initiate. The Default Master Package makes this simple to do with simple "ping-pong" patrols, which direct AI to move between two or more points. Let's do that now.
- Turn your attention to the room with the round grating.
- Place a LvlWarlockFrost Actor somewhere in the room.
- Also place a patrolIdleMarker (Under Miscellaneous > IdleMarker in the Object Window)
- Double-click the Warlock Ref and set the patrolIdleMarker as its linkedRef, just as before. Click OK.
- Double-click the patrolIdleMarker and navigate to the "Patrol Data" tab.
- Check "Patrol Data" and enter an Idle Time of 10.0, or whatever you like.
- Still in the patrolIdleMarker properties, set its linked Ref to the nearby NorThroneShadow furniture.
- OK to close the patrolIdleMarker properties.
- Double-click the NorThroneShadow, and give it a Patrol Data Idle Time of around 10.0 as well.
- Place another patrolIdleMarker and make it a linkedRef of the Throne. Make sure it has an Idle Time as well.
- Your final setup should resemble that in Fig 5.9.
Launch Skyrim and enter the ToggleDetection console command. The actor will walk to each Idle Marker and idles at each of them for the time specified. Notice that when the actor reaches the end of the linkedRef chain, it paths through the chain backwards. This is why we call it a "ping-pong patrol": the actor is bounced back and forth between the ends.
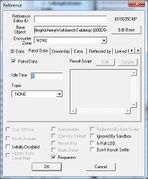
Fig. 5.8:
Type the time here, in seconds, that you want an actor to idle for.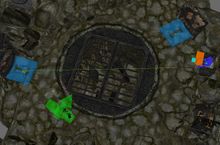
Fig. 5.9: An Actor "Linked-Ref Chained" to three Patrol Points in the 2nd room.


Looping Patrols[edit | edit source]

A Looping Patrol is set up exactly like a ping-pong patrol, with one meaningful extra step: you'll "close the loop" of the patrol chain, meaning the actor will follow that route in order, never reversing direction.
- Direct you attention to the next room. There are sarcophagi here if you're using the example plugin.
- Place a new LvlWarlockNecromancer, as well as a EncSkeleton01Melee1H.
- Place a patrolIdleMarker and give it some Idle Time value, as before.
- Ctrl+D to duplicate the patrolIdleMarker. Note that the new duplicate has the Patrol Data automatically copied.
- Ctrl+D again for a total of three markers in this chamber.
- Link the Necromancer and these points, just as before.
- Link the final patrolIdleMarker in the chain to the first. This is "closing the loop".
- Just for fun: link the Skeleton to the Necromancer; it will try to follow behind.
- Your final arrangement will resemble Fig 5.10. Note the green lines forming a complete loop.
Try running this in-game. Observe the difference: instead of re-tracing steps, the Necromancer should continue in a loop, with the skeleton staying a small distance behind.

PatrolIdleMarker is an Idle Marker which already has a range of subtle animations associated with it. This makes it preferable to other objects, such as an XmarkerHeading, when setting up patrols. There are also other Idle Markers available, such as SearchingTableIdleMarker and WarmHandsStandIdleMarker , which can be used to trigger specific animations which are more deliberate and grounded with the environment. Try swapping some of your patrolIdleMarker objects with these and experiment to get results you're happy with.
Setting Actor Difficulty[edit | edit source]
You may have noticed that all the Leveled Lists you have placed so far are green. This indicates the default Easy difficulty. Using difficulty variation is a good way to provide some variety and pacing to your dungeon. Try setting some now.
- Double-clicking any of your leveled actors and open the Leveled Actor tab.
- Specify whatever difficulty you'd like from the drop-down.
- Click OK to accept changes.
- Note the color change of the lvl marker. (Fig 5.11a-d)
It's a good rule of thumb to set about 50% of your leveled actors to "easy", and not throw too many non-easy actors into any single encounter. It's also generally advised to place only one "very hard" list per dungeon. These, of course, are only guidelines, and may not always be the best course. Test your content mercilessly, get feedback from players, and tune according to that.
-
The relative difficulty of an encounter is based upon the Encounter Zone, player level and the leveled list itself. So, for example, a level one player who enters a dungeon with an encounter zone of twenty may encounter very difficult draugr, even from the easy leveled lists. Try testing your dungeon by setting yourself to different levels before entering.

Fig. 5.11a:
Easy Leveled List
Fig. 5.11b:
Medium Leveled List
Fig. 5.11c:
Hard Leveled List
Fig. 5.11d:
Very Hard Leveled List


| Return to Tutorial Hub | Next Tutorial | ||
| Language: | English • français • 日本語 |
|---|