Object Palettes
Overview
This tutorial explores the Creation Kit's Object Palette (OPAL) system.
You will learn:
- What OPALs are, and when (and when not) to use them.
- How to use OPALs to create collections of objects.
- How quickly preview and place objects with OPALs.
- How to work with the advanced features of the OPAL system.
- Where you can download some sample OPAL collections.
Introduction
Object Palettes (OPALs) are user-created collections of placeable objects. Once you've created an OPAL, you can use it to quickly find, view, and place objects in your levels.
OPALs don't let you do anything new, or anything you couldn't accomplish in some other way. But they are an alternative to the Duplicate-And-Swap method of placing clutter described in the Clutter Tutorial.
Especially early on, you may find that OPALs are faster and easier to use simply because they have a good collection of 'curated' objects that all make sense together, objects you might not have discovered on your own. As you become more familiar with the Creation Kit and its naming conventions, though, you may find it faster to Duplicate-And-Swap, or to search for items in the Object Window. Or not. It's really a matter of personal preference-- some people use OPALs extensively, and some people never use them at all.
Although any kind of placeable object can be added to an OPAL, in our experience, OPALs tend to work best for small sets of clutter that will be used repeatedly, like furniture, rubble, and shelf junk. They don't work well for large collections of pieces, or for tasks where you may use any given piece only a few times (such as your initial level layout).
Working with OPALs
To bring up the Object Palette window, go to World > Object Palette Editing.
The Object Palette window generally remembers the last OPAL you had open, but since this is your first, it's empty. Let's add some items to it:
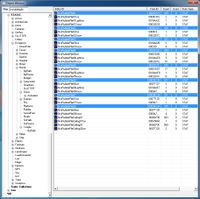
- In the Object Window, filter for 'NorRubblePile', then select the 'All' category (if it isn't selected already). You should see about three dozen objects.
- CTRL-Click to select 'NorRubblePile01', 'NorRubblePile02', ..., up to 'NorRubblePile08'.
- Left-Click and hold on one of the selected items, and drag them to the Palette Object list on the left side of the Object Palette window. This should add the main eight NorRubblePile objects to your palette.
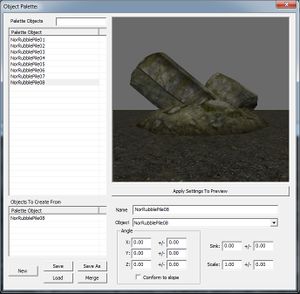
Now that we have some objects in the OPAL, let's take a look at the window a little more closely.
- The Palette Objects Filter allows you to filter for a specific subset of objects in the palette. For example, if you enter '08', only NorRubblePile08 will be shown.
- The Palette Objects list shows all of the objects in the palette, in alphabetical order.
- To add items to this list, drag them in from the Object Window.
- To remove items, click on an item in this list and press the Delete key.
- If you select any of these objects, a preview of the object automatically appears in the window at right. This window can be manipulated just like the Preview Window, allowing you to pan, rotate, and zoom around the object for a better look.
- The Objects to Create From list shows which objects the Palette will place in the world when you use it. This is almost always just a single object (the one you have selected), though if you select multiple objects at the same time, they'll all appear here, and the palette will pick from them at random.
- Below that are the file options. You can create a New (empty) Object Palette, Save or Save As the current Palette, Load another Palette, or Merge this Palette with another.
Let's go ahead and use our OPAL. Select a piece of rubble from the list. Then, in the Render Window, hold CTRL+ALT and Left-Click. The rubble appears where you clicked, and starts selected, allowing you to rotate or reposition it as you like. That's all there is to it.
Advanced OPAL Settings
The vast majority of the time, that's really all you need to know about OPALs-- it's just that simple. But occasionally, you may want to experiment with some of the additional features on the right side of the OPAL window. Take a minute to try them out:
- The Name field allows you to rename the object in this Palette only. This can be helpful if you have trouble remembering the name of an object, or want it to sort differently in the OPAL's alphabetical list (save and reload the OPAL to get it to resort).
- Be careful not to abuse this, though-- mastering the Creation Kit's naming conventions is a critical tool in learning your way around.
- The Object field lets you change what object the palette entry is pointing to.
- The Angle allows you to specify the initial X, Y, or Z rotation the object will have when you place it.
- The first column allows you to specify a specific rotation.
- For example, all books are lying on their side by default. If you plan to place a large number of books standing on end, giving them an Angle X:90 will allow them to start standing up, which may make this faster.
- The second column allows you to specify a restricted random rotation (within +/- degrees).
- When placing minor items like spoons or cups, this may give you some quick variety.
- The final checkbox forces the item to conform (lie flat with) the slope of the point where you place it.
- When placing ground cover like rugs, pelts, or hay, this does a reasonable job of getting them close to the desired slope-- though some adjustment may still be required.
- The first column allows you to specify a specific rotation.
- The Sink field is a Z-offset: it causes the item to be placed higher or lower than the point the Creation Kit calculates when you click on a point.
- The Scale field automatically scales the item by a fixed or random amount. This can be useful for things like hay or rugs, but shouldn't be used on furniture or items.
- The Apply Settings to Preview button will allow you to quickly see what your Angle, Sink, or Scale changes will mean for the object.
Sample OPALs
It's worth taking the time to explore the Object Window and build your own OPAL collections- it's a great way to familiarize yourself with the huge variety of objects you can find in the game. But a few sample collections are also available to get you started. Just download any or all of the files below and unzip them to your game's \OPAL\ directory.
- File:LandscapeOPALs.zip - OPALs for exterior landscaping.
- File:ExteriorOPALs.zip - OPALs for exterior spaces, like camps, forts, and ruins.
- File:InteriorOPALs.zip - OPALs for interior spaces, like mines, caves, forts, and ruins.
- File:MiscOPALs.zip - OPALs for specific uses or needs, like Bones, Idle Markers, and Dummy Objects.
| Language: | English • polski |
|---|

