Tutoriel de Bethesda : Interface du Creation Kit/fr
Tutoriel de Bethesda : Interface du Creation Kit
| Tutoriel de Bethesda : Interface du Creation Kit/fr | |
|---|---|
| Série : Tutoriels de base de Bethesda, page 2 | |
| Sommaire du tutoriel | |
| Tutoriel suivant | |
| Tutoriel vidéo compagnon | |
Présentation
Ce chapitre de la série de tutoriels officiels guidera les nouveaux utilisateurs vers leur première expérience avec le kit de création, et donnera aux moddeurs expérimentés un rappel sur l'interface.
Les utilisateurs apprendront:
- Les composants de base de l'interface du Kit de création
- Comment naviguer dans la fenêtre de rendu 3D
Que fait ce bouton ?
Une fois que vous avez lancé l'éditeur, il peut être difficile de prime abord de comprendre ce qui est en face de vous. Décomposons chaque élément de l'éditeur et commençons à donner un sens à tout cela.
Vous pourriez être tenté de passer ce chapitre et d'apprendre en explorant le kit de création, en particulier si vous êtes familier avec les outils précédents de Bethesda Game Studios. Ce n'est pas grave, mais n'oubliez pas de revenir consulter cette page si vous êtes bloqué.
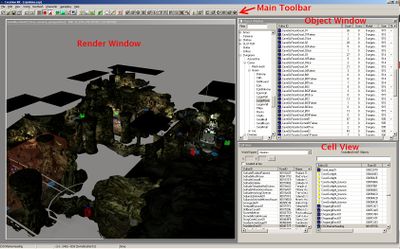
Barre d'outils principale
La barre d'outils principale est l'endroit où la majorité des fonctions du kit de création peuvent être lancées, soit par les menus ou soit par les différents boutons. Elles sont trop nombreuses et complexes pour toutes les détailler ici, et leurs diverses caractéristiques seront expliquées quand cela sera nécessaire. Ceux qui sont intéressés peuvent lire les descriptions détaillées des différents menus et des boutons dans l'article barre d'outils principale.
Avant de commencer, vous devez d'abord charger les données. Depuis le menu 'File', choisissez 'Data...', puis double cliquez sur 'skyrim.esm'. Lorsque vous faites cela, la case à cocher à côté du fichier sera cochée, ce qui indique qu'il sera chargé.
Fenêtre de Rendu
La fenêtre de rendu (Render Window) est le moyen avec lequel nous interagirons avec le jeu durant ce tutoriel.Tout de suite elle est vide, mais une fois que nous aurons chargés une "Cell", il sera visible dans la fenêtre de rendu et modifiable dans celle-ci.
La "Cell View"
Il y a cinq composants majeurs à connaitre dans la "Cell View".
- World Space Cette liste déroulante détermine quelles cellules apparaissent dans la liste au-dessous. Les intérieurs sont considérés comme un world space spécial. Laissons de côté cet aspect pour le moment vu que nous allons travailler d'abord sur un intérieur.
- X/Y En travaillant avec des extérieurs, vous pouvez les charger manuellement en entrant des coordonnées. Ceci ne marche que pour les espaces extérieurs et sera grisé pendant l'utilisation d'espaces intérieurs sauf si un espace extérieur a été choisi.
- "Cell list" C'est une liste des "cellules" qui composent l'espace que vous avez chargé. Une seule cellule est considérée comme chargée chaque fois, bien que de multiples cellules extérieures soient visibles dans quelques cas.
- Liste des références Cette liste, qui est probablement vide pour vous en ce moment, se remplira avec toutes les références existantes dans la cellule chargée. Vous pouvez avoir accès aux références par cette liste, ou en interagissant directement avec eux dans la fenêtre de rendu.
- Filtre En entrant du texte dans cette case, vous pourrez afficher dans la liste des références juste les objets qui contiennent ce mot. Par exemple, je veux seulement les objets associés à la quête DA10 et, en entrant DA10, la liste me montrera seulement ces objets. Où, autre exemple, j'ai trois objets dans ma liste : "CaveGHall01", "CaveGFloor", et "TrollFrost", en entrant "Cave" dans le filtre, la référence "TrollFrost" n’apparaîtra plus. Cependant, elle restera visible dans la fenêtre de rendu.
Object Window
L'Object Window nous permet de parcourir les divers objets de base que nous pouvons utiliser pour créer le jeu. Il existe plusieurs catégories et types d'objets auxquels nous nous référerons tout au long de ce tutoriel.
- Filter (filtre) Tout comme la Cell View, l'Object Window a un champ de filtrage que nous pouvons utiliser pour affiner ce qui apparaît dans la liste en dessous.
- Liste des catégories Au-dessous du filtre apparaissent les nombreuses catégories d'objets de base. Les utilisateurs avancés peuvent souhaiter sélectionner la catégorie "*All" au bas de la liste, tout montrer, et ensuite utiliser le filtre de nom pour accéder plus rapidement aux éléments, mais pour ce tutoriel, nous allons spécifier manuellement l'emplacement des objets nécessaires.
- Liste des objets de base Sur la droite de la fenêtre sont les différents objets de base que vous pouvez consulter, modifier et, généralement, placer dans la fenêtre de rendu (Render Window).
Contrôle de la caméra
Quels que soient vos plans, presque tout ce que vous faites dans le Kit de création nécessitera d'utiliser Render Window pour regarder et manipuler les objets. Si vous n'avez jamais travaillé en 3D, cela sera peut-être un peu laborieux pour vous habituer à contrôler la caméra.
Tout d'abord, nous allons charger une cellule existante pour avoir quelque chose à regarder. Recherchez et double-cliquez sur la cellule intérieure "AnisesCabin01" dans la Cell View. Cela va charger la cellule, l'amenant à apparaître dans votre fenêtre de rendu.
NOTE : Si rien ne s'affiche, mais que votre colonne de droite est remplie avec des objets, essayez un double-clic sur un de ces objets. Cela ne sélectionne pas seulement l'objet, mais va forcer la caméra à se concentrer sur l'objet. Il s'agit d'un moyen pratique de vous réorienter si vous êtes "perdus".
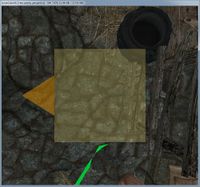
Votre vue initiale devrait être centrée sur un marqueur jaune, comme dans la Figure 2. (Si ce n'est pas le cas, appuyez sur "M" pour rendre les marqueurs visibles. Dans le cas contraire, votre camera doit être simplement orientée ailleurs. Ce n'est pas grave: sélectionnez n'importe quel objet pour le retrouver)
Faites un simple click gauche pour sélectionner un objet. Vous devriez voir un contour fin composé de lignes vertes, rouges et bleues. Ceci est le "cadre d'encombrement", pour le moment nous retiendrons simplement que cela nous montre ce qui est sélectionné. Essayez de faire tourner la molette de la souris lentement en avant et en arrière. Notez que cela fait zoomer la camera.
Next, try panning the camera. This is accomplished by holding down the middle mouse button or spacebar and moving the mouse in any direction.
By now it's possible you've lost sight of your selected object. Let's re-focus the camera. There are a few ways to do this:
- Press Shift+F. This focuses the camera on the currently selected object(s). It does not affect camera angle, and resets the camera pivot if no objects are selected.
- Press "T". This forces a top-down view. If anything is selected, it will zoom the camera to the extents of that selection. With nothing selected, it simply rotates the camera down (which can sometimes disorient you if there's nothing to look at directly below the camera!)
- Press "Y". This cycles through a few pre-set camera angles, and otherwise works exactly like "T". Easy to remember because they're right next to each other. Convenient!
- Use the mouse wheel to zoom the camera in or out.
Now we'll try orbiting the camera. With any object(s) selected hold "Shift" while moving the mouse to rotate the camera around the object in any direction. The selection will always remain in the center of your view. With nothing selected, the camera will rotate around itself. This can be useful for advanced users, but will probably be disorienting to beginners, and is not usually needed.
It's very important to become comfortable using these controls, so spend some time loading up various cells and looking around them. You'll probably be clumsy at first, but before long it will become second nature.
Concealing Objects
If you zoom out so that you can see the whole area of AnisesCabin01 (a single room in this case), and click on the yellow marker you originally selected... you may find that you are unable to select it. Instead, you select a large pink box that surrounds the room, which in the Cell View window, appears to be called "defaultSetStageTRIG".
Stuff getting in the way is a common and basic problem, but one that has an easy and powerful solution. With defaultSetStageTRIG, press the number 1, twice. The defaultSetStageTRIG will disappear. Press 1 again, and it will reappear.
What is happening here is that the first time you press "1", the selected object (or objects) are made so they ignore the mouse, and you can click through them. If they aren't already transparent, they are also made transparent (doesn't make a noticeable difference to defaultSetStageTRIG, which is already transparent), and the name of the item in the Cell View is changed from black to light blue, to show that it has been hidden (probably also not visible to you, since the item's selected, so it's not black!)
The second time you press 1, the item is hidden completely, rather than just "ghosted".
The third time, it is returned to normal: fully visible, clickable, and with a black name in the Cell View once again.
So, press "1" again until defaultSetStageTRIG disappears, then try selecting, hiding and ghosting other items, such as walls and furniture, until you are happy with the process.
If you have unselected an item while it is ghosted or invisible, you can no longer select it in the Render Window. Instead, select it in the Cell View (it will be one of the blue-named objects), click the titlebar of the Render window, and press 1 until your object cycles back to full visibility.
If you feel you have completely messed up which items are ghosted and which are not, you can press "F5" to return all items to their normal visible, clickable state.
Manipulating Objects
Now that we have an idea how to view objects, let's look at how to move them around a bit.
NOTE: While you're getting used to these controls, it's a good idea to work in a throwaway plugin to avoid saving accidental modifications to objects that may affect other mods or the base game. You may want to use the testquest.esp file created at the beginning of this tutorial.
Select any object(s) in the Render Window. You can move, or "translate" the object simply by holding the left-mouse button down and dragging the object around.
You may notice that the object jumps around rather than moving smoothly - this is because grid snapping is on. You can toggle this with the "Q" hotkey or the ![]() button in the Main Toolbar. We'll talk more about grid snapping in the layout chapter.
button in the Main Toolbar. We'll talk more about grid snapping in the layout chapter.
Also note that you're only moving the object on the horizontal plane, or the "X/Y axis" of the world. You can move the object up/down by holding "Z" while dragging it. Likewise, you can hold "X" to constrain movement to X axis, or "C" to constrain movement to the Y axis. It's "C" (and not Y) because "Z" "X" and "C" are right next to each other. Convenient!
Rotation is accomplished by simply selecting an object and holding the right mouse button while moving the mouse. Rotation is affected by angle snapping (Snap to Angle button ![]() or CTRL-Q in Render Window), and also can be axis constrained by holding X, Y or Z while rotating. You should also note that objects rotate around their pivot point, indicated by a small, yellow "+". Being aware of pivot points will become important for users who expect to be working with the Render Window frequently.
or CTRL-Q in Render Window), and also can be axis constrained by holding X, Y or Z while rotating. You should also note that objects rotate around their pivot point, indicated by a small, yellow "+". Being aware of pivot points will become important for users who expect to be working with the Render Window frequently.
Objects can be scaled as well. Scale by holding "S" while dragging with the left mouse button. Heavily scaled art will look out of place, however, so it's best to avoid using this tool unless it's absolutely required.
Undoing your changes
If you do something bad by accident, never fear! Just about any action you perform in the render window can be undone by clicking the "Undo" button ![]() on the Main Toolbar, or hitting "Ctrl-Z". Holding down Ctrl-Z will rapidly undo many actions. You can test it, by undoing everything you have done up to this point.
on the Main Toolbar, or hitting "Ctrl-Z". Holding down Ctrl-Z will rapidly undo many actions. You can test it, by undoing everything you have done up to this point.
If you undo too many steps, the Redo button ![]() is your friend, at least until you perform another action in the render window: at that point, any undone actions that you have not redone are lost.
is your friend, at least until you perform another action in the render window: at that point, any undone actions that you have not redone are lost.
Gizmos
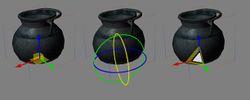
The Creation Kit offers a set of "gizmos", or visual helpers for movement, rotation and scaling. Generally speaking, the gizmos offer a visual aid for moving objects around. "Gizmo handles" are individual parts of the gizmo that can be clicked on, activating that part of the gizmo.
For Example, clicking on the green arrow in the Movement Gizmo will constrain movement to the Y axis.
"E" Enables the Movement gizmo
"W" Enables the Rotation gizmo
"2" Enables the Scaling gizmo
There are a few rules governing gizmos:
- Only one gizmo can be active at a time.
- Normal object manipulation is unavailable while a gizmo is active.
- "G" can be used to toggle global/local movement and rotation.
- Global/Local translation carries over to non-gizmo rotation (but not movement).
Onward!
Once you're comfortable moving around in the editor, you're ready to start making content!
If you're interested in building spaces, try moving on to the level design tutorial series. (NOTE: The "next tutorial" button will take you here)
Or, if you're more interested in quests and characters, you can start with the quest design fundamentals tutorial series.
| Sommaire du tutoriel | Tutoriel suivant | ||
| Langues : | English • Deutsch • français • 日本語 • 한국어 • polski • русский |
|---|


