Bethesda Tutorial Creation Kit Interface
| Bethesda Tutorial Creation Kit Interface | |
|---|---|
| Basics Series, Chapter 2 | |
| Return to Tutorial Hub | |
| Next Tutorial | |
| Companion Video Tutorial | |
Overview[edit | edit source]
This chapter of the official tutorial series will guide new users through their first experience with the Creation Kit, and give experienced modders a refresher on the interface.
Users can expect to learn:
- The basic components of the Creation Kit interface
- How to navigate in the 3D Render Window
What's this button do?[edit | edit source]
Once you have the editor up and running, it can be overwhelming at first to understand what's in front of you. Let's break down each element of the editor and begin to make sense of it all.
You may be tempted to jump ahead and learn your way around by exploring, especially if you're familiar with any previous Bethesda Game Studios tools. That's okay, but remember to come back and check this page if you get stuck.
Main Toolbar[edit | edit source]
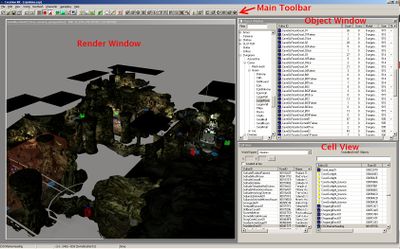
The Main Toolbar is where the majority of Creation Kit features can be launched from, either via menus or the various buttons. They are too numerous and complex to get into here, and various features will be explained as they are needed. Those interested can read detailed descriptions of the various menus and buttons in the Main Toolbar article.
Before you can start, you first have to load the data. From the 'File' menu, choose 'Data...', then double click 'skyrim.esm'. When you do this, the checkbox next to it will become checked, which indicates that it will be loaded.
Render Window[edit | edit source]
The Render Window is the main way we'll be interfacing with the game for this tutorial. Right now it is an empty pane, but once we load a cell, this is where the 3D visuals of the space will appear and can be worked with.
Cell View[edit | edit source]
The cell view has five major components to be aware of.
- World Space This drop-down dictates which cells appear in the list below it. Interiors are considered a special world space. Leave this setting alone for now, as we will be working with an interior at first.
- X/Y When working with an exterior, you can manually load a cell via coordinates. This is irrelevant when working with interiors and will be grayed out except when an exterior worldspace has been chosen.
- Cell List These are the cells that make up the world space you've specified. Only one cell is considered "loaded" at each time, although multiple exterior cells may be visibly rendered in some cases.
- Reference List This list, which is probably empty for you right now, will populate with all the references that exist within the loaded cell. You can access references either through this list, or by physically interacting with them via the Render Window.
- Filter Box Entering text in this box will cause the Reference List to only display items containing that string. For example, I may only care about items associated with the DA10 quest, and entering DA10 will only show those items. Or, as another example, if I have three objects in my list: "CaveGHall01", "CaveGFloor", and "TrollFrost", entering "Cave" in the filter box would cause the "TrollFrost" reference to no longer appear. It would, however, still be visible in the Render Window.
Object Window[edit | edit source]
The Object Window allows us to browse the various base objects that we can work with to create the game. There are many categories and types of objects, and we'll refer to these as needed throughout the tutorial.
- Filter Much like the Cell View, the Object Window has a filtering field we can use to narrow down what appears in the list below.
- Category List Below the filter are the many categories of base objects. Advanced users may wish to select the "*All" category at the bottom of the list, to show everything, and then use the name filter to more quickly access items, but for this tutorial we'll manually specify the locations of objects needed.
- Based Object List On the right of the window are the various base objects you can browse, edit and (usually) place in the Render Window.
[edit | edit source]
Controlling the Camera[edit | edit source]
Whatever your plans are, almost anything you do in the Creation Kit will require you to use the Render Window to look at and manipulate objects. If you've never worked in 3D, it can be a bit overwhelming to get used to controlling the camera.
First, let's load up an existing cell so we have something to look at. Locate and double-click the Interior cell "AnisesCabin01" in the Cell View. This will load the cell, causing it to appear in your Render Window.
NOTE: If nothing shows up, but your right-hand column is populated with objects, try double-clicking on one of those objects. This not only selects the object, but will force the camera to focus on the object. This is a handy way to re-orient yourself if you become "lost".
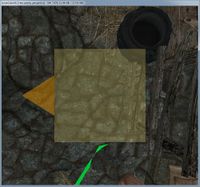
Your initial view should be centered on a yellow marker, as seen in Figure 2. (If not, try pressing "M" to make sure markers are viewable. Otherwise, your camera may just be focused elsewhere. That's fine: just select any object and follow along)
Single-click this to select it. You should notice a thin outline of green, red and blue lines. This is the "bounding box", and for now we just care that it lets us know what's selected. Try scrolling your mouse wheel slowly back and forth. Notice that this zooms the camera.
Next, try panning the camera. This is accomplished by holding down the middle mouse button or spacebar and moving the mouse in any direction.
By now it's possible you've lost sight of your selected object. Let's re-focus the camera. There are a few ways to do this:
- Press Shift+F. This focuses the camera on the currently selected object(s). It does not affect camera angle, and resets the camera pivot if no objects are selected.
- Press "T". This forces a top-down view. If anything is selected, it will zoom the camera to the extents of that selection. With nothing selected, it simply rotates the camera down (which can sometimes disorient you if there's nothing to look at directly below the camera!)
- Press "Y". This cycles through a few pre-set camera angles, and otherwise works exactly like "T". Easy to remember because they're right next to each other (assuming a QWERTY keyboard). Convenient!
- Use the mouse wheel to zoom the camera in or out.
Now we'll try orbiting the camera. With any object(s) selected hold "Shift" while moving the mouse to rotate the camera around the object in any direction. The selection will always remain in the center of your view. With nothing selected, the camera will rotate around itself. This can be useful for advanced users, but will probably be disorienting to beginners, and is not usually needed.
It's very important to become comfortable using these controls, so spend some time loading up various cells and looking around them. You'll probably be clumsy at first, but before long it will become second nature.
Concealing Objects[edit | edit source]
If you zoom out so that you can see the whole area of AnisesCabin01 (a single room in this case), and click on the yellow marker you originally selected... you may find that you are unable to select it. Instead, you select a large pink box that surrounds the room, which in the Cell View window, appears to be called "defaultSetStageTRIG".
Stuff getting in the way is a common and basic problem, but one that has an easy and powerful solution. With defaultSetStageTRIG, press the number 1, twice. The defaultSetStageTRIG will disappear. Press 1 again, and it will reappear.
What is happening here is that the first time you press "1", the selected object (or objects) are made so they ignore the mouse, and you can click through them. If they aren't already transparent, they are also made transparent (doesn't make a noticeable difference to defaultSetStageTRIG, which is already transparent), and the name of the item in the Cell View is changed from black to light blue, to show that it has been hidden (probably also not visible to you, since the item's selected, so it's not black!)
The second time you press 1, the item is hidden completely, rather than just "ghosted".
The third time, it is returned to normal: fully visible, clickable, and with a black name in the Cell View once again.
So, press "1" again until defaultSetStageTRIG disappears, then try selecting, hiding and ghosting other items, such as walls and furniture, until you are happy with the process.
If you have unselected an item while it is ghosted or invisible, you can no longer select it in the Render Window. Instead, select it in the Cell View (it will be one of the blue-named objects), click the titlebar of the Render window, and press 1 until your object cycles back to full visibility.
If you feel you have completely messed up which items are ghosted and which are not, you can press "F5" to return all items to their normal visible, clickable state.
Manipulating Objects[edit | edit source]
Now that we have an idea how to view objects, let's look at how to move them around a bit.
NOTE: While you're getting used to these controls, it's a good idea to work in a throwaway plugin to avoid saving accidental modifications to objects that may affect other mods or the base game. You may want to use the testquest.esp file created at the beginning of this tutorial.
Select any object(s) in the Render Window. You can move, or "translate" the object simply by holding the left-mouse button down and dragging the object around.
You may notice that the object jumps around rather than moving smoothly - this is because grid snapping is on. You can toggle this with the "Q" hotkey or the ![]() button in the Main Toolbar. We'll talk more about grid snapping in the layout chapter.
button in the Main Toolbar. We'll talk more about grid snapping in the layout chapter.
Also note that you're only moving the object on the horizontal plane, or the "X/Y axis" of the world. You can move the object up/down by holding "Z" while dragging it. Likewise, you can hold "X" to constrain movement to X axis, or "C" to constrain movement to the Y axis. It's "C" (and not Y) because "Z" "X" and "C" are right next to each other. Convenient!
Rotation is accomplished by simply selecting an object and holding the right mouse button while moving the mouse. Rotation is affected by angle snapping (Snap to Angle button ![]() or CTRL-Q in Render Window), and also can be axis constrained by holding X, Y or C while rotating. You should also note that objects rotate around their pivot point, indicated by a small, yellow "+". Being aware of pivot points will become important for users who expect to be working with the Render Window frequently.
or CTRL-Q in Render Window), and also can be axis constrained by holding X, Y or C while rotating. You should also note that objects rotate around their pivot point, indicated by a small, yellow "+". Being aware of pivot points will become important for users who expect to be working with the Render Window frequently.
Objects can be scaled as well. Scale by holding "S" while dragging with the left mouse button. Heavily scaled art will look out of place, however, so it's best to avoid using this tool unless it's absolutely required.
Undoing your changes[edit | edit source]
If you do something bad by accident, never fear! Just about any action you perform in the render window can be undone by clicking the "Undo" button ![]() on the Main Toolbar, or hitting "Ctrl-Z". Holding down Ctrl-Z will rapidly undo many actions. You can test it, by undoing everything you have done up to this point.
on the Main Toolbar, or hitting "Ctrl-Z". Holding down Ctrl-Z will rapidly undo many actions. You can test it, by undoing everything you have done up to this point.
If you undo too many steps, the Redo button ![]() is your friend, at least until you perform another action in the render window: at that point, any undone actions that you have not redone are lost.
is your friend, at least until you perform another action in the render window: at that point, any undone actions that you have not redone are lost.
Gizmos[edit | edit source]
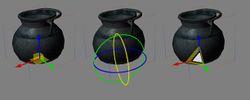
The Creation Kit offers a set of "gizmos", or visual helpers for movement, rotation and scaling. Generally speaking, the gizmos offer a visual aid for moving objects around. "Gizmo handles" are individual parts of the gizmo that can be clicked on, activating that part of the gizmo.
For Example, clicking on the green arrow in the Movement Gizmo will constrain movement to the Y axis.
"E" Enables the Movement gizmo
"W" Enables the Rotation gizmo
"2" Enables the Scaling gizmo
There are a few rules governing gizmos:
- Only one gizmo can be active at a time.
- Normal object manipulation is unavailable while a gizmo is active.
- "G" can be used to toggle global/local movement and rotation.
- Global/Local translation carries over to non-gizmo rotation (but not movement).
Onward![edit | edit source]
Once you're comfortable moving around in the editor, you're ready to start making content!
If you're interested in building spaces, try moving on to the level design tutorial series. (NOTE: The "next tutorial" button will take you here)
Or, if you're more interested in quests and characters, you can start with the quest design fundamentals tutorial series.
| Return to Tutorial Hub | Next Tutorial | ||
| Language: | English • Deutsch • français • 日本語 • 한국어 • polski • русский |
|---|


