Bethesda Tutorial Layout Part 1
| Bethesda Tutorial Layout Part 1 | |
|---|---|
| Level Design Series, Chapter 1 | |
| Return to Tutorial Hub | |
| Next Tutorial | |
| Example Plugins: | |
| Initial | Completed |
| Companion Video Tutorial | |
Overview[edit | edit source]
This chapter will guide you through the basics of creating a layout for an interior space using the "Ancient Nord Ruin" art.
The reader will learn:
- What "kits" are and how to use them
- How to find kit pieces in the Object Window
- Kit piece naming conventions
- How to place and fit kit pieces together
- How to test a custom dungeon in game
Kits[edit | edit source]
The majority of spaces in Skyrim are created using "kits". These kits are composed of pieces of environment art designed to be used together to create a wide variety of spaces, and are instrumental to our ability to create the large number of areas in the game with the flexibility to keep things fresh and experiment with gameplay, while minimizing the amount of custom art that needs to be created.
One heavily used kit in Skyrim is the "Ancient Nord Ruin" kit. Because most players will be very familiar with the kit, we'll be using it for the first phase of our layout in this tutorial. Some other examples of the kits available are the Cave Kit and the Imperial Fort Kit.
Finding Kit Pieces in the Object Window[edit | edit source]
To make the standard kits available, first click on the load button ![]() on the toolbar at the top of the creation kit window, double-click the checkbox in front of "Skyrim.esm" to make sure it is selected, and click OK. Answer "yes to all" for any errors that pop up during this process.
on the toolbar at the top of the creation kit window, double-click the checkbox in front of "Skyrim.esm" to make sure it is selected, and click OK. Answer "yes to all" for any errors that pop up during this process.
To view categories of kits in the object window, expand the ‘World Objects’ category on the left side of the Object Window. From there, expand the "STATIC > Dungeons" categories. Several kit types are available. For the purposes of this tutorial we will be using the "Nordic" category. You can browse through this category to see the different sub kits and pieces that are available for use in this kit. For now, choose the "SmRooms" sub-kit.
You can use the Preview Window to preview objects by right clicking an object in the object window and selecting "preview". A window will pop up showing the object. This window automatically updates to show whatever object you select in the Object Window, so it can be handy to keep up for browsing the art. Unfortunately, the camera controls for the Preview Window are a markedly different and simplified subset of those in the Render Window, and these differences can take some getting used to.

Kits are very robust, and the large number of pieces at your disposal can be overwhelming at first. Stick with it! Just knowing your way around the kit is a huge part of being able to effectively work with it, and this will take some time and experimentation on your part. Give yourself a generous amount of time for this before moving on. Try not to get frustrated at slow progress right now!
Kit Naming Conventions[edit | edit source]

Let's examine the name of a piece of this sub-kit: NorRmSmWallSideExSm01. The name is a sort of code - it may not make much sense at first, but once you understand the naming convention it tells you everything about the piece at a glance.
Let's break down this name and examine the meaning of each component.
| Nor | Short for "Nord" - this lets us know it's part of the Nord Ruins kit |
| Rm | Stands for "room", the sub-kit this piece is a member of. For example, a piece beginning with NorHall would be part of the Nord Hall sub-kit. |
| Sm | This stands for "small". The Nordic Room kit uses "Sm" for small rooms and "Bg" for big rooms. |
| Wall | Fairly self-explanatory: this is a wall. Pieces in this kit are wall, mid, or cor (for corner) pieces. |
| Cor | Corner pieces. Designated as CorIn (inside corner) or CorOut (Outside corner.) |
| Side | Pieces in the Nordic Small room kit fit together as either "Front" or "Side" More on this later. |
| Ex | Denotes an exit/doorway piece. This will snap nicely with doors and matching "Ex" doorways within the same kit. |
| Sm | Denotes the size of the exit/doorway piece. The Nordic Room kit uses "Sm" for small exits and "Bg" for big exits. Only matching sizes will fit together. |
| 01 | The number suffix usually means that a piece has multiple variations. The number increments to identify each variation the piece has. |
You are able to search for the pieces you need by typing any of these parts into the Object Window filter. For example, if you want to view all of the Nordic Small Room pieces, type "NorRmSm" into the filter. The search will turn up results based on the category selected on the left side of the object window.

Once you've learned the naming convention, you can use the asterisk "(*)" to serve as a wildcard when searching for pieces in the Object Window. For example, if you are searching for all possible exits from a Nordic Small Room, just enter "NorRmSm*Ex" into the Object Window Filter. Each possible exit piece for the Nordic Small Room kit will appear. More about wildcards at Wikipedia
Building a Room[edit | edit source]
You are now equipped with all the information you need to create an actual, playable space. We'll go slowly through the first handful of steps. Once you've learned the fundamentals, you'll be able to create a full layout using the Nordic Ruins kit at your own pace.
Step 1: Creating A Cell[edit | edit source]
Before we can do anything else, we need to create a space to work in. You do this by clicking on World > Cells, then in the Cell Info window you right click any cell and select New and type in the Cell EditorID you want for your cell. We'll call this dungeon LokirsTomb. Click Ok to close the Cell Info Window. Now we need to find LokirsTomb in the Cell View window. You can either scroll down till you find it, or you can check the box Show only active (*) cells (you'll then only see edited cells) or check the box Loaded at top (edited cells are at the top in the Cell View window).
Now that you have your own interior cell to work with, be sure to select the LokirsTomb cell.
Right click on the LokirsTomb Cell and pick "View" to assign it to the render window.

It's important to be 100% sure of what cell you have loaded before doing any editing. There are two places to check this: the title bar of the Render Window, and the area above the filter box in the Cell View window both show the name of the currently-loaded cell
Step 2: Placing Your First Piece[edit | edit source]
Let's get started by placing our first piece. Take a look at your Object Window and expand: "World Objects > STATIC > Dungeons > Nordic" You'll notice several sub-kits here, but for now we're just concerned with the Small Room, or "SmRooms" sub-kit. Expand that sub-kit now, and the list on the right-hand side of your Object Window will populate with a number of pieces beginning with "NorRmSm".
Now that we have the sub-kit loaded and ready to go, select "NorRmSmWallSide01" and place it into your cell by dragging and releasing it over the Render Window. You may or may not see the object appear. In either case, right-click on the newly-created reference ID in your Cell View Window. Choose "Edit". As seen in Fig 2, change the XYZ Position coordinates to 0,0,0, and click OK.
Double-click the ref ID in the Cell View to manually focus the Render Window camera on it, and you should see a piece of floor floating in space. Double-clicking the object also made this object the current selection, so you can use your camera controls to get a good look at it.
Working on the Grid[edit | edit source]
Before going any further, it's important to understand "the Grid", and "Snapping" to it.
When we work in the Render Window, we are actually within an invisible, three-dimensional Cartesian Grid. The center of this grid, at XYZ coordinates (0,0,0), is referred to as the "Origin" - which is where we manually placed NorRmSmWallSide01 only moments ago. See Fig. 2
You don't always need to be aware of the grid. When placing an enemy, rotating a treasure chest, or adjusting the position of a light, for example, precision isn't important. The Grid is critical when working with kits, however. Kit pieces are designed to "snap" to each other precisely, and the Grid is the only way to get this precision. "Eyeballing" kit pieces will always leave gaps and seams.
Everything in the Creation Kit is measured in "Units". These units don't correspond to any real-world units of measurement, but Fig. 3 should give you an idea of how they scale against our kit and some characters.
The Nordic Ruin works well on a 128-unit grid. To set this up, either right-click anywhere in the Render Window and choose "Render Window Properties", or click this button in the Main Toolbar: ![]() . This will cause the dialog in Fig. 4 to appear. Choose the "Movement Tab" if it is not already visible. There are several options in here, but for the moment we just want to make sure that "Snap To Grid" is set to 128, and "Snap To Angle" is 45. Click Apply to save your settings and dismiss the dialog.
. This will cause the dialog in Fig. 4 to appear. Choose the "Movement Tab" if it is not already visible. There are several options in here, but for the moment we just want to make sure that "Snap To Grid" is set to 128, and "Snap To Angle" is 45. Click Apply to save your settings and dismiss the dialog.
Returning to the Render Window, make sure that snap-to-grid is toggled on. This is controlled with the "Q" hotkey or this button: ![]() . Likewise, snap-to-angle should be enabled. This is toggled with "Ctrl+Q" or
. Likewise, snap-to-angle should be enabled. This is toggled with "Ctrl+Q" or ![]() .
.
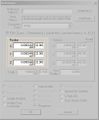
Fig. 2:
Manually placing our first piece at the origin.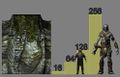
Fig. 3:
Some reference markings for unit scale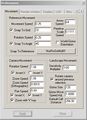
Fig. 4:
Preferences: Movement Tab


Step 3: Fitting the Pieces Together[edit | edit source]
Select your NorRmSmWallSide01 piece we placed before. Use "ctrl+D" to create a duplicate piece. This will place a new NorRmSmWallSide01 reference directly on top of the pre-existing one. Note that the duplicated object is automatically selected for you.
-
Remember that you have to "click in" to the render window before performing operations like duplicate. Also, if objects inside the render window are not being selected, type CTRL+P or click the  Enter Portal Mode button in the main toolbar.
Click and drag on the object inside the Render Window to move the newly-created wall piece. With grid-snapping turned on, it will lock into place relatively easily.
Two walls is hardly a room; we need corners! Return your attention to the Object Window and search for "NorRmSmCorIn01", then drag it into the render window. Rotate the piece into the correct orientation to line up with one of your walls and drag it into place. See Fig. 5. Remember to have your angle-snapping turned on and locked at 45 degrees.

When dragging new references to the Render Window, they will be placed with their pivot point wherever your cursor is when you release the left mouse button. This makes it easy to quickly create new pieces at the correct floor height. If you release over the void, the object will be placed at the camera.
Some kits have a "flow", which means that pieces have to be configured in a specific way for aesthetic reasons. For example, in this kit, walls are either "side" or "front" types. The two walls you've placed are side walls, as denoted in the name of the piece. Any perpendicular walls must therefore be of the front type. In this case, it's because of ceiling details that flow the length of the room, and using the pieces incorrectly can create large gaps in the ceiling.
In the Object Window, find "NorRmSmWallFront01" and drag it into the Render Window. If needed, Rotate the piece to line it up with one of the corner pieces. Complete the outer walls with two additional "NorRmSmWallFront01" pieces. You can then finish the room's walls using corners and the same amount of "NorRmSmWallFront01" and "NorRmSmWallSide01" pieces on each side.
The room is nearly complete - except for the gaping hole in the center.See Fig. 6. Place a NorRmSmMid01 piece, which can be snapped into the gap. Duplicate the mid piece and keep snapping until the hole is filled. There's something you have to check at this point: this piece also has specific flow, so rotation is important, even though it may not appear to be at first glance.
To check the ceiling flow, rotate the camera so you're looking at the ceiling. Notice the linear pattern in the pieces. Rotate the mid pieces individually where necessary to connect the pattern to the walls. See Fig. 7 for the correct configuration.
-
Rotating the camera to look up can be disorienting, especially if you are new to the Creation Kit or working in 3D. Be patient and use Shift+F to re-focus the camera and start over if you end up looking into the void.
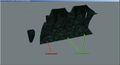
Fig. 5:
NorRmSmCorIn01 lined up with NorRmSmWallSide01.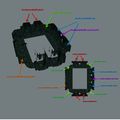
Fig. 6:
The outer edges of your room.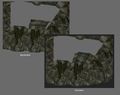
Fig. 7:
The NorRmSmMid01 piece placed incorrectly, notice the gap. On the right the piece is in the correct configuration.


Step 4: Connecting Rooms and Finishing Layout[edit | edit source]
We've completed a room with walls, a ceiling, and a floor - but no way out. Time to add a door. Delete one of the NorRmSmWallFront01 pieces by selecting it in the render window and pressing "delete". In the Object Window, search for NorRmSmWallFrontExSm01 and drag it into the render window. Remember to preserve front/side consistency. Since this exit is on a "front" wall, use a "front" exit piece.
-
Not sure what object you have selected? The Main Toolbar displays this in its lower-left corner. If you have multiple objects selected, it displays the most recently selected object name and "+X more" to give you an idea how large your total selection is. Your current selection is also highlighted in the Cell View Window
Try creating a hallway connected to the new doorway. In the object window search for NorHallSm1WayEndExSm01. Make sure your Object Window is opened to WorldObjects>Static>Dungeons>Nordic>SmHalls. Note the ExSm suffix, shorthand for "Exit Small". This lets us know it will snap with any other ExSm piece in the Nordic kit. Be sure grid-snapping is still on and snap the pieces together.
You now know everything you need complete the first layout pass for this dungeon. Try using the image below to do so now. If you get stuck, try downloading the example plugin to see the layout completed.
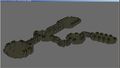
Fig. 1:
The completed layout map.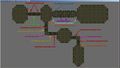
Fig. 2:
Completed layout with labels


-
When loading example plugins, remember not to load your plugin to avoid conflicts caused by having two cells with the same name.
Step 5: Checking It Out In the Game[edit | edit source]
As you work, it's a good idea to frequently test your work in-game. For a refresher on loading your plugin, check here. As you walk around the space, look for gaps and seams you may have accidentally missed in the editor.
If you choose to load the above plugin to your game, or if you named your newly created cell the same as LokirsTomb, you can teleport to it by typing COC LokirsTomb in the console.

-
When testing, it's helpful to use the COCMarkerHeading. These markers are only used for testing - when using the COC console command, this is where you will appear. Only one of these markers should be placed per cell. If a cell has a pre-existing coc Marker, simply move it before saving the plugin. Like all markers, if it's hidden, press "M" to show it. If you are having trouble finding it in the Object Window, simply type "COC" into the filter box and select the *ALL category.
Problem[edit | edit source]
-
'Creation-kit' has been having some slight problems with rendering objects from your mod into the real game, although this is a problem for some people. If you make a mod that has a Piece of Static objects in it, and then you save and upload, but when you go to test it out it is not there then the problem has occurred, currently there is not a fix to this, I will be looking for a way on avoiding this, or preferable fixing it. Hopefully Bethesda Game Studios.
| Return to Tutorial Hub | Next Tutorial | ||
| Language: | English • français • 日本語 • polski • русский |
|---|