Bethesda Tutorial Creation Kit Interface/ru
Интерфейс Creation Kit
 | На русском языке Требуется помощь переводчика |
 | Статья распространяется под лицензией Creative Commons. Авторы: Tiara, Garin и см. историю. |
| Первые шаги | |
|---|---|
| Серия: Основы, глава 2 | |
| К другим учебникам | |
| Следующая статья | |
| Сопутствующий видеурок | |
Обзор
Это первый материал из серии официальных руководств по Creation Kit. С его помощью вы познакомитесь с интерфейсом, а опытные пользователи освежат свои знания, полученные при работе с предыдущими редакторами, и узнают о нововведениях.
В данном руководстве рассматриваются:
- Основные компоненты интерфейса Creation Kit.
- Навигация по трехмерному окну визуализации (3D Render Window).
Что это за кнопка?
Установив и первый раз запустив редактор, достаточно непросто в нем сразу разобраться. Давайте попробуем рассмотреть каждый элемент редактора по отдельности, чтобы понять, что к чему.
При желании, вы можете пропустить это руководство и перейти к любому другому, особенно, если вы знакомы с предыдущими редакторами от Bethesda Game Studios. В этом нет ничего страшного, но не забудьте вернуться и перечитать данное руководство, если вы застряли.
Главная панель (en)
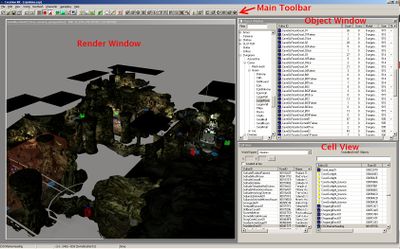
Main Toolbar (Главная панель) - панель, на которой расположены наиболее часто используемые в работе с Creation Kit инструменты, которыми можно воспользоваться, нажав на соответствующую кнопку. Они слишком многочисленны и сложны, поэтому объяснять их предназначение мы будем по мере продвижения. Желающие могут прочитать подробное описание различных меню и кнопок в материале Главная панель (en).
Перед тем, как приступить к работе, вы должны загрузить данные. В меню "File" выберите "Data...", а затем двойным щелчком мыши выберите "skyrim.esm". Когда вы сделаете это, рядом с названием файла появится флажок, который обозначает, что файл будет загружен.
Окно визуализации (en)
Окно визуализации (Render Window) является основным инструментом, при помощи которого мы будем взаимодействовать с игрой в этом руководстве. Сейчас эта панель пуста, но как только мы загрузим ячейку, в ней отобразятся трехмерное изображения, с которыми мы и будем работать.
Окно ячеек (en)
Окно ячеек (Cell View Window) состоит из пяти основных компонентов:
- World Space This drop-down dictates which cells appear in the list below it. Interiors are considered a special world space. Leave this setting alone for now, as we will be working with an interior at first.
- X/Y Когда работаете с внешним видом, вы можете загрузить ячейку вручную через координаты. This is irrelevant when working with interiors and will be grayed out except when an exterior worldspace has been chosen.
- Cell List These are the cells that make up the world space you've specified. Only one cell is considered "loaded" at each time, although multiple exterior cells may be visibly rendered in some cases.
- Reference List This list, which is probably empty for you right now, will populate with all the references that exist within the loaded cell. You can access references either through this list, or by physically interacting with them via the Render Window.
- Filter Box Entering text in this box will cause the Reference List to only display items containing that string. For example, I may only care about items associated with the DA10 quest, and entering DA10 will only show those items. Or, as another example, if I have three objects in my list: "CaveGHall01", "CaveGFloor", and "TrollFrost", entering "Cave" in the filter box would cause the "TrollFrost" reference to no longer appear. It would, however, still be visible in the Render Window.
Окно объектов
Object Window(Окно объектов) позволяет просматривать различные объекты базы, с которыми мы работаем при создании. Есть много категорий и типов объектов, и мы будем обращаться к ним по мере необходимости на протяжении всего урока.
- Filter(Фильтр) Похож на Cell View, Object Window(Окно объектов) имеет поле для фильтрации, которое мы можем использовать, чтобы сузить круг поиска того, что появляется в списке ниже.
- Category List(Лист категорий) Ниже фильтра, категории базовых объектов. Опытные пользователи, возможно, пожелают использовать "все" категории и фильтры для более быстрого доступа к элементам, но в этом уроке мы будем вручную указывать расположение необходимых объектов.
- Based Object List(Лист базовых объектов) В правой части окна находятся различные объекты базы, которые вы можете просматривать, редактировать и помещать в окно рендеринга.
{{InDepth| Base Object vs Reference Это важно для пользователей, чтобы понять разницу между базой объектов и ссылками. Всякий раз, когда вы помещаете объект в мир, вы создаете экземпляр или ссылку на базовый объект. Например, если перетащить "TrollFrost" в мир и изменения, которые ссылаются, или «ссылку», наши изменения будут влиять только на этот конкретный Troll. Если мы будем вносить изменения непосредственно в объект базы TrollFrost, однако, все Troll будут затронуты, в том числе те, которые уже созданы. По этой причине, моддеры, как правило, хотят избежать изменения уже существующих объектов базы других модов.
Навигация в окне визуализации
Управление камерой
Whatever your plans are, almost anything you do in the Creation Kit will require you to use the Render Window to look at and manipulate objects. If you've never worked in 3D, it can be a bit overwhelming to get used to controlling the camera.
First, let's load up an existing cell so we have something to look at. Locate and double-click the Interior cell "AnisesCabin01" in the Cell View. This will load the cell, causing it to appear in your Render Window.
NOTE: If nothing shows up, but your right-hand column is populated with objects, try double-clicking on one of those objects. This not only selects the object, but will force the camera to focus on the object. This is a handy way to re-orient yourself if you become "lost".
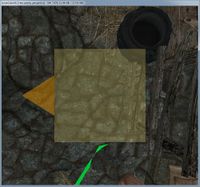
Your initial view should be centered on a yellow marker, as seen in Figure 2. (If not, try pressing "M" to make sure markers are viewable. Otherwise, your camera may just be focused elsewhere. That's fine: just select any object and follow along)
Single-click this to select it. You should notice a thin outline of green, red and blue lines. This is the "bounding box", and for now we just care that it lets us know what's selected. Try scrolling your mouse wheel slowly back and forth. Notice that this zooms the camera. (If not, you may need to "click into" the Render window.)
Next, try panning the camera. This is accomplished by holding down the middle mouse button and moving the mouse in any direction.
By now it's possible you've lost sight of your selected object. Let's re-focus the camera. There are a few ways to do this:
- Press Shift+F. This focuses the camera on the currently selected object(s). It does not affect camera angle, and resets the camera pivot if no objects are selected.
- Press "T". This forces a top-down view. If anything is selected, it will zoom the camera to the extents of that selection. With nothing selected, it simply rotates the camera down (which can sometimes disorient you if there's nothing to look at directly below the camera!)
- Press "C". This cycles through a few pre-set camera angles, and otherwise works exactly like "T"
- Use the mouse wheel to zoom the camera in or out.
Now we'll try orbiting the camera. With any object(s) selected hold "Shift" while moving the mouse to rotate the camera around the object in any direction. The selection will always remain in the center of your view. With nothing selected, the camera will rotate around itself. This can be useful for advanced users, but will probably be disorienting to beginners, and is not usually needed.
It's very important to become comfortable using these controls, so spend some time loading up various cells and looking around them. You'll probably be clumsy at first, but before long it will become second nature.
Манипуляция объектами
Теперь, когда мы знаем как смотреть объекты, давайте теперь рассмотрим как перемещать их.
NOTE: While you're getting used to these controls, it's a good idea to work in a throwaway plugin to avoid saving accidental modifications to objects that may affect other mods or the base game. You may want to use the testquest.esp file created at the beginning of this tutorial.
Select any object(s) in the Render Window. You can move, or "translate" the object simply by holding the left-mouse button down and dragging the object around.
You may notice that the object jumps around rather than moving smoothly - this is because grid snapping is on. You can toggle this with the "Q" горячая клавиша или ![]() кнопка в Главная панель (en). Мы поговорим больше о привязке к сетке в расположение.
кнопка в Главная панель (en). Мы поговорим больше о привязке к сетке в расположение.
Also note that you're only moving the object on the horizontal plane, or the "X/Y axis" of the world. You can move the object up/down by holding "Z" while dragging it. Likewise, you can hold "X" or "Y" to constrain movement to those axes, too.
Rotation is accomplished by simply selecting an object and holding the right mouse button while moving the mouse. Rotation is also affected by grid snapping, and also can be axis constrained by holding X,Y or Z while rotating. You should also note that objects rotate around their pivot point, indicated by a small, yellow "+". Being aware of pivot points will become important for users who expect to be working with the Render Window frequently.
Objects can be scaled as well. Scale by holding "S" while dragging with the left mouse button. Scaled art will look out of place, however, so it's best to avoid using this tool unless it's absolutely required.
Гизмо
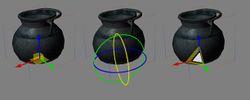
Creation Kit предлагает набор "gizmos" (штуковин/вещиц), визуальных помощников для перемещения, вращения и масштабирования объектов. Проще говоря, гизмо визуально показывают изменения объекта. "Gizmo handles" (или рычаги гизмо) являются важнейшей составляющей гизмо, т.к. с их помощью производится изменение объекта.
Например, нажатие на зеленую стрелку в Movement Gizmo (гизмо перемещения) будет изменять размер по оси Y.
"E" Включает Movement gizmo (гизмо перемещения)
"W" Включает Rotation gizmo (гизмо вращения)
"2" Включает Scaling gizmo (гизмо перемещения)
Есть несколько правил использования гизмо:
- Только один гизмо может быть активен одновременно.
- Нормальные манипуляции с объектом недоступны в тот момент, когда активен рычаг.
- "G" может быть использована для переключений глобальных/локальных перемещений и вращений.
- Global/Local translation carries over to non-gizmo rotation (but not movement).
Далее!
Как только вы почувствуете себя свободно, перемещая объекты в редакторе, вы можете переходить к созданию контента для игры!
Если вы заинтересованы в создании игровых пространств, попробуйте перейти к серии руководств по дизайну уровней.
Если вы заинтересованы в создании квестов и персонажей, попробуйте перейти к руководству по основам квестописания.
| К другим учебникам | Следующая статья | ||
| Language: | English • Deutsch • français • 日本語 • 한국어 • polski • русский |
|---|


