Bethesda Tutorial Encounters/ja
 | このページは日本語です。 テキストのすべてまたは選択された部分の翻訳が必要です。 |
| このページは日本語です。 リンク先ページの編集上の訂正または翻訳が必要です。 |
| Bethesda Tutorial Encounters/ja | |
|---|---|
| レベルデザイン シリーズ、5章 | |
| チュートリアルハブに戻る | |
| 次のチュートリアル | |
| プラグインの実例: | |
| 初期 | 完成 |
| コンパニオン・ビデオ・チュートリアル | |
概要
このチャプターでは、巡回するアクターやそのアクターと行動を共にしている別のアクターとの戦いに関する設定の基礎について考えます(※ 訳者注釈:すなわち徒党を組んだ敵グループの作成のことだと思う)。
このチャプターで学べること:
- Leveled リストおよびエンカウントアクターの基礎について
- 標準マスターパッケージの助けを借りて、簡単なパトロールを設定する方法
- ピンポンパトロールとループパトロールの2つの違いについて
- アクターに追従する別のアクターの作成方法
基本的な戦い
Creation Kit はあなたに多くの種類のゲームプレイを作成する能力を提供します - しかし、戦いに関してはプレイヤーの活発な動作の手数が大きな割合を占めます。ダンジョンでは特にそうです。Creation Kit は、単純に動くだけではなく、1つ1つの戦闘が記憶に残るようフォーカスを当てられるよう、素早く戦闘に入ることのできるツールを提供します。
Leveled リストとエンカウントアクター(Lvl vs Enc)

戦闘 NPC には2種類の基本的なタイプ(ENC と LVL)があり自由に選択できます。2つのアクタータイプは、Object Window の "Actors > Actor" セクションに両方共あります。もしくは Enc か Lvl" でフィルターしても構いません。
Leveled アクター(接頭詞が "Lvl" のもの)は、プレイヤーのレベルに応じて何を発生させるのが友好なのかをゲームに伝える情報を持っています。 例えばLvlBanditMelee2H は、両手持ち武器の山賊を発生させます。男性/女性や、使う武器が戦鎚なのか両手斧なのかグレートソードなのかなどはわかりません。詳細はランダムです。
Encounter アクター(接頭詞が "Enc" のもの)は、一般的には Leveled リストに追加するためのキャラクターやクリーチャー(EncBandit01Melee1HImperialF01/02/03/etc...)で、ランダムではありません。 例えばスキーヴァーを必要としているときは、EnvSkeever アクターを配置してください。 その場所に侵入した際、スキーバーが生まれる場所を指定したということです。これは EncFox、EncDeer もしくは EncSabreCat などでも同様です。

Enc アクターには 'Template' が付いたもの(例. EncBandit00Template)と長い名前が付けられたもの(例. EncBandit01Melee1HImperialF)があります。一般的にこれらは配置するべきではありません。これらはの Enc アクターは、Leveled リストで使われ、それによって置き換えて使うのが通常です(例. LvlBanditMelee1H, or LvlBanditMeleeAny)。
Likir's Tomb に最初に戦場にしましょう。LvlWarlockFire を選択し、2つ目の部屋にドラッグ&ドロップしてください。場所を決めたら、プラグインをセーブして、ゲーム内でテストしてみてください。魔術師は、火炎のスペルを使ってくることに気づいたでしょう。さらに敵を発見するまで魔術師はぼんやり立っているだけということにも気付くかもしれません。それに関してどうにかしましょう。

プレイヤーが中に入ったとき、すぐに攻撃し始めるような場所に敵を置かないようにしてください。Bethesda は、これをサンドイッチルールと呼んでいます。ロード画面によってプレイヤーの注意が逸らされると仮定するのがベストです - コントローラーを手元に置いてしまったり、ぼーっとしたり、サンドイッチを取りに行ってしまうかもしれません。サンドイッチ規則を守ることは、プレイヤーに戻ってくる時間の決定権を与えることを意味します。
Linked-Refs とパトロール
敵に命を吹き込むのに最も簡単な方法は、パトロールを作成して参照させることです。 これは Creation Kit が単純な AI の振る舞いを完全にサポートしてくれる機能です。
Default Master Package と Linked-Refs
Default Master Package は、パトロールポイントを多くのアクター、そのアクターに追従するアクター、特定ポイントを守るアクター用に特別に用意されたものです。
ダンジョン内のアクターにそれをするための最も簡単な方法は、パトロールをさせることです。'lvl' アクターの多く、LvlWarlock は Default Master Package を使っているため、パトロールの設定はとても簡単です。もしまだ CraftingAlchemyWorkbench もしくは CraftingAlchemyWorkbenchTabletop を部屋に用意していないのであればまず置いてください、もしくは他の備品でも構いません。 - それは錬金術テーブル「である必要はありません」、私達は何らかの備品を使用するよう魔法使いを設定するつもりでいます。
- 魔術師をダブルクイックして、Linked Ref タブをクリックする。(Fig 5.2)
- 空のエリアをダブルクイックして、"Choose Reference" ダイアログを表示させる。(Fig 5.3)
- Select Reference in Render Window ボタンをクリックし、Render Window の錬金術テーブルをダブルクリックする。すぐに OK ボタンを押し、さらに "Reference Window" で OK ボタンを押す。すると魔術師から錬金術テーブルへラインが見えるはずである。(Fig 5.4)
- さらに錬金術テーブルをダブルクリックし、Patrol Data をクリックし、Patrol Data チェックボックスにチェックを入れる。このとき Idle Time に値の入力が可能である。
- アクターがこの特定のパトロールアイドルマーカーに待機する秒数を設定する。魔術師がそこに無限に留まる必要があるので、少なくとも1秒の Idel Time を設定する必要がある。
- If you don't put a time here the Warlock will simply walk up to the table, interact with it, then back out of it and just stand there. 今のところ他のパトロールの参照が今のところ無いので、魔術師にパトロールの時間を与えたことは、魔法使いが永久にテーブルに留まることを保証する。
-
Link-Refs は、1つにもう1つの参照を知らせる方法です。これは "単なる" 接続で、単純な関連以上の情報を持ちません。関連が必要なときは、どんなときにでもこれを使います。このチュートリアルでは、アクターがパトロールするのを補助します。なぜなら Default Master Package がこの関連を参照するからです。
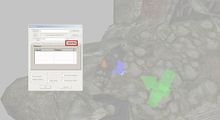
Fig. 5.2:
Linked Ref タブ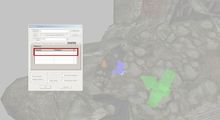
Fig. 5.3:
空のエリアをダブルクリックする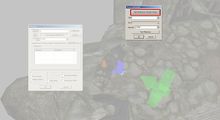
Fig. 5.4:
Reference window を選択する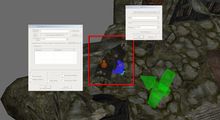
Fig. 5.5:
錬金術テーブルを選択する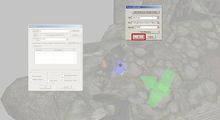
Fig. 5.6:
Reference window を選んで OK を選択する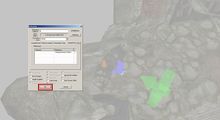
Fig. 5.7:
OK を選択する


"Ping-Pong" Patrols
しかしながら、必ずしもキャラクターが一箇所に留まることは望まない。NPC が空間を移動することは、生命活動の感覚を作り出し、戦いの始め方にバリエーションを加えます。Default Master Package は、単純な"ピンポン"パトロールを使うことでこれを実現します。そのためには2つ以上の場所を移動するよう API に命令しましょう。では、やってみましょう。
- 丸格子の部屋に注意を向ける。
- LvlWarlockFrost アクターを部屋のどこかに配置する。
- PatrolIdleMarker も配置する。(Object Window の Miscellaneous > IdleMarker)
- 既にやった通り、魔術師をダブルクリックして、PatrolIdleMarker を LikedRef として設定する。OK をクリックする。
- PatrolIdleMarker をダブルクリックし、"Patrol Data" タブに移動する。
- "Patrol Data" にチェックを入れ、Idle Time を 10.0 もしくは好きな値に設定する。
- PatrolIdleMarker のプロパティーのまま、LinkedRef を側にある NorThroneShadow の椅子に設定する。
- PatrolIdleMarker のプロパティーを閉じていい。
- NorThroneShadow をダブルクリックし、同じようにPartrol Data に 10.0 の Idel Time を設定する。
- 別の PatrolIdleMarker を設置し、王座に LinkedRef を設定する。同じく Idel Time が設定されていることを確認する。
- 最終的に Fig 5.9 に似た状態になっているはずである。
Skyrim を起動し ToggleDetection console command を実行してください。 アクターはそれぞれの Idle Marker に従って歩き回ります。そして、それぞれの Idel Time に従って怠けます。 Notice that when the actor reaches the end of the linkedRef chain, it paths through the chain backwards. This is why we call it a "ping-pong patrol": the actor is bounced back and forth between the ends.
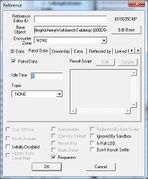
Fig. 5.8:
Type the time here, in seconds, that you want an actor to idle for.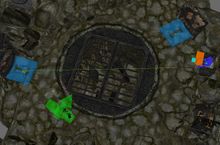
Fig. 5.9: An Actor "Linked-Ref Chained" to three Patrol Points in the 2nd room.


Looping Patrols

A Looping Patrol is set up exactly like a ping-pong patrol, with one meaningful extra step: you'll "close the loop" of the patrol chain, meaning the actor will follow that route in order, never reversing direction.
- Direct you attention to the next room. There are sarcophagi here if you're using the example plugin.
- Place a new LvlWarlockNecromancer, as well as a EncSkeleton01Melee1H.
- Place a patrolIdleMarker and give it some Idle Time value, as before.
- Ctrl+D to duplicate the patrolIdleMarker. Note that the new duplicate has the Patrol Data automatically copied.
- Ctrl+D again for a total of three markers in this chamber.
- Link the Necromancer and these points, just as before.
- Link the final patrolIdleMarker in the chain to the first. This is "closing the loop".
- Just for fun: link the Skeleton to the Necromancer; it will try to follow behind.
- Your final arrangement will resemble Fig 5.10. Note the green lines forming a complete loop.
Try running this in-game. Observe the difference: instead of re-tracing steps, the Necromancer should continue in a loop, with the skeleton staying a small distance behind.

PatrolIdleMarker is an Idle Marker which already has a range of subtle animations associated with it. This makes it preferable to other objects, such as an XmarkerHeading, when setting up patrols. There are also other Idle Markers available, such as SearchingTableIdleMarker and WarmHandsStandIdleMarker , which can be used to trigger specific animations which are more deliberate and grounded with the environment. Try swapping some of your patrolIdleMarker objects with these and experiment to get results you're happy with.
Setting Actor Difficulty
You may have noticed that all the Leveled Lists you have placed so far are green. This indicates the default Easy difficulty. Using difficulty variation is a good way to provide some variety and pacing to your dungeon. Try setting some now.
- Double-clicking any of your leveled actors and open the Leveled Actor tab.
- Specify whatever difficulty you'd like from the drop-down.
- Click OK to accept changes.
- Note the color change of the lvl marker. (Fig 5.11a-d)
It's a good rule of thumb to set about 50% of your leveled actors to "easy", and not throw too many non-easy actors into any single encounter. It's also generally advised to place only one "very hard" list per dungeon. These, of course, are only guidelines, and may not always be the best course. Test your content mercilessly, get feedback from players, and tune according to that.
-
The relative difficulty of an encounter is based upon the Encounter Zone, player level and the leveled list itself. So, for example, a level one player who enters a dungeon with an encounter zone of twenty may encounter very difficult draugr, even from the easy leveled lists. Try testing your dungeon by setting yourself to different levels before entering.

Fig. 5.11a:
Easy Leveled List
Fig. 5.11b:
Medium Leveled List
Fig. 5.11c:
Hard Leveled List
Fig. 5.11d:
Very Hard Leveled List


| Return to Tutorial Hub | Next Tutorial | ||