Bethesda Tutorial Traps and Prefabs
| Bethesda Tutorial Traps and Prefabs | |
|---|---|
| Level Design Series, Chapter 6 | |
| Return to Tutorial Hub | |
| Next Tutorial | |
| Example Plugins: | |
| Initial | Completed |
| Companion Video Tutorial | |
Overview[edit | edit source]
This chapter covers the basics of working with AI ambushes and traps.
The reader will learn the following skills:
- Activate Parenting
- Using Ambush set-up prefabs
- Basics of Trap prefab Placement
- Use of other prefabs
Linked References[edit | edit source]
The previous tutorial discussed linked references, or linkedRefs. In that example, linkedRef relationships were used to create NPC patrol paths. This behavior is the result of logic that has already been set up with an AI package. This is just one example of how linkedRef and other object-to-object relationships can be used to drive complex interaction in the Creation Kit.
Basic Activation Parenting[edit | edit source]
When the player "uses" an object, they are activating it. Activation is an important concept when dealing with interaction. Three things happen whenever an object is activated.
- Native Behavior Most objects have some default behavior when activated. Doors will open/close, a container will display its contents, an NPC will enter conversation or be pickpocketed, and so on. These behaviors are automatic unless deliberately blocked by script.
- Script Event Activation also sends a notification to Papyrus, allowing us to react to the activation in novel ways. While this tutorial won't cover scripting, we will be taking advantage of pre-existing scripts that rely upon these Activation Events.
- Activate Parent We are able to specify one or more "Activate Parents" of a reference. This simply means that when the Parent object is activated, any "children" will also receive an Activation.

Let's take advantage of an activate parent relationship now. The Portcullis in Fig 6.1 uses an Activate Parent link, as indicated by the blue and white line. The white end is the activate parent while the blue end is the child. Try emulating this setup in your own level:
- Load LokirsTomb01 from the example plugin or your own.
- Replace NorDoorMedium01 with a norPortcullisLarge01.
- Make sure the new portcullis is snapped into place
- Next, place a "NorPullChain01" on the wall nearby
- Double-Click the NorPortcullis and click on the Activate Parents tab. (Fig 6.2)
- Double-click the empty white area and a "Choose Reference" dialog box will appear. (Fig 6.3)
- Click the Select Reference in Render Window button. (Fig 6.4) Note the crosshair cursor:

- Double-click on the "NorPullChain01" in the Render Window. (Fig 6.5)
- Click OK to close and accept both windows.(Figs 6.6/6.7)
- Notice a blue/white line now drawing between the portcullis and switch. This represents the activate parent relationship.
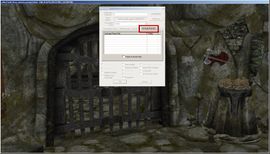
Fig. 6.2:
The Activate Parents tab on the Portcullis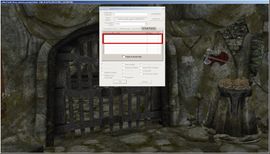
Fig. 6.3:
Double click in the Activate Parent Ref section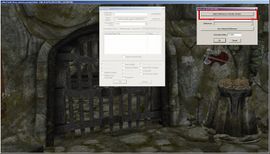
Fig. 6.4:
Activate Ref Selection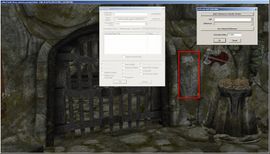
Fig. 6.5:
Select the Pull Chain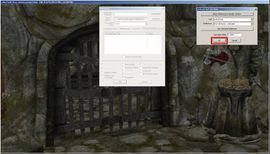
Fig. 6.6:
OK Activate Ref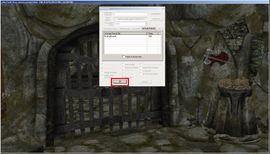
Fig. 6.7:
OK Reference


An object can have more than one activate parent. For example, it's usually wise to provide a lever on either side of a portcullis, just in case the player somehow becomes trapped on the wrong side of it. You may also notice a checkbox which will cause a reference to ignore all activation from non-parents.
Ambushes[edit | edit source]
Finding and Placing an Ambush Prefab[edit | edit source]
This dungeon already features several encounters, but no clear climax. We'll add one now; a boss draugr will climb out of a tomb as the player enters the final chamber. Creating an event like this can be complex when done from scratch. Because of this, you are provided with a set of "prefabs" - which are simply a collection of objects which have already been scripted and connected for you.
- Load the interior cell "warehouseAmbushes"
- Make sure Markers are visible (M hotkey)
- Direct your attention to the draugr ambush prefabs along the south end of the cell
- There are two horizontal sarcophagus prefabs. We want the one pictured in Fig 6.9.
- Using either drag-select or ctrl+click, select all of the following five references:
- LvlDraugrAmbushMelee1HMale
- defaultActivateSelfTRIG
- DragonPriestCoffinMarker
- NorSarcophagusTopAnim01
- NorSarcophagusBottom
- With all these objects selected simultaneously, press ctrl+C to copy. Note that copying the references individually will not work; you'll lose their relationship data.
- Load LokirsTomb01.
- Focus the camera on the cave area and press "ctrl+V" to paste the prefab objects
-
When making complex, multi-object selections such as this, it can be useful to cycle visibility with the "1" key. Selected objects will be faded, hidden, and un-hidden by this key, making it easy to determine what you have and haven't got selected.
Don't worry too much about pasting your prefab exactly where you want it placed. It's often easier to move them into the Void somewhere nearby and move each element into the scene piecemeal, as in Fig 6.10. The important thing is to be mindful of objects which have been lined up carefully in the prefab. Let's go ahead and do that now:
- Select the Sarcophagus, Lid, and the orange Furniture Marker.
- Turn Snap-To-Grid off it is isn't already. (Q hotkey)
- Move these, as a group, onto the raised platform in our cave area of our dungeon. (Fig 6.11)
- Optional Position the LvlDraugrAmbushMelee1HMale near the sarcophagus. It will start in the sarcophagus; this is a visual aid for yourself.
- Optional Assuming you want a traditional "boss" encounter, set the difficulty of the draugr to Very Hard as shown in the previous tutorial and/or replace with LvlDraugrAmbushBossMale (Control+F)
- Modify your navmesh to cut out the area now beneath the sarcophagus.
- Move the blue triggerbox into the room. (Fig 6.12) It isn't going to help us much in its current state - We'll deal with that next.
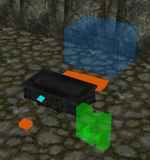
Fig. 6.9:
The Horizontal Sarcophagus Ambush prefab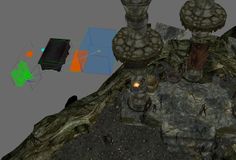
Fig. 6.10:
Ambush set up pasted into Lokir's Tomb and moved into the void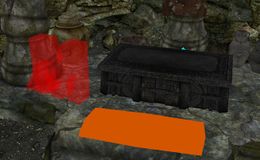
Fig. 6.11:
Sarcophagus set up moved into place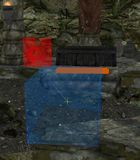
Fig. 6.12:
Triggerbox moved into place


Triggering an Ambush[edit | edit source]
The blue trigger is a critical element of the prefab. When the player collides with it, the draugr begins to climb out of its tomb. The default size of the trigger doesn't do much good, however. We'll need something bigger to stage this event well. We'll use non-uniform scaling to sculpt a custom trigger shape to fit the room.
- Select the blue trigger primitive
- Press "2" to bring up the Scale Gizmo.
- Notice that the non-uniform gizmo (Fig 6.13) offers two handles per axis.
- Place your cursor over one of the red x-axis handles. Click and hold when the handle turns yellow.
- NOTE: If your red/green handles are reversed, don't worry. This just means your trigger is rotated and won't cause any erors.
- Drag your cursor to scale the trigger to a thickness similar to that in Fig 6.14.
- Repeat this process with the green y-axis handle to stretch the trigger across the room, as in Fig 6.15.
- Use the blue z-axis handles to stretch the trigger vertically so that there's no chance the player will go over or under it.
- Move the trigger to cover the transition between hall and cave, and re-scale as neccessary (Fig 6.16). Use your own judgement on the right moment to trigger the ambush.
- Press "2" again to dismiss the gizmo and resume normal editing.

There are a few rules of thumb to keep in mind for good trigger placement: - Very large triggers can be slightly more expensive to process. In general, however, err on the side of too large.
- Avoid "thin" triggers, which may fail to detect actors. 128 is a good minimum thickness on all axes.
- Get creative with trigger positioning. Sometimes the most efficient trigger will be placed at a strange angle.
- It's possible to manually define the dimensions of a primitive. Double-click to open reference properties, and navigate to the "Primitive" tab. The XYZ Bounds values define how thick the primitive is along the corresponding axis.
- Primitives can also be colored however you like, also from the Primitive tab. This can be a useful way to color-code triggers for personal reference.
- Chokepoints are useful for triggers you want to be sure get hit.
Save your plugin and test the ambush in-game several times. Try to role-play as different types of players, who may be sneaking, running backwards, or doing anything else you can think of. Strive to make the staging of your ambush work for as many player circumstances as possible.
You may wish to add more draugr ambushes to your level. You can also trigger multiple ambushes from a single trigger - feel free to try this extended tutorial before moving on, which covers that. The completed example plugin also includes some additional ambushes set up this way.
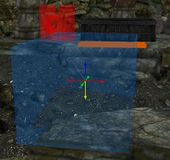
Fig. 6.13:
Scale Gizmo for trigger primitive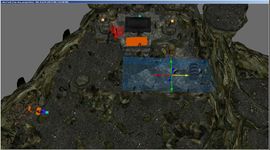
Fig. 6.14:
Triggerbox scaled in one direction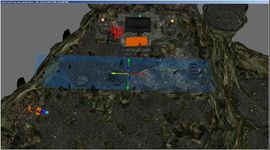
Fig. 6.15:
Triggerbox scaled in the other direction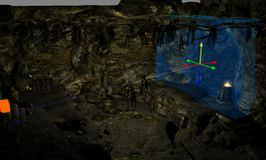
Fig. 6.16:
Triggerbox scaled to cover hallway


Traps[edit | edit source]
Ambushes aren't the only gameplay device for which prefabs are useful. Most traps are also composed of several objects working in concert with each other. Traps are a useful pacing device, even when they are easily noticed and avoided. Players will be on the lookout for other traps and the chance to lure enemies into them.
One of the traps available is a simple swinging mace. We'll place one of these into Lokir's Tomb as an example.
Using a Prefab Mace Trap[edit | edit source]
Setting up a trap prefab isn't very different from the process involved with a ambush prefab. Follow along with these steps:
- Load the interior cell "warehouseTraps"
- Locate "TrapMace01" (Fig 6.33) [The easiest way to locate a specific trap is find it in the list that displays all the objects in the current cell (bottom-right of the Cell View window) and double click it]
- Note the blue/white line which renders once the mace is selected
- Select the "TrapMace01" and connected "TrapTripwire01" object. (Fig 6.34)
- Ctrl+C to copy
- Load "LokirsTomb"
- Ctrl+V to paste into the cell
- Position the mace as desired. Keep in mind it will swing/hang freely after the trap has been sprung.
- Position the tripwire as desired. You can use Fig 6.36 as a guideline.
Test your trap in game several times. You may wish to tweak the placement of the tripwire and mace quite a bit before finding a setup that you're happy with.
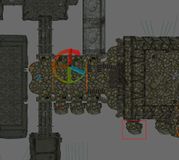
Fig. 6.33:
Locating the Mace Trap in WarehouseTraps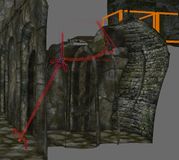
Fig. 6.34:
Activate parent link between Mace Trap and Tripwire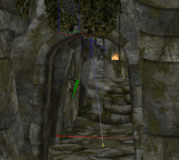
Fig. 6.36:
Final placement of Mace Trap and Tripwire


Non-Prefab Traps[edit | edit source]
Not all traps require prefabs or separately-placed triggers, such as the examples in Figs 6.49a-d below. These can be placed directly into your space like any other object, and they should work automatically. Although they are not prefabs, these are still available in "WarehouseTraps" for your convenience.
Try to think of clever ways to use traps in conjunction with the environment, characters and other traps. For example, a room full of oil pools and lanterns could be interesting place to battle a fire mage.
You can also mix and match traps with different triggers, such as pressure plates, levers and triggers. Feel free to experiment as you learn the system. You may also want to take a look at the Advanced Traps Tutorial for more information.
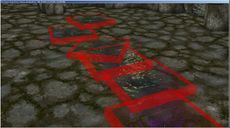
Fig. 6.49a:
TrapOilPool01. Fire will spread across overlapping pools.
Fig. 6.49b:
BearTrap01 with built-in trigger (orange marker)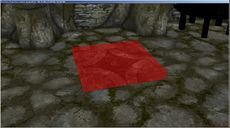
Fig. 6.49c:
TrapNorFirePlate01. Red marker indicates hazardous.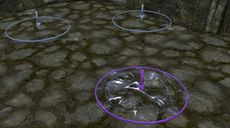
Fig. 6.49d:
Trap Rune Projectiles


Other Prefabs[edit | edit source]
Prefabs aren't only useful for traps and ambushes. There are other types of prefabs available, such as mining ore nodes or barred doors. Try this optional tutorial if you'd like to add some now. (Some are included in the example file)
Now that your dungeon has some gameplay, it's time to start thinking about performance. We'll cover optimization in the next chapter - because no matter how brilliant your content may be, it's no fun if it doesn't run.
| Return to Tutorial Hub | Next Tutorial | ||
| Language: | English • français |
|---|