Bethesda Tutorial Navmesh/ja
 | このページは日本語です。 テキストのすべてまたは選択された部分の翻訳が必要です。 |
| このページは日本語です。 リンク先ページの編集上の訂正または翻訳が必要です。 |
| Bethesda Tutorial Navmesh/ja | |
|---|---|
| レベルデザイン シリーズ、4章 | |
| チュートリアルハブに戻る | |
| 次のチュートリアル | |
| プラグインの実例: | |
| 初期 | 完成 |
| コンパニオン・ビデオ・チュートリアル | |
概要[edit | edit source]
このチャプターでは、Navmesh (ナビメッシュ)を手動もしくは自動で作る方法について考えます。
このチャプターで学べること:
- Navmesh (ナビメッシュ)とは何か。そして重要なのはなぜか。
- リキャストベース生成を使うことで自動生成する方法(※ 訳者コメ:自動生成したものを手動で作りなおすことをリキャストと読んでいると思う)
- 手でNavmesh (ナビメッシュ)を編集する方法
- Navmesh (ナビメッシュ)の警告の直し方
- 基本的にカバーする生成方法
[edit | edit source]
散らかったら部屋を作った場合、アクターをナビゲートするために必要になるものです。navmesh を見てください。単純に言うならば、Navmesh (ナビメッシュ)は歩く場所をアクターに伝えるためのポリゴンのコレクションです。
私達がゲームをするとき与えられた情報を得るのは簡単なことです。私たちの頭脳は全てのヴィジュアルの詳細、常に描画された結果と予想を処理できます。残念ながら、AI システムは人間の頭脳の足元にも及びません、従って、私達が与えた情報に依存します。Navmesh (ナビメッシュ)は、AI アクターが与えられた空間を認識するための重要な知識のことです。
Navmesh (ナビメッシュ)エディターは骨の折れるツールです - 最初はイライラさせられるでしょう。着実にステップ・バイ・ステップで学んでいきましょう。一度原理を学習すれば、すぐにNavmesh (ナビメッシュ)のエキスパートになれます。

GECK ユーザへ: not much in the way of navmeshing by hand has changed. There have, however, been additions to auto generation, such as the all-new "Recast" generation mode, which is covered in this tutorial. For more information, check the Navmesh Generation page. Users of the Oblivion and/or Morrowind Construction Set will note that Navmesh has entirely replaced the pathfinding system in those tools.
[edit | edit source]
Navmesh (ナビメッシュ)のすべての作業は、完全に独立したエディタモードで行います。このモードに移行するには、メインツールバーのナビゲーションボタン (Fig. 4.1) を押すか、"CTRL+E" を押してください。Navmesh toolbar (Fig. 4.2) が現れます。
Navmesh (ナビメッシュ)は自動で生成されるので、私達は実質、ナビゲーションツールバーを使うことはありません。便宜上存在します。私達は自動生成するためにNavmesh (ナビメッシュ)のモードでいる必要があるということがわかるでしょう。
自動生成には4つの種類があります: オブジェクトベース, Havok ベース生成, リキャストベース, and アドバンス. 建物で一番メジャーな方法は、リキャストベース生成を使うことです。そして、後でNavmesh (ナビメッシュ)を整理します。このチュートリアルでは、オブジェクトベースもしくはHavok ベース 生成について掘り下げることはしません。自動生成と手動による整理より、早い方法が見つかるかもしれません。 - あなたがそのほうほうに満足しているのであれば、それは好みの問題です。
リキャスト生成を使って LokirsTomb にNavmesh (ナビメッシュ)の初期パスを生成してみましょう。
- アクティブにするために Render Window をクリックする。
- Render Window で何も選択されていないことを確認する(もしもそうでない場合、何もない空間(Void)を選択するかD キーを押す)。
- メインツールバーの Navmesh メニューから Recast Based Generation を選択する: Navmesh > Generation > Recast Based Generation。
- Recast Navmesh Generation ダイアログが出る。(Fig 4.3)
- 値がたくさんあるが何も気にする必要はない。値が Fig 4.3 と大体同じなら "OK" を押すだけで良い。
- "OK" をクリックする。使っている PC によって多少時間が掛かる。
- 終わるとNavmesh (ナビメッシュ)は、Fig 4.4 もしくは 4.5 に似たものが表示されるはずである。
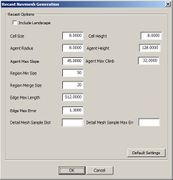
Fig. 4.3: Navmesh Recast Window
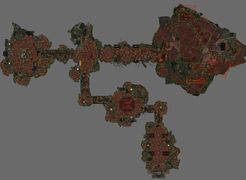
Fig. 4.4:
リキャストNavmesh (ナビメッシュ)生成後の結果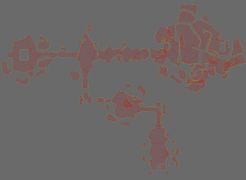
Fig. 4.5:
リキャストNavmesh (ナビメッシュ), Navmesh (ナビメッシュ)のみの表示


-
Sometimes you need to navmesh a large section of a level, but you don't want to delete other navmeshes in the level. You can hold CTRL+ALT and Left-Click and Drag Select all of the references in the cell that you want to navmesh. Once you have the references selected, click Recast Based Generation and navmesh will only be generated for those references.
[edit | edit source]
Now that we have a navmesh created, we need to spend some time cleaning it up. The easiest and fastest way to do this is by hand. Before we begin the clean up process, take a minute to look at your navmesh and see where Recast Based generation didn't do so well.
If you're having trouble seeing your navmesh you can try one of the three Navmesh modes: Normal, Transparent, Navmesh Only. Press "W" to cycle through the three different modes, or use the toolbar buttons, pictured here:
![]()
[edit | edit source]
When cleaning up automatically-generated navmesh, it's often best to begin by eliminating unnecessary segments of navmesh that have been placed on non-reachable areas. This will make it easier for us to see what's going on with the remaining navmesh afterward.
The Cave area and the stairs of the Nordic Ruins seem to be the biggest offenders. You will also see a lot of navmesh islands. Don't worry about these for now. Once we have cleaned up the main navmesh, removing the islands is fast and easy.

For advanced users whom want to get rid of the islands right away, CTRL+Left Click one triangle on each navmesh you want to keep and then press "I". This is called Inverse Flood Fill and selects all navmeshes not currently selected. Once you press "I" and all of the islands are selected, delete them with "R" or "DELETE". This is faster than deleting each unwanted island manually, but it's also much easier to accidentally delete useful navmesh - be careful!
Begin by taking care of the cave section first. Then, we'll clean up the rest of the navmesh. For now, you'll only need to know about the three buttons on the far left of the navmesh toolbar:
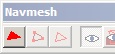
Fig. 4.6:
Select Triangle Button
Fig. 4.7:
Select Vertex Button
Fig. 4.8:
Select Edge Button


To clean up the cave section, Left Click and Drag Select the vertices in the cave section. Remember to toggle visibility ("W") to get your bearings. Don't worry about trying to preserve any of the navmesh in the cave area: we'll rebuild it later. Be sure that you have Select Vertex (Fig 4.7) and/or Select Triangle (Fig4.6) toggled on. You can clean up the cave section by selecting the vertices or triangles or both. Fig 4.9a shows the navmesh with all vertices and triangles (or "verts and tris", for short) in the cave area selected and ready for deletion.
Once you've selected the Triangles and/or Vertices you wish to delete, press either "R" or "del" to delete the selection. With the cave section removed, your navmesh should look similar to that shown in Fig 4.9b.
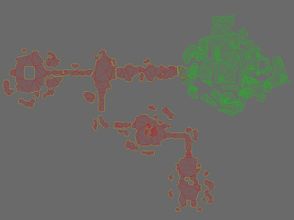
Fig. 4.9a: Navmesh, cave section selected
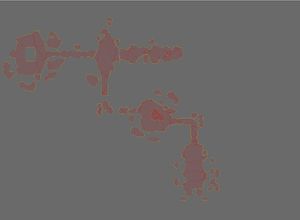
Fig. 4.9b: Navmesh, cave section removed


[edit | edit source]
It's time now to create the navmesh in the cave section by hand.
-
As you create and edit more and more navmeshes you will want to begin using Navmesh hotkeys instead of using the toolbar. T toggles Triangle Selection On/Off
V toggles Vertex Selection On/Off
G toggles Edge Selection On/Off
Toggle Vertex Selection on by either clicking the ![]() button in the navmesh toolbar or by using hotkey "V" and zoom into the beginning of the cave section. Right Click on the floor. Notice a vertex has appeared. Now create two more vertices the same way. You should see something like Fig 4.10 - three yellow (or two yellow and one green) vertices on the floor.
button in the navmesh toolbar or by using hotkey "V" and zoom into the beginning of the cave section. Right Click on the floor. Notice a vertex has appeared. Now create two more vertices the same way. You should see something like Fig 4.10 - three yellow (or two yellow and one green) vertices on the floor.

Make sure you do not have Grid Snap on. You don't need it when navmeshing and will only cause problems if left on.
-
Navmesh editing uses a separate set of hotkeys than regular Creation Kit editing. Some hotkeys you may be accustomed to, such as "T" for top-down viewing, are re-bound to new keys while editing navmesh mode. You may wish to print and refer to the Navmesh Cheat Sheet while getting used to this mode.
Notice the colors of the vertices you've created. Green indicates that a vertex is currently selected. Yellow vertices are unselected and disconnected - not part of any triangle. Vertices that are unselected and part of a triangle render Red. Yellow vertices serve no purpose and can be safely deleted if any are left hanging around a complete navmesh.
To create a Triangle, select all three of your disconnected, yellow verts by using CTRL+Left Click on each vertex - or simply Drag Select all three at once. The selected vertices will turn green to show that they are selected. Press "A" or use ![]() to create a triangle from the three vertices, as in Fig 4.11. Note that "A" only works when exactly three verts are selected.
to create a triangle from the three vertices, as in Fig 4.11. Note that "A" only works when exactly three verts are selected.
Fig. 4.10: Three Yellow (disconnected) verts
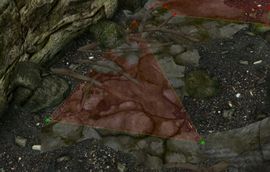
Fig. 4.11: Triangle formed from three verts


Notice that two vertices remain green/selected after creating the triangle. This makes it easier to create subsequent triangles. With two vertices selected, all you need to do to create another triangle is CTRL+Right-Click. A new vertex is created where you click and automatically creates a new triangle.
[edit | edit source]
Now that we have our first triangle, we need to fill up the rest of the cave section with other triangles. The easiest way to do this is to select two vertices and ctrl+Right-Click to place a third vertex. This will automatically create a new triangle between the two selected vertices and the newly-placed one.
Notice that once the new triangle is created, two vertices remain selected/green. Simply use ctrl+Right-Click to create another triangle. With practice, you can get into a rhythm and be able to fill up spaces quickly just by holding CTRL and Right Clicking. If the two green vertices aren't the two you need to create your next triangle, simply press "Tab" to swap selected vertices. Go ahead and fill up the rest of the cave section. Once your done, your cave section navmesh should look similar to Fig 4.12 and 4.13 below.
(Note: your results may vary depending on how much your clutter matches that in the example file)
-
With this technique, you can create triangles very quickly and cover a lot of ground by simply using CTRL-Right Click. We fondly call this technique "Walking the Dog".
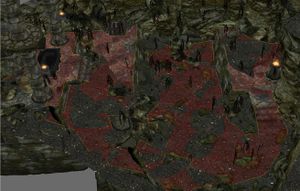
Fig. 4.12:
Results from the Recast Navmesh Generation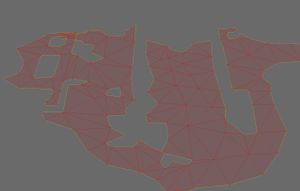
Fig. 4.13:
Recast Navmesh, navmesh only


[edit | edit source]
Before we move on to navmeshing the rest of the cell, let's look at the nordic stairs, NorHallSm1wayStairs128. Stairs are a typical problem area when using automatic generation. Your navmesh is probably disconnected here, as shown in Fig 4.14a.
Luckily, the Creation Kit makes it easy to quickly join disconnected navmesh like this.
For this example, we want a clean edge at the top and bottom of the stairs. Follow these steps:
- Delete any vertices on the staircase itself, if applicable.
- Re-arrange the vertices at the top and the bottom of the staircase, creating a clean, open edge at each side.
- If either edge has three or more vertices at the top of the stairs, merge some of the vertices so there are only two remaining. - To merge vertices, select which ones you want to merge and press "Q" or
 on the toolbar.
 - Make sure edge selection is toggled on ("G")
- Double-click one of the edges. Double-clicking an edge selects the two vertices on that edge - they will turn green to indicate this.
- With the two vertices selected, hold CTRL and double-click the other edge. Navmesh is automatically generated to join the edges. Your result should look similar to Fig 4.14b below.
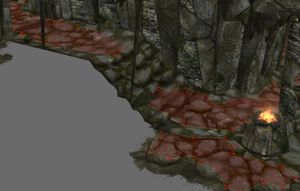
Fig. 4.14a: Stairs after Recast Navmesh Generation
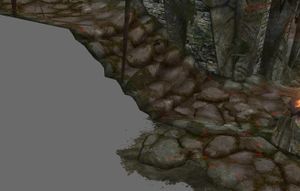
Fig. 4.14b: Cleaned up stair navmesh


[edit | edit source]
With the cave section navmeshed and the stairs connected you now know the essentials and are equipped to continue navmeshing the rest of the cell. Go ahead and navmesh the rest of the cell and if you run into any problems, the following pointers may come in handy.
- Focus on a clean, simple navmesh. This will be easier to edit and run faster in-game.
- Remember your hotkeys! Keep the Navmesh Cheat Sheet handy while learning.
- Don't bother creating navmesh in areas that AI won't be able to use anyway, such as narrow areas between furniture. Pathing Tests can be used to test this.
- Remember: to automatically create navmesh between two nearby, open edges: Double-Left Click one edge, then CTRL+Double-Left Click the other edge.
- Take advantage of the multiple view modes. To cycle through, press "W" or use the toolbar buttons

- To delete a triangle, toggle "T", select the offending triangle and press DELETE or R. You can also undo a change you've made with CTRL-Z.
- Deleting any vertex will delete all triangles and edges of which it was a part.
- Remember the hotkeys for toggling Triangle, Vertex, and Edge Selection. (T, V, G respectively).
- To merge vertices, select two or more and press Q or The vertices will merge to the first selected vertex.
- Double-Click an edge (with Edge Selection turned on, "G") to quickly select its two vertices.
- Remember how two vertices remain selected after creating a triangle? You can cycle through which two vertices you want selected by pressing "TAB".
- You can press "R" to delete selected objects if you don't want to reach across your keyboard and hit the DELETE key.
- Strive to create "fat" triangles - as close to equilateral as possible. These are much more efficient. Thin, "skinny" triangles are to be avoided. Use edge-rotating with hotkey "S" or
 to achieve a more ideal result, as picture in Fig 4.15s before & after example.
 - If you have what looks like a connected navmesh, but you see a yellow edge, this just means there are two vertices overlapping each other. To fix, drag select over the vertices and merge them together ("Q"). If the yellow edge remains, do the same thing on the vertices on the other side of the edge. If the yellow edge disappears, you have merged the vertices and have connected your navmesh.
- Right-Click on an edge to create a vertex on that edge. This is called splitting an edge.
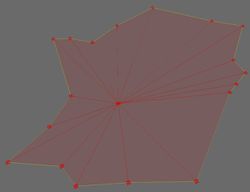
Fig. 4.15a: Example of inefficient, "sunburst" edges
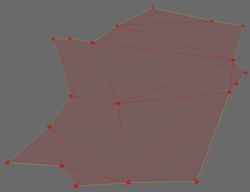
Fig. 4.15b: Same navmesh shape after edge-flipping cleanup


Here is what the navmesh should look like near the cluttered areas of the level. Notice in Fig 4.16 that the navmesh goes under physics-enabled (moveable/dynamic) objects. You never need to navmesh around a Havok object, the navmesh takes care of it during run-time. In the example below, the Havok objects in the scene are the shovel, wooden cart, and ceramic pot. Notice the navmesh goes underneath these objects. The wooden barrels are not Havok objects and therefore we need to navmesh around them.

Fig. 4.16: Navmesh properly avoiding static but not dynamic objects

Fig 4.17 shows approximately what your navmesh should look like after you're done. In this example, we've left the small, isolated navmesh "islands". These can easily be deleted.
- Select any triangle in your main navmesh and press "I" or

- This is called inverse flood fill and selects all navmeshes not in the selection. Assuming your playable area consists of a single, contiguous navmesh, all the area now highlighted green are unnecessary.
- With the islands selected, delete them with "R" or "DELETE".
- Your final navmesh should look similar to that in Fig 4.18.
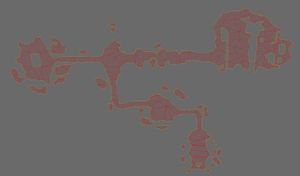
Fig. 4.17: Hand Crafted Navmesh w/islands
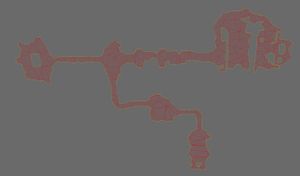
Fig. 4.18: Final Navmesh


[edit | edit source]
You need to always check your navmesh for errors after you're done navmeshing a cell. This is a relatively simple process.
-
You'll be notified upon saving your plugin if you have any errors. Regardless if you get an error or not when saving, you should always run "Check Navmesh".
- Bring up the Select Triangle by Index dialog pictured in fig 4.18. There are three ways to do this:
- Use the Find Triangle button on the Navmesh Tool Bar,

- Pressing the "CTRL+F" hotkey
- Via the Main Menu: Navmesh > Select Triangle by Index.
- Use the Find Triangle button on the Navmesh Tool Bar,
- Once this dialog is up, select "Check Navmesh".
- A warning, shown in fig 4.19, pops up showing how many triangles were found (if any) and asks if you want to delete all of them.
- Next, deal with the problem triangles. There are two approaches to this:
- Choosing "Yes" will delete all of the problem triangles - but you'll have to go in and find where these triangles were located and patch them up (usually by creating a new triangle). You won't have any way to find these triangles except by eye, which can be difficult with complex navmesh, especially if the offending triangles were small or overlapped.
- We recommend you fix each error by hand, in which case you can select "No" to bypass. This will close the warnings dialog.
- Select Next Warning in the Select Triangle dialog. The render window camera will automatically snap to the problem triangle and highlight it for you. Most errors are easily solved by deleting the problem triangle and rebuilding.
- If you have more than one warning, select Check Navmesh once again and repeat the process until all problem triangles have been corrected. (You have to re-check between each deletion because the index of navmesh triangles is affected when you correct each error.)
- When you've finished, save your plugin again.
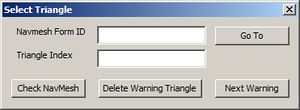
Fig. 4.18: Select Triangle Dialogue
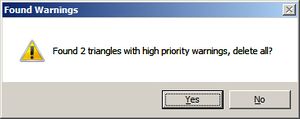
Fig. 4.19: Navmesh Warnings


-
If you don't want to fix each error by hand, click through each bad triangle with the "Next Warning" button, then choose "Yes" to delete all of the problem triangles. This will let you know where to check the navmesh for missing coverage after the deletion.
Create Cover Edges[edit | edit source]
Cover edges store data such as the height of a piece of cover, which NPCs use in combat and during regular pathfinding.
- To automatically detect cover, navigate to Navmesh > Find Cover from the Main Toolbar, or use the
 button in the Navmesh Toolbar.
 - Finding cover should take a small amount of time to process, depending on your hardware and the complexity of the navmesh.
- When done, you'll notice different colored edges in your navmesh. Each color represents different cover heights. The navmesh should look similar to that pictured in Fig 4.20 below after you've generated cover.
- To get a better visual of what kind of cover is in your level, simply navigate to Navmesh > Draw Cover (shown in Fig 4.21).
With navmesh complete, actors will be able to navigate the space. Building quality navmesh can be a time-consuming and, at times, tedious process - but the results of a bad navmesh are evident during gameplay.
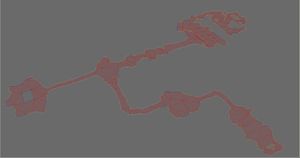
Fig. 4.20:
A typical navmesh with cover data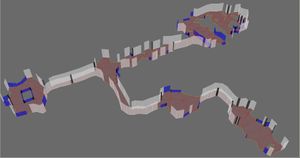
Fig. 4.21:
Navmesh with Cover Draw toggled on


-
Cover information isn't just used for ranged combat - it also determines where an AI will tend to go when fleeing from an enemy, for example. So it's a good idea to generate this information, even when it doesn't seem important.
Navmesh can hold more data than just cover - it's also possible to mark triangles as water, preferred, and edges as drop-down ledges. More information can be found here.
It is also possible to fine-tune cover data, although this level of detail isn't often necessary. To manually adjust cover data, select an edge and press "E". This will summon the "Edge Cover" dialog.
Here are a few pages you might want to reference during and after the tutorial, or in your further reading.
- Navmesh Overview - The Navmesh category has links to other topics regarding navmesh.
- Main Toolbar - Information on what the different icons on the Main Toolbar and Navmesh Toolbar and what they do.
- Navmesh Toolbar - Explains the buttons in the Navmesh Toolbar.
- Navmesh Cheat Sheet - Useful Hotkeys while in navmesh editing. Good to print out and keep handy while learning.
A solid navmesh provides the foundation needed to set up good NPC and combat gameplay. In the next tutorial we'll deal with just that.
Known Issue[edit | edit source]
There was an issue causing navmeshes in .ESPs to stop working if you travelled a few cells away from where they were placed. NPCs stopped moving and would not resume until the game was restarted. This issue was resolved with the 1.6 Title Update.
| Return to Tutorial Hub | Next Tutorial | ||
| Language: | English |
|---|