Uploading To Steam Workshop
| Uploading To Steam Workshop | |
|---|---|
| Basics Series, Chapter 3 | |
| Return to Tutorial Hub | |
| Next Tutorial | |
Overview[edit | edit source]
Bethesda Game Studios and Valve have partnered to bring Skyrim mods to the Steam Workshop. The Elder Scrolls and Fallout modding communities have been a great testament to the ingenuity and creativity of our PC gamers for years, and we're excited to help bring your mods to a larger audience than ever before.
The Creation Kit offers new functionality to creators to make distributing and updating mods as seamless as possible.
Upload Process for Plugins[edit | edit source]
The process for uploading your mod to Steam Workshop is relatively simple. Just follow these instructions:
- Make sure you are online and connected to your Steam Account
- Press Ctrl+S to save your plugin. If this is a new file, you'll be prompted to create your plugin.
- From the Main Toolbar, select File > Upload Plugin and Archive to Steam
- You'll be prompted to Add files to Archive by Hand.
- Some of the files directly associated with your mod will be archived automatically. (The automatic archiving function is just rudimentary.)
- Select "No" unless you are sure you need to manually archive specific files. (But usually you will need to manually archive the files that were missed.)
- For details on how to gather up all the files you need and build an archive, follow this link: Create Archive.
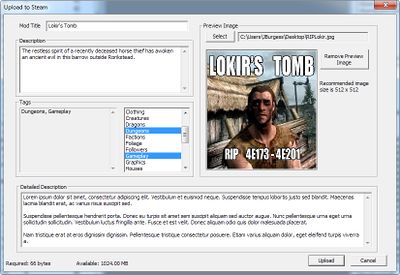
- The Steam Workshop Upload dialog will appear. (Pictured, right)
- Mod Title: The name of your mod as it will appear to users. Choose something you'll stick with!
- Description: A brief synopsis of your mod, visible from Steam Workshop.
- Tags: Assign any tags relevant to your content. These will help users find your mod.
- Preview Image: Choose a jpg image to accompany your mod. 512x512 images are best!
- Once you're happy with these settings, click "Upload".
- The title bar of the dialog will now change to "Sharing mod with Steam Cloud..."
- There will be a delay, depending on the size of your mod, and you'll be notified if the mod uploaded successfully.
Upload Process for Archive-Only Mods[edit | edit source]
Not every modder needs to work in the editor. Re-texture mods, for example, simply need to over-write existing texture files. The Creation Kit makes it possible to upload these mods to Steam Workshop as well.
The process is exactly the same as above, except that when you are prompted to Add files to Archive by Hand, select "Yes".
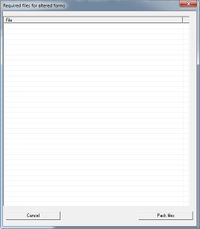
In the dialog that appears, simply drag-and-drop your modified files. Choose "Pack Files" when done, and resume as above.
It's also possible to manually create archives without uploading. Simply navigate to "File > Create Archive" from the Main Toolbar.
Accessing and Managing your Mod on the Steam Workshop[edit | edit source]
Once your mod is uploaded to the Steam Workshop, it will be available to all PC Skyrim players. Here's how to locate and manage your mod on the Workshop. Note that there can sometimes be a delay before your mod will appear on the Steam Workshop, although the process is usually near-instant.
- Make sure you logged into the Steam account with which you uploaded your mod.
- Visit your Steam profile community page.
- In the "Actions" area, click "View Workshop Files"
- Look for the mod you just uploaded and click through.
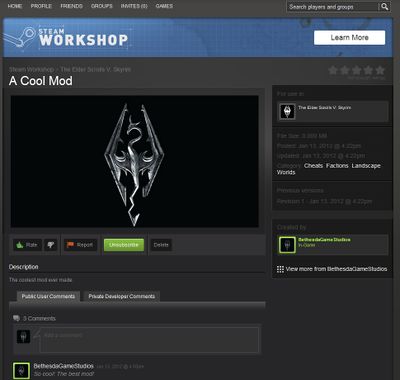
- This page includes all the normal mod tools, plus a few special tools just for you.
- (Author Only) Delete: If you'd like to manually remove your mod from the Steam Workshop, use this button.
- (Author Only) Private Developer Comments: Only visible to you and developers, this section allows developers to interact and comment on your mod.
- (Author Only) Revision History: You're also able to view a log of previous updates to your mod. Note that only the most recent version is stored on the Cloud. Be sure to keep good backups locally.
- Rate: Give your mod a thumbs-up or thumbs-down rating.
- Report: Offensive or inappropriate mods can be reported. Mods which are reported may be banned. A banned mod is not deleted from Steam Workshop; it is only hidden from the general public.
- Subscribe: Subscribing to your mod will automatically download the latest version from Workshop when Skyrim is launched. Note that the Workshop-downloaded version of you mod will have a slightly modified filename - so you don't have to worry about accidentally over-writing your local, work-in-progress version.
- Public User Comments: Be sure to check your comments section for feedback from the community!
- Created By: This section provides links to your other Workshop files and Steam profile.
- Other Information: This page also includes information, viewable by everyone: File Size, original upload date, most recent update, and category tags.
- UPDATING YOUR MOD on Steam. You must have the .esp named the same as when you first uploaded it in order for it to upload to the same mod area without duplicating as a "new" mod. If you are versioning your mod, e.g., MyMod_0_1.esp was the original, and you are now trying to update on STEAM, but you versioned it to MyMod_0_2.esp it will upload as a "new" mod. To keep it as an update to your original mod, you will need to temporarily rename the new version back to MyMod_0_1.esp and STEAM will then find and update with the new file.
Frequently Asked Questions[edit | edit source]
I don't like X, and have a suggestion to improve it![edit | edit source]
The Steam Workshop exists to help connect modders and gamers - it's important that it serves the needs of both groups as well as possible. If you've got any complaints, suggestions or bugs, please let us know on the official Creation Kit forum.
How do I update my Preview Image/Mod Description/Tags?[edit | edit source]
You can update any of these fields by re-uploading the mod through the Creation Kit, even if the plugin itself is unchanged.
How do users download an older version of my mod?[edit | edit source]
Only the most recent version of a mod is stored on the Workshop, and is automatically distributed to subscribers. It's wise to keep backups locally so you can roll back if your players begin to report complaints or bugs with your mod, so that you can roll back to an earlier version.
Why can't I use my screenshot as a preview file?[edit | edit source]
Preview images must be in .jpg format. Skyrim screenshots are .bmp files by default. You can use free image manipulation software such as Irfanview or Gimp to convert your screenshots into usable preview images. Remember that 512x512 images will look best in Steam Workshop.
As I was entering details for my mod (in the Steam Upload dialog, Fig 1), it was suddenly replaced with old information![edit | edit source]
When updating a previously-uploaded mod, "Getting details on published files…" will appear in the title bar of the Upload dialog. Once the Creation Kit has completed fetching your existing details from Steam Workshop, it will auto-fill the dialog with your current information. If you enter new details before this completes, they may be over-written. Luckily this process only takes a few seconds.
Why can't I drop my files into the manual archive creator? (Fig 2)[edit | edit source]
In order to be archived, files must be organized within the "Skyrim/Data" folder, and of an appropriate format (such as DDS, NIF, WAV, etc) to be interpreted by the Creation Kit. Note - For most users, the Data folder exists in a location similar to: C:\Program Files (x86)\Steam\steamapps\common\skyrim\data
My mod is dependent on some other mod(s). How can I make sure gamers get all the files they need?[edit | edit source]
To specify mod or DLC dependencies for your mod, go to its Steam workshop page and select "Add/Remove Required DLC" for DLC or "Add/Remove Required Items" for required mods. The required mods selector will allow you to choose mods that you have published, favorited, or are subscribed to. You may favorite a required mod, add it as a required item, then unfavorite if you wish. The DLC selector provides a simple checklist of the available Skyrim DLC packages. To require a DLC, simply check its checkbox.
I am working on an update to my mod, but the launcher downloaded my old version![edit | edit source]
If you have subscribed to your own mod on the Steam Workshop, the Skyrim Launcher will sync your plugin to what's stored online - regardless if your version is newer. It would be a good practice to not subscribe to your own mods, or to make periodic backups.
| Language: | [[::Uploading To Steam Workshop|English]] • [[::Uploading To Steam Workshop/fr|français]] • [[::Uploading To Steam Workshop/ja|日本語]] |
|---|


