Additional Prefabs
 |
TAKE NOTICE!
This article has been flagged as incomplete or inaccurate. Take any information here with a grain of salt. Help out! If you have the knowledge needed, please edit this article so we can remove the Incomplete flag. |
Overview[edit | edit source]
This tutorial, originally included in the Lokir's Tomb tutorial series, provides details on the use of prefabs which are neither traps nor enemy ambushes.
Other Prefabs[edit | edit source]
There are a variety of other objects that we have created simple set ups for that you can easily place or copy out of WarehousePrefabs. These include Ore Veins that can be mined, Barred Doors that can only be opened from one side, Removable Torches that turn on/off a light source, and more.
Mining Ore[edit | edit source]
Mining ore is easy to place and can vary your dungeon pacing. There are two parts to placing a mineable ore: the Ore Vein itself, and a mining furniture object.
Let's try placing an ore vein without using a prefab. First we will place an ore vein in our Dungeon by filtering for MineOre with *All selected in the Object Window. This will pull up a very large list.

The naming convention is fairly straightforward MineOreTypeShape_TextureVariant. Type = the ore you will receive (iron, silver, gold) Shape = there are four shapes for each type named 01-04 TextureVariant = a different texture for the dirt "skirt" around the ore, so it can match your dungeon
Place MineOreGold04_CaveGWall in the cave area of our LokirsTomb and rotate it a bit so it looks nice.

Next: place a furniture so the player will use the appropriate mining animation. There are three mining furnitures we can use: PickaxeMiningFloorMarker, PickaxeMiningTableMarker & PickaxeMiningWallMarker. Find these by filtering for Mining. The Wall, Floor, or Table portion of the name describes where the pickaxe will hit in the animation. We are going to place a PickaxeMiningWallMarker on the ground near our Ore then move and rotate it so the bottom is roughly even with the floor and wall area of the marker is slightly embedded in the Ore Vein. Be sure to test these in game to visually spot-check your marker placement.
Next, double click the furniture marker, then choose to "Activate Parents" and add a new link to the ore vein.
The final thing we need to do is create a "Linked Ref" from the Ore Vein to the Mining Furniture, by double clicking the ore vein, and choosing the "Linked Ref" button then adding the link to the furniture.. This allows the ore to know which furniture to use. If you don't have a furniture hooked up, the ore will automatically appear depleted when you run the game since it would be frustrating to find ore that you can't mine.
By using a variety of ore shapes and rotating them in different ways you can avoid having your mining area appear too regular and the three mining furnitures allow you to use them just about anywhere. Don't forget to place a pickaxe (weapPickaxe) nearby if you want to be certain your player can harvest the ore!
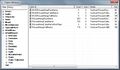
Fig. 6.54:
Mining furniture in Object Window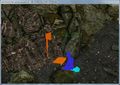
Fig. 6.55:
Mining furniture placed at Ore Vein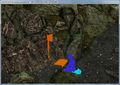
Fig. 6.56:
Completed Mining set up


Barred Doors[edit | edit source]
We often like to create loops in our levels so that a player doesn't have to backtrack the whole way out or to open up new paths once you been through in a specific direction. Sometimes we will use a portcullis for this, but Barred Doors are another method that works well. A basic set up can be found in the WarehousePrefabs cell.

|

|
| Fig. 6.57: Locating the Barred Door in WarehousePrefabs |
Fig. 6.58: Copy this basic Barred Door set up |
If we wanted to place one of these in our level we would select both the door and the door bar by dragging a selection around both and copy/pasting them into our level. Since we copied both at the same time, the linkedRefs between the two pieces are carried over so we don't have to change anything there.

|
| Fig. 6.59: Barred door pasted into Lokir's Tomb |
As you can see, this Dwarven door doesn't work with our Nordic doorway so we are going to select just the door and use Ctrl+F to replace the door with a different one. Swapping the object in this way keeps all the scripts, linkedRefs and activate parenting that have been added to the reference so everything will still work. In this case we are going to use NorWoodDoor01.

|

|
| Fig. 6.60: Door has been swapped with norWoodDoor01 |
Fig. 6.61: Wooden door realigned and snapped in place |
Since it has a different rotation than the other door we will want to turn on grid snapping and rotation snapping to move it into place in the doorway. We will then move the door bar into place as well and adjust the height if necessary. Lastly, since doors open in one direction we are going to double click the door and check Open By Default to make sure that it opens the correct direction, toward the bar. If it doesn't just rotate it 180 degrees and then uncheck Open By Default so that it starts closed.

|
| Fig. 6.62: Bar snapped in place, door complete |
Now our barred door is complete! The player will only be able to open the door once the bar has been lifted from the correct side. If you need to bar a larger or double door, swap the DoorDeadBolt01 for DoorDeadBoltDbl01.
Removable Torches[edit | edit source]
Removable Torches are an object we scripted up for spaces where we wanted to specifically allow stealth to be used. These consist of a RemovableTorchSconce01 object and any light object. The basic set up can be found in WarehousePrefabs

|

|
| Fig. 6.63: Locating a Removable Torch in WarehousePrefabs |
Fig. 6.64: Copy this basic Removable Torch set up |
We will select both of these and copy them into our level, then we can just move them around as necessary. The removable torch sconce will disable the light that it is is LinkedReffed to when you remove the torch and enable the light again if you replace the torch.

|

|

|
| Fig. 6.65: Removable Torch placed in Lokir's Tomb |
Fig. 6.66: Torch Lit when running the game |
Fig. 6.67: Torch Extinguished when running the game |
Now our player can take out the torch while the enemy's back is turned, making stealth easier!

If you want a sconce that is empty till the player places a torch, do the following: - On the light marker check Initially Disabled.
- On the removable torch sconce, go to the Scripts Tab at the very end, select the RemovableTorchSconce01SCRIPT and click the Properties button, then set StartsEmpty to TRUE by selecting the property and pressing the Edit Value button in the upper right corner and checking the box.
For more on the new scripting language and using Properties check out the Papyrus Tutorials.
Weapon Mounts[edit | edit source]
Weapon mounts are something we created mainly for the player's house so that you can display cool weaponry that you found in your adventures. Since custom player houses frequently show up as mods, we'll go over how to place one of these in Lokir's Tomb for reference.
There are several types of weapon mounts and examples of each can be found and copied directly from Warehouse Prefabs.

|

|

|
| Fig. 6.68: A single weapon mount |
Fig. 6.69: A weapon and shield mount |
Fig. 6.70: A weapon rack |
Lets copy and paste the single weapon set up from WarehousePrefabs. Select the mount, the white activator that sits in front of it, and the weapon it is linked to and copy/paste them into Lokir's Tomb. Next, just move and position them as you wish.

|

|
| Fig. 6.71: A single weapon mount set up selected |
Fig. 6.72: A single weapon mount set up in Lokir's Tomb |
Lets say we wanted to replace that sword with a battle axe. First, delete the sword and place a Steel Battle Axe instead. Next select the white activator we copied with the mount and create a linkedRef connection from the activator to the weapon as you have done in previous tutorial sections. It doesn't matter where the Battle Axe is placed, but we keep it close by to remember what is on the mount. Now we can see it on the mount in game.

|
| Fig. 6.73: Battle Axe on mount in Lokir's Tomb |
Using the Sword and shield version or weapon rack version is just as easy. They work in the same way, but have multiple mount pieces and activators. You simply copy and paste them and from the correct activator to the weapon or shield you want in that slot.

|

|
| Fig. 6.74: |[[image:WeaponMount07.jpg|left|thumb|Sword and Shield mount spread out to show separate pieces |
Fig. 6.75: Weapon rack spread out to show separate pieces |