Bethesda Tutorial Lights and FX
| Bethesda Tutorial Lights and FX | |
|---|---|
| Level Design Series, Chapter 8 | |
| Return to Tutorial Hub | |
| Next Tutorial | |
| Example Plugins: | |
| Initial | Completed |
| Companion Video Tutorial | |
Overview[edit | edit source]
This chapter will guide you through the basics of lighting and FX placement in a dungeon. Users will learn:
- The types of light-casting objects available
- How to manipulate shadow and non-shadow casting lights
- Achieving ambiance with FX and ImageSpace
- Use of External Emittance to inherit time-of-day light coloring
Types of Lights[edit | edit source]
There are four types of lights available in the Creation Kit. All lights are grouped together under WorldObjects > Light in the Object Window. They can be placed and manipulated like regular objects. Each type of light has its own properties.
- Omni Light
This type of light casts a sphere of light in all directions from its pivot point, and does not cast any shadows. It is the most common light used because it is the cheapest to render. Omni-directional lights are cheap to render in part because they pass through objects - as can be seen in Fig 8.1a.
- Shadow-Casting Omni
This type of light casts a sphere of light, just like a regular omni, but casts shadows. Shadow-casting lights can be identified by a purple axis, seen in Fig 8.1b.. Shadows generate additional polygons and only four can be visible at any given time, so be careful of how many of these you use. Too many shadow-casting lights will quickly cause performance problems and visual bugs.
- Spotlight
Spotlights cast light in a single direction and are useful for when you need a focused light, like with a skylight. All spotlights are shadow-casting lights, and therefore should be used frugally. (Fig 8.1c)
- Hemispherical
Hemispherical lights are represented by a red half-sphere in the Creation Kit. These lights behave like an omni, except that they will cast shadows from only one side of the pivot, which is what the half-sphere marker indicates. These lights are used less commonly, and are not pictured here.
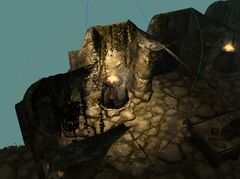
Fig. 8.1a:
An Omni Light without shadow-casting.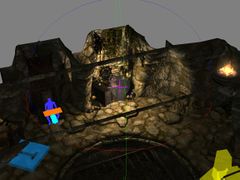
Fig. 8.1b:
A shadow-casting Omni. Note purple pivot within bulb.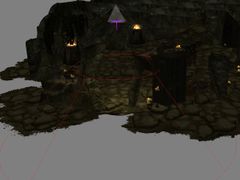
Fig. 8.1c:
A spotlight. The red wireframe shows the area in which the spotlight will cast light.


Working With Lights[edit | edit source]
Lighting a space, in its most basic form, is simple. Your goal is to provide enough illumination for the player to navigate and clearly make out critical elements such as levers, NPCs or loot. Lights will generally be placed next to in-world light sources such as torches, sky-holes, or bio-luminescent plants.
In practice, however, lighting for games is a meticulous art. The power and importance of good lighting cannot be over-stated, and the Creation Engine provides creators with more tools than ever before to create spaces that are not just beautifully lit, but also serve as a design tool for guiding players and creating emotional impact.
Lights can be located in the Object Window, in WorldObjects > Lights. From here, they can simply be dragged into the Render Window, just like static art. Be sure that Markers are visible ("M" hotkey), Light Markers are on with "CTRL+I", and that lighting preview is also toggled on with the "A" hotkey or toolbar button: ![]()
Shadow rendering must also be enabled in the preferences. File->Preferences->Shaders, check the box for shadows, click apply.
The following are some tips and lighting-specific shortcuts to help you achieve good results. Also try looking at the example plugin for ideas on how best to light your space.
- Pressing "L" toggles light radius markers. A wireframe sphere will appear around an omni light, and a spotlight will have a cone of effect. It is usually easier to work with the light markers off because they tend to clutter up your scene.
- Holding the "S" and dragging your mouse with a light selected will change the scale of a light - shrinking or enlarging the area of effect.
- Similarly, holding "ctrl+alt+s" while dragging the mouse with a light selected will increase/decrease the brightness of the light.
- Visual "Striping" artifacts sometimes occur when using shadow lights, as seen in Fig 8.2a. This can be fixed by manually adjusting the Depth Bias of the light casting the shadows. Hold "alt+B" while dragging the mouse. Adjust the light only as much as required to get rid of the striping, as going too far can cause another visual error which can make shadows appear to float.
- You may occasionally see another strange visual error, pictured in Fig 8.2b. This seam is actually caused by a tiny seam at the center of a shadow-casting omni. This is fixed by simply rotating the light.
- There are many attributes of lights that can be set on both the base object itself and the Light tab within the properties of an individual reference.
In Object Window, filter by Default*. Place DefaultTorch01NS near FXfireWithEmbersHeavy, adjust brightness and area of affect, see Fig 8.1a for reference. For lanterns and candle lights you can use DefaultCandleLight01NS such as in Fig 8.1b (for tight group of candles, it is recommend to stick with one light object). If you want the light to flicker more you can select *_Fast or *_SuperFast types from the Object Window, or if you want steady light then select *_NoMove. Experiment with the different lights.
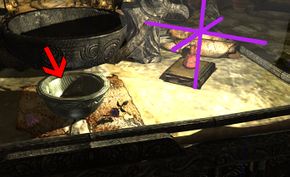
Fig. 8.2a:
Striping Artifacts caused by a shadow-caster with a poor Depth Bias setting.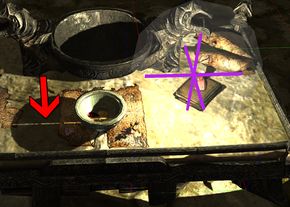
Fig. 8.2b:
A visual bug caused by the hemishperical seam of a shadow-casting Omni light. Rotating the light can hide this seam and fix the glitch.


Using Effects and External Emittance[edit | edit source]
The Creation Kit ships with a number of Special Effects, or "FX", that creators can use to establish mood and create convincing ambiance throughout a space. FX objects interact with light, so be sure you've done at least a rough pass of lighting with both shadow and non-shadow-casting lights in your space before proceeding.
Let's try working with one of the most common FX objects, a misty fog, and observe how it interacts with our lighting.
- Before we begin, there are a few settings you'll need switched on for an accurate lighting preview.
- Toggle lighting preview on with the "A" hotkey or

- Toggle Imagespace Preview on with the "6" hotkey or

- Toggle Animation FX preview on:

- Toggle Markers on. ("M" hotkey)
- Toggle lighting preview on with the "A" hotkey or
- Place an "FXMistLow01" object somewhere in your cell.
- Try Dragging your Mist object near a non-shadow-casting light - Notice that it picks up the light's coloration. (Fig 8.3a)
- Now try dragging the same object near a shadow-casting light. It inherits the directional/ambient light of the cell, but not the light.
- Keeping FXMistLow01 selected, call up the Reference Batch Action menu with the "-" (minus) hotkey. Your selected FX object(s) will appear in the left-side list.
- Select the "Set external emittance" radio button.
- Under the "Interior Light" dropdown menu, choose "DefaultCandleLight01".
- The "Reference" field should display the name of the light you selected. Double-check to make sure you didn't accidentally select some other object.
- Click the "Do" button in the lower-right corner.
- Note the change in the coloration of the FX mist object.

Only use this method around shadow casters, because external emittance will prevent the mist from being affected by any other light - including the player's spell effects or torch. To make sure your external emittance shows up in the render window, be sure FX preview is active:
External emittance can also be utilized by "Glow Fills". A Glow Fill is type of FX object that mimics the haze surrounding a light source. Let's see that in action now.
- Bring an FXAmbBeamDust03 into a room. (Fig. 8.3a)
- By default it picks up the default color and light direction of the cell
- We want the time-of-day to be reflected in this light beam. We'll follow a similar process as above.
- Bring up the batch action menu with the beam selected using the "-" (minus) key.
- In the "Action" options, select "Set external emittance", and select the light you want to match in the "Exterior Light" dropdown menu.
- The lights commonly used for effects are all prefixed with "FX" in the menu. Here we will use "FXLightRegionCaveBlueSkylight." ("Fig. 8.3b")
- Click "Do" to apply the change.
You can preview how the time of day will affect this light by going to file > preferences or right-clicking in the Render Window and choosing "Render Window Preferences" from the context menu. Select the "Render Window" tab. In the section labelled "Time/Day of Month", adjust the slider to change the time of day in the render window. ("Fig. 8.3c") You can then place a regular omni light near the beam and assign emittance to that as well. Try using "FXLightRegionSunlightWhite" which will cast white light, but allow the fx to keep its blue tint. Don't forget to press "M" to toggle the markers to see what the light will look like without markers cluttering up the window.

Markers can get in the way when you're trying to precisely positions lights and FX objects. Keep in mind, however, that these objects remain selected when hidden. This means you can still use gizmos after you've toggled markers with "M". You can also toggle "M" while holding the left mouse button to drag a light. These tricks make it easier to fine-tune your ambiance without markers cluttering up your view.
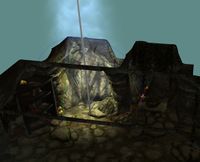
Fig. 8.3a:
FxAmbBeamDust03 placed in the first room of Lokir's Tomb.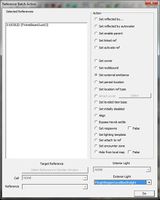
Fig. 8.3b:
The batch action window as used to set external emittance.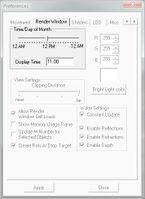
Fig. 8.3c:
The time slider in the preferences window.


Lighting Templates and Imagespaces[edit | edit source]
Another important element behind establishing the correct mood for your interior will be choosing the most appropriate Lighting Template and worldspace.
To set the lighting template in a cell, right-click on the cell name in the Cell View window and select "Edit", or go to World > Cells from the main menu and manually navigate to LokirsTomb. Click on the "Lighting" tab (Fig 8.4a). Here you can change the lighting template here to see what kind of effect it has on the scene in the render window.
Try experimenting; if we change the template to "MineTemplateClose" the cell will appear more foggy and dark. The "AzurasStarTemplate" will make it brighter and more colorful. You can also uncheck any of the properties near the dropdown box here to set your own values. Alternatively, setting the lighting template to NONE will allow you to manually set each value.

Changing the ambient color of a template won't do anything immediately noticeable. This value is used in the "Directional Ambient Lighting" tab. If you click the "Set From Ambient" button, the colors will all update to reflect the color chosen in the ambient color on the lighting tab.
With the template is set, we can set the ImageSpace. This can be set in the "ImageSpace" dropdown menu on the "Common Data" tab in the cell window. In most cases, this is set to "DefaultImageSpaceDungeon" because we can control the color and lighting more just by changing the lights and colors. We can do some more exaggerated things by using imagespaces as seen in "AzurasStarImageSpace" with the increased depth of field or in "FrostmereCryptImageSpace" with desaturation and increased contrast. "Fig.12" "Fig. 13"
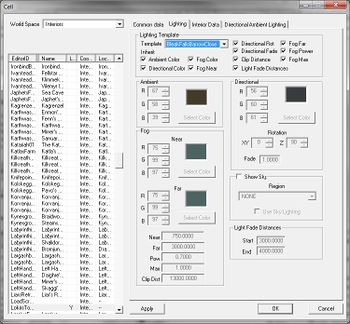
Fig 8.4a: The Lighting Template Dropdown
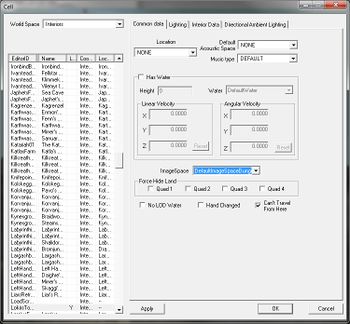
Fig 8.4b: The ImageSpace Dropdown


-
The section below details how to modify the lighting templates of individual rooms, but does not explain in detail how to create and modify RoomMarkers and Portals. If you are having a hard time viewing/creating RoomMarkers please visit this page for detailed instructions: http://www.creationkit.com/Bethesda_Tutorial_Optimization#Room_Markers_and_Portals . This will be especially helpful to those working on their own plugin, instead of the LokirsTomb demo plugin
- Setting the lighting template in the cell window will apply that change to the entire cell, but we can also change the template on a room by room basis. Bring up the "Show/Hide" menu and click "Portals and Rooms" to make room markers visible in the render window. Select the room whose template you want to change and bring up the batch action window. Select the "Set lighting template" action and you can then change the lighting template of the room by choosing a new template in the "Lighting Template" dropdown. The main reason we change the template is to reflect the size of a room and how far the player can see. In a small area like the first room of Lokir's Tomb it is better to use a template such as "BleakFallsBarrowClose". If we were to use the "BleakFallsBarrowFar" template things would appear much flatter and have less contrast. "Fig.8.5e" "Fig. 8.5f" If we use the close template in the large final room of Lokir's Tomb, the fog prevent the player from seeing across the room and flatten everything out. In a room like this it would be better to use "BleakFallsBarrowMedium". If you have a very large room, choose "BleakFallsBarrowFar". Use your discretion on which template you should use for each room.
- You can also change the imagespace on each room for even more variety. Bring up the reference window on a room marker and go to the "Bound Data" tab to access the Image Space dropdown. Setting this value to "DEFAULT" will set the imagespace to that of the entire cell.
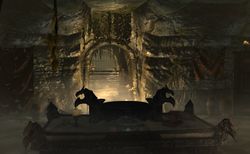
Fig. 8.5a:
The first room of Lokir's tomb using MineTemplateClose.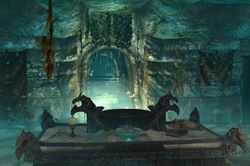
Fig. 8.5b:
The first room of Lokir's tomb using AzurasStarTemplate.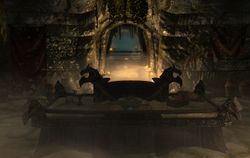
Fig. 8.5c:
The first room of Lokir's tomb using AzurasStarImageSpace.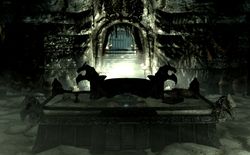
Fig. 8.5d:
The first room of Lokir's tomb using FrostmereCryptImageSpace.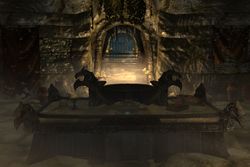
Fig. 8.5e:
The first room of Lokir's tomb using BleakFallsBarrowFar Template.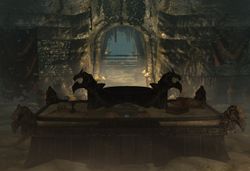
Fig. 8.5f:
The first room of Lokir's tomb using BleakFallsBarrowClose Template.


| Return to Tutorial Hub | Next Tutorial | ||