Bethesda Tutorial Optimization
| Bethesda Tutorial Optimization | |
|---|---|
| Level Design Series, Chapter 7 | |
| Return to Tutorial Hub | |
| Next Tutorial | |
| Example Plugins: | |
| Initial | Completed |
| Companion Video Tutorial | |
Overview[edit | edit source]
This chapter will guide you through optimizing a dungeon to enhance performance. The reader will learn:
- Tips for the best possible performance
- The tools available for optimization
- How to place room markers and portals
What is Optimization?[edit | edit source]
Objects are often rendered in games when they don't need to be, wasting precious performance. For example, if the player is in a room with walls on all sides, the player cannot see anything outside of the walls. Objects behind these walls don't need to be rendered. By default, however, such objects may render. See Fig 7.1 for an example. While the need to cull such objects may seem obvious to us, game engines sometimes have a hard time making decisions about what needs to be drawn.
In order to help the game know to not render anything outside the walls, we have special tools available to us to optimize the room. Thanks to these tools the game can make better decisions about what to render and what to cull. The tools we have available are Portals, Room Markers, Multibounds, and Occlusion Planes.
Manual optimization is not always necessary - some spaces are very simple and have very little to gain. Remember that a space that performs well on your machine may run very poorly on another with a different hardware configuration. This tutorial will try and give you some familiarity with best practices to make your mod run well on as many machines as possible.
Build for Performance with Best Practices[edit | edit source]
There are a number of guidelines you can keep in mind throughout building to avoid performance problems. Paying attention to these best practices will make your dungeon much easier to optimize.
- Watch your object count
Put simply, the object count is the number of "objects" rendered at a given time in the game. Some complex references may actually be made up of several objects, therefore the number of references is not actually a good indicator of your actual object count. Still, it's a good rule of thumb to keep the number of references down in a space for the sake of performance.
- Avoid Long Sight Lines
Rendering depends largely on the player's line of sight, or how far the player can see before her view is blocked. The longer the line of sight in a space, the more objects the game needs to render. It doesn't matter if there is a door or a wall blocking the way, whatever is in that line will render. Manual optimization will help avoid the worst instances, but it's a good idea to avoid long sight-lines in the first place.
There is a line of sight issue in Lokir's Tomb that could potentially cause performance problems if left unchecked. From the entry room you can see into the next two rooms causing the game to render a lot of objects as seen in Fig 7.2.
We can fix this by adding a staircase to the large hallway section leading into the cave. This will elevate the entire cave area, helping us block line of sight. Because we have elevated an entire room, we'll have to adjust the navmesh to match as well.
- Locate the "NorHallBg1way01" reference closest to the dungeon entrance.
- Ctrl+F to replace this with a "NorHallBg1wayStairs256" object
- Make sure Markers are toggled on ("M" hotkey)
- Adjust the dungeon and navmesh to snap with the new stair
- Check carefully for any seams introduced by the adjustment.
- Check the number of lights
The number of lights in a space affects performance as well. Try not let any object be lit by more than two lights. You can get a feel for how many references a light affects by "CTRL+I" to toggle light markers on then toggling the "L" hotkey. You can also look for lighting issues in a space by right clicking in the render window and selecting "Render Window Properties". Go to the "Shaders" tab and check the box that says "# of lights". Fig 7.3 shows an example space that has too many lights. The colors represent the number of lights hitting a each reference. Green represents an unlit piece and red means there are too many lights on a piece and performance issues are likely. It is good practice to make sure nothing shows up red when lighting your dungeon.
- Observe Framerate w/FRAPS
FRAPS is a piece of software that allows you to capture video and screenshots in game, but it also shows the framerate as it is running. It is a good idea to run through your space with FRAPS running to check your framerate while trying to look in all directions. A good rule of thumb is to try and stay consistently above 30 frames per second. If your framerate dips at any point, there could be an object count issue in your field of view. Download FRAPS here.
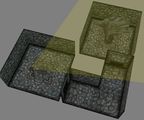
Fig. 7.1: Without Manual Optimization, the Statue will render because it is within the player's yellow view cone, even though the player cannot actually see it.
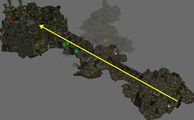
Fig. 7.2: Lokir's Tomb features a long, unbroken sight-line.
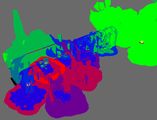
Fig. 7.3: References with red/purple shading have too many lights hitting them.


Room Markers and Portals[edit | edit source]

Room markers are simple shapes you can create which define an area as a room. Rooms, in essence, act as collectors. When culling, the renderer will treat everything inside another room as invisible, saving valuable processing power.
Room Markers[edit | edit source]
A Room Marker, sometimes called a Roombound, is a box used to group objects together, allowing Creation Engine to render or cull them as a group. We could create a large room marker which surrounds a room, for example. By default, standing within this marker would look normal - but once you step out of it, every object encompassed by the room marker would be culled, and become invisible.
The boxes "A" and "B" in Fig 7.4 represent two Room Markers. The black dot is the player, and the shaded triangle illustrates the player's field of vision. With just those room markers, the player would only see the references contained within room "A". Thanks to portals, however, we can create logical links between room Markers.
Portals[edit | edit source]
A portal is a sort of doorway from one Room Marker to another. Without portals, the player in Fig 7.4 will see any reference contained within Room "A", but nothing within Room "B". There are two portals in that diagram, however: portal "a" and portal "b".
Because the player's view frustum includes some or all of "a", the contents of both "A" and "B" will be rendered. (Assuming that "a" is linked to both "A" and "B", of course. More on that later.)
Note that the player cannot see any part of portal "b". This means that any Room connected to that portal (none are pictured) will be culled.
Optimization Workflow[edit | edit source]
Manual optimization with Room Markers and Portals can be difficult thing to understand. Let's go through the process with Lokir's Tomb to see it in action.
Step 1: Creating Room Markers[edit | edit source]
Before we begin, there are a couple quick set-up steps:
- Break the long sight-line as mentioned above if you haven't already (Fig 7.2)
- Toggle Snap-to-Grid On (Q hotkey or
 )
) - On the main toolbar, click: View > Show/Hide Window
- Check "Portals and Rooms". NOTE: "Light Markers" must be checked as well
Lokirs Tomb is basically made up of five distinct areas. We'll use a room marker to define each of these areas in a way the Creation Engine can easily understand. We'll begin with the first room, and then repeat to create the rest.
- Ctrl+click to select wall pieces from each side of the room
- Click the "Create a Roombound" button on the Main Toolbar:

- Note that our new Room Marker encompasses all the objects in our selection.
- Manually Scale your new Room Marker to include any stray pieces, as in Fig 7.5b.
- Repeat this process to create a total of five rooms, as seen in Fig 7.5c-e.
- Optionally, you can duplicate and scale your existing Room Marker by hand. It's up to you, as long as you achieve the same result.

It's possible to go overboard here. Each Portal the camera frustum hits involves a calculation cost, meaning that too many Rooms/Portals can actually cause a space to run slower than without them. It's a good rule of thumb to avoid situations where the line-of-sight will penetrate more than 3-5 portals.
Some of your rooms may overlap or be separated by small gaps, as in Fig 7.5d, depending on how you created them. You can use non-uniform scaling (covered in an earlier tutorial) to minimize these errors. Strive to line Rooms up at the most narrow possible points, such as doorways. Further information on working with primitives can be found here. The Creation Kit will attempt to correct minor errors when we link these rooms together later, but it's best to strive for good snapping now, as in Fig 7.5e.
Try running the game now. You'll notice that things don't look right; each room renders on its own while the player is within. You'll see gaps to the void anywhere another Room Marker begins. We'll install portals in the next step, which will allow the Creation Engine to render multiple Rooms at once.
-
Perfectly aligned room edges are important, or you can end up with very small overlapping areas and/or gaps in which the game will not render correctly. These are notoriously difficult to find and debug, but can usually be avoided by good snapping habits at this stage.

When creating a Room Marker (or other primitive) with objects selected, the newly-created primitive will match the position, rotation, and bounds of the selection. This can be extremely useful for quickly creating precise Room Markers, as seen above. You can also create "old-fashioned" primitives: simply click the button with nothing selected, then click where you'd like to place your new primitive, then scale as needed.
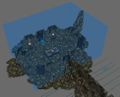
Fig 7.5a: Room marker created by selecting walls at each side of the entry room.
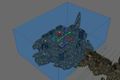
Fig 7.5b: The room marker re-sized to contain the entire entry room.
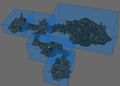
Fig 7.5c: Room markers containing each room of the dungeon.
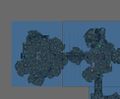
Fig 7.5d: A gap between two room markers in orthographic top down view.
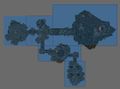
Fig 7.5e: All room markers lined up perfectly in orthographic top down view.


Step 2: Thinking With Portals[edit | edit source]
We'll create portals everywhere that a) two Room Markers meet and b) the player should be able to see from one room to the next. You can think of them as a sort of user-defined window. Try creating a portal now:
- Select the Room Marker encompassing the first room. Be sure nothing else is selected.
- Position the camera within the room.
- Look through the doorway, similar to a first-person view, as in Fig 7.6a.
- Enter "Portal Mode" by pressing
 or the Ctrl+P hotkey.
- NOTE: While in portal mode, only portals can be selected.
- Click the "Create Portal" button in the Main Toolbar:

- Click on the visible blue surface within the doorway
- A dark shape, flush with the edge of your room, will have been created. This is your portal.
- Sometimes the portal will not be created on the correct edge of the room. If this happens, press shift+F to focus the camera on the newly-created portal, then rotate/position it approximately where the two rooms meet. It will be snapped precisely when we join it with the second room, which we'll do shortly.
- Use the scale gizmo to adjust the shape of the portal. It should be as small as possible while completely filling the visible space at the intersection. (Fig 7.6b)
Your portal is positioned correctly, but it's only linked to one of the two rooms. You'll need to link it to the second room before it will work properly.
- Keeping the portal selected, exit Portal Mode. ( or Ctrl+P)
- Ctrl+Click to select the second Room Marker.
- You should now have two objects selected: the portal and the unlinked second room.
- Click the "Link Portal To Room" button:

Note the white arrow now drawn from the portal to the center of the newly-linked room. (Fig 7.6c) This visual representation is a good way to spot-check connections in a space. You may also notice a slight change in the scale/position of Room Marker #2. The Linking process will ensure the Room edges and Portal are co-planar, which sometimes corrects small errors. It's still best to try and make sure your rooms are properly snapped ahead of time, however. These auto-adjustments can become problematic when you're working with a room with multiple portals; a correction on one side of the room may create a gap on the other - so it's best not to rely upon them entirely.
-
If you're having trouble selecting a portal, simply go into Portal Mode by selecting a Room Marker and pressing "CTRL+P" or , and select your portal. When in Portal Mode, you can only select portals. This comes in handy when you have a lot of references blocking your view.
Keep this in mind if you ever find yourself unable to select anything in the editor - you may have accidentally entered portal mode!
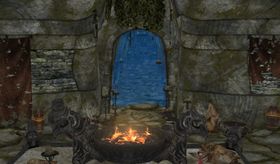
Fig 7.6a: The border between two room markers where we want to create our portal.

Fig 7.6b: The portal placed at the border and sized to cover the entire connecting area.
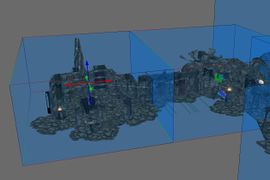
Fig 7.6c: Two rooms linked to a co-planar portal. Note the white arrows.


Step 3: Finishing the Optimization Pass[edit | edit source]
With Room Markers in place, continue adding portals throughout LokirsTomb until every room is linked. This layout is relatively straightforward, and most problems can be diagnosed by simply running the space in-game and looking for areas where some or all of the objects you'd expect to see pop out of existence, usually because of a gap or overlap where two Room Markers meet.

Some tips for advanced optimization: - Multiple rooms can be joined and treated as a single Room Marker. This allows coverage of irregular room shapes, and is especially useful for areas with several off-grid transitions. To join rooms, select each Room Marker and press the "Join Rooms" button:
 Joined rooms are indicated by a double-ended blue arrow.
 - It's possible to get a clean, diagram-style view of your connections. With Portals and Rooms hidden from the View menu, select all objects and double-tap "1" to hide. Then check the View menu to show Portals/Rooms, enter Portal Mode, and select all portals. (Fig 7.7)
- Once connected to Room Markers, a portal cannot be moved. You can break this link with the "Break Portal Link" button:

- Each reference can only belong to a single Room Marker - by default, the one in which its pivot point is contained. If a reference needs to be visible in multiple Rooms, assign it to the "NONE" multibound in its reference properties.
- Skyboxes can be used to set up a Skybox diorama to make your spaces with sky-holes more believable.
- Multiple rooms can be joined and treated as a single Room Marker. This allows coverage of irregular room shapes, and is especially useful for areas with several off-grid transitions. To join rooms, select each Room Marker and press the "Join Rooms" button:
Once your level is optimized for maximum performance, you're ready to move on to lighting and FX!
| Return to Tutorial Hub | Next Tutorial | ||