Bethesda Tutorial Planning the Quest/ru
Планирование квеста
 | На русском языке Требуется помощь переводчика |
 | Статья распространяется под лицензией Creative Commons. Авторы: HappyConsole, Aswo, Tiara и см. историю. |
| Первые шаги | |
|---|---|
| Серия: Основы квестописания, глава 1 | |
| К другим учебникам | |
| Следующая статья | |
Overview
This chapter will walk you through the preliminary steps of making a quest for Skyrim, setting up the overall structure of the quest's broad strokes in the editor.
The reader will learn:
- How to structure a quest before beginning implementation
- How to make a completely new quest
- What "quest stages" are and how to create them
Breaking down the Idea
Let's begin with a high-level idea for a quest. This will be a simple quest with a very straightforward player experience, so you can get a sense of how quests get built in the Creation Kit. Once you have that down, it's just a matter of details.
So starting with:
The player meets Bendu Olo, a Dark Elf who recently had his amulet stolen by a thief who is hiding out in a nearby cave. He offers to pay the player twice what the amulet is worth if it is returned to him.
So we can break this down into a set of sequential story phases:
- Pre-Quest: The player has never met Bendu Olo. The amulet is in the cave, along with the thief.
- Stage 1: The player has met Bendu Olo and been given the task of getting the amulet.
- Stage 2: The player has killed the thief.
- Stage 3: The player has retrieved the amulet.
- Stage 4: The player has given the amulet back to Bendu Olo and retrieved his reward.
It helps to think of stages as marking the event that has most recently happened. We'll use these stages to determine which dialogue options an NPC offers to the player, set the objective and quest target, and track the overall progress of the quest.
Creating the Quest Object
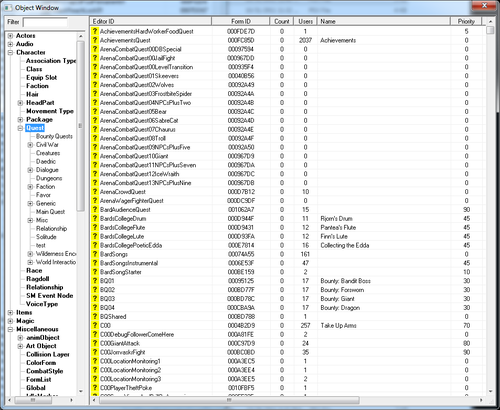
In the Object Window, navigate to Character -> Quest in the category list. Right-click anywhere in list of quests and select "New."
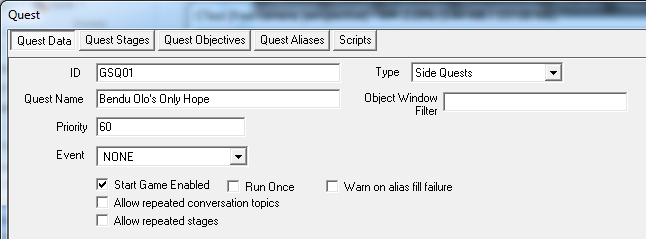
This brings up the quest window and the default Quest Data tab, which can be a little intimidating with all its widgets, but we'll get through this.
The important fields to worry about (and fill out) right now are:
- ID: This is what the Creation Engine uses internally to identify the quest. Fill this in with "GSQ01" (without the quotes).
- Quest Name: The name that the player will see and associate with the quest. Enter: "Bendu Olo's Only Hope"
- Priority: Affects the ordering of dialogue when multiple quests are using an actor. "60" is the typical value for a non-questline standalone quest, so put that in here.
- Type: Select "Side Quest" here. This just affects how your quest is displayed in the player's journal.
Hit the "OK" button in the bottom right to save your quest.
Making the Quest Stages
Open your quest back up by double-clicking it in the object list. Click on "Quest Stages" to go (unsurprisingly) to the Quest Stages tab.
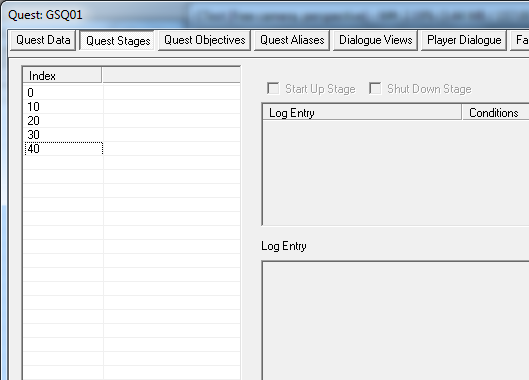
Here is where we'll layout the quest as we had broken it down. The table on the left (with the column labeled "Index") is where the stages will be listed. Right-click in it and select "New."
It creates the stage for you right away, with the stage number selected for editing. Leave this as 0 for now, and we'll consider this our "pre-quest" stage before the player has really interacted with this content.
Right-click in the table and select "New" again to create another stage. Label this one "10" -- we typically number quest stages in increments of 10 because that gives us flexibility to go back and add additional intermediate stages if we need to later, without having to renumber everything. (If you ever programmed in BASIC, you should feel at home with this convention.)
Continue on creating stages numbered 20, 30, and 40.
Your Quest Stages tab should now look something like this.
The bare skeleton of your quest has been created, but there's still a lot of work to be done...
| К другим учебникам | Следующая статья | ||
| Language: | English • français • polski • русский |
|---|


