Difference between revisions of "Tutoriel de Bethesda : Construction 1/fr"
imported>Azerteam |
imported>Azerteam |
||
| Line 81: | Line 81: | ||
Vous disposez désormais de toutes les informations nécessaires pour créer un véritable environnement jouable. Nous aborderons progressivement les premières étapes. Une fois acquis les fondamentaux, vous serez en mesure de créer tout un environnement en utilisant le kit des Ruines Nordiques à votre propre rythme. | Vous disposez désormais de toutes les informations nécessaires pour créer un véritable environnement jouable. Nous aborderons progressivement les premières étapes. Une fois acquis les fondamentaux, vous serez en mesure de créer tout un environnement en utilisant le kit des Ruines Nordiques à votre propre rythme. | ||
<br> | <br> | ||
== | ==Étape 1 : Créer une cellule== | ||
Avant de pouvoir faire quoi que ce soit d'autre, nous avons besoin de créer un espace pour travailler. Généralement, on créé un nouvel espace en dupliquant une cellule existante. La cellule que vous choisissez contient déjà des données qu'il vous sera peut-être nécessaire de modifier, mais nous verrons cela plus tard. Pour le moment, recherchez la cellule '''aaaMarkers''' dans la Cell View, effectuez un clic droit et choisissez '''Duplicate Cell''' (dupliquer la cellule). Vous devriez voir apparaître une nouvelle cellule dans la liste, juste en dessous de la cellule originale. Renommez cette nouvelle cellule en la sélectionnant et en appuyant sur F2. Nous appellerons ce donjon '''TombeDeLokir'''. | |||
Maintenant que vous disposez de votre propre cellule de travail, assurez-vous de sélectionner la cellule TombeDeLokir (et non aaaMarkers) et effacez les objets listés dans la colonne des objets (à droite dans la Cell View) afin de partir d'une zone vierge. Ne craignez pas d'effacer le ''navmesh'' également, nous y reviendrons plus tard. | |||
Faites un clic droit sur la cellule TombeDeLokir et choisissez "View" pour l'afficher dans la Render Window. | |||
{{WarningBox| | {{WarningBox|Il est important d'être sûr à 100% de la cellule affichée avant d'effectuer la moindre modification. Il y a deux moyens de le vérifier : dans la barre de titre de la [[Render_Window/fr|Render Window]], et dans la zone au-dessus de la barre de recherche de la [[Cell_View_Window/fr|Cell View]]. Les deux affichent le nom de la cellule active. }} | ||
==Step 2: Placing Your First Piece== | ==Step 2: Placing Your First Piece== | ||
Revision as of 19:56, 3 August 2018
Tutoriel de Bethesda : Construction 1
 |
LISEZ CETTE NOTE !
Cet article est destiné à accueillir la traduction d'un article écrit dans une autre langue et n'est pas terminé. Certaines parties sont encore en version originale, ou absentes. Aidez-nous ! Si vous avez les connaissances nécessaires, s'il vous plaît, modifiez cet article afin que nous puissions retirer le drapeau "Traduction incomplète". |
| Tutoriel de Bethesda : Construction 1/fr | |
|---|---|
| Série : Aménagement d'espaces de jeu, page 1 | |
| Sommaire du tutoriel | |
| Tutoriel suivant | |
| Exemple de modules : | |
| Initial | Terminé |
| Tutoriel vidéo compagnon | |
Commencement
Ce chapitre vous guidera dans la conception et l'aménagement d'espaces intérieurs en utilisant le style des anciennes ruines Nordiques.
Vous allez apprendre:
- Ce que sont les "kits" et comment les utiliser
- Comment trouver les pièces d'un kit dans l' Object Window
- Les conventions utilisées pour le nom des pièces
- Comment placer et adapter les pièces du kit ensembles
- Comment tester un donjon personnalisé dans le jeu
Kits
La majorité des espaces dans Skyrim sont crées à partir de "kits". Ces kits sont composés de pièces environnement conçues pour être utilisées ensemble pour créer une large variété d'espaces. Le grand nombre de pièces présentes minimise le nombre de pièces personnalisées qui doivent être créées.
Le kit le plus utilisé c'est "Ancient Nord Ruins" (Ancienne ruines Nordiques). Parce que la plupart des joueurs seront très familiers avec le kit, nous l'utiliserons pour la première partie de ce tutoriel. D'autres kits sont disponibles comme le Cave Kit (Cavernes) ou le Imperial Fort Kit (fort impérial).
Trouver les pièces d'un kit dans l'Object Window
Pour rendre les kits standards disponibles, cliquez d'abord sur le bouton de chargement ![]() dans la barre d'outils en haut de la fenêtre du Creation Kit, cochez la case en face de "Skyrim.esp" en double cliquant dessus puis cliquez sur OK. Repondez "Yes" à toutes erreurs qui pourrait s'afficher pendant le chargement.
dans la barre d'outils en haut de la fenêtre du Creation Kit, cochez la case en face de "Skyrim.esp" en double cliquant dessus puis cliquez sur OK. Repondez "Yes" à toutes erreurs qui pourrait s'afficher pendant le chargement.
Pour voir les catégories de kits dans l'Object Window, cliquez sur l'onglet 'World Objects' sur le côté gauche de l'Object Window. De là, développez la catégorie "STATIC > Dungeons". Plusieurs types de kits sont disponibles. Aux fins de ce tutoriel, nous allons utiliser la catégorie "Nordic". Vous pouvez parcourir cette catégorie pour voir les différents sous-kits et les pièces qui sont disponibles pour une utilisation dans ce kit. Pour l'instant, choisissez le sous-kit "SmRooms".
Vous pouvez utiliser le Preview Window pour un aperçu des objets à l'aide d'un clic droit sur un objet dans l'Objet Window et en sélectionnant "preview". Une fenêtre apparaîtra montrant l'objet. Cette fenêtre se met à jour automatiquement pour afficher n'importe quel objet que vous sélectionnez dans l'Objet Window, si bien qu'il peut être pratique de la maintenir pour parcourir les éléments artistiques. Malheureusement, les commandes de la caméra pour la fenêtre preview sont un sous-ensemble très différent et simplifié de ceux de la Render Window, et ces différences peuvent prendre un certain temps pour s'y habituer.

Les kits sont très complets et le grands nombres de pièces à votre disposition peut être accablant aux premiers abords. Ne baissez pas les bras ! Sachez juste que vous repérer à travers les kits est une partie importante pour pouvoir travailler efficacement avec et cela prendra un certain temps et nécessitera quelques expérimentations de votre part. Donnez-vous assez de temps pour ça avant de passer à autre chose. Essayez de ne pas vous frustrer si vous progressez lentement !
Conventions de la dénomination des Kits
Examinons le nom d'un élément de ce sous-kit : NorRmSmWallSideExSm01. Le nom est une sorte de code. Il peut sembler ne pas avoir beaucoup de sens, mais une fois que vous aurez compris les conventions de dénomination, il vous apprendra tout sur l'élément en un regard.
Décomposons ce nom et examinons la signification de chaque composant.
| Nor | Diminutif de "Nord". Cela nous apprend que l'élément fait partie du kit "Nord Ruins" (Ruines Nordiques). |
| Rm | Pour "room" (pièce, salle), le sous-kit dont cet élément fait partie. Par exemple un élément commençant par NorHall fera partie du sous-kit des Halls Nordiques. |
| Sm | Pour "small" (petit). Le kit des Salles Nordiques utilise "Sm" (small) pour les petites salles et "Bg" (big) pour les grandes salles. |
| Wall | "Wall" (mur) signifie que l'élément est un mur. Dans ce kit, les éléments peuvent-être "wall" (élément mural), "mid" (élément central), ou "cor" (élément d'angle). |
| Cor | Éléments d'angle. Ils peuvent être de type "CorIn" (angle intérieur) ou "CorOut" (angle extérieur). |
| Side | Les éléments du kit des Petites Salles Nordiques peuvent appartenir au type "Front" (élément de façade) ou "Side" (élément latéral). Nous le verrons plus en détail par la suite. |
| Ex | Désigne une issue ou l'embrasure d'une porte. Ces éléments s'adaptent parfaitement aux éléments de porte et sont assortis entre eux au sein d'un même kit. |
| Sm | Indique la taille l'issue ou de l'embrasure. Le kit des Salles Nordiques utilise "Sm" pour les petites issues et "Bg" pour les grandes issues. Seuls les éléments de même taille s'assemblent entre eux. |
| 01 | Le chiffre à la fin du nom indique généralement que l'élément existe en plusieurs variantes. Le chiffre augmente pour chaque nouvelle variation d'un même élément, permettant ainsi de les distinguer. |
Vous avez la possibilité de rechercher les éléments dont vous avez besoin en tapant n'importe quelle partie du nom dans la barre de recherche ("Filter") de l'Object Window. Par exemple, si vous souhaitez voir tous les éléments des Petites Salles Nordiques, tapez "NorRmSm". Attention : La recherche est éffectuée dans la catégorie sélectionnée dans la colonne de gauche de l'Object Window.

Une fois les conventions de dénomination assimilées, vous pouvez utiliser l'astérisque "(*)" comme métacaractère lors de vos recherches d'éléments dans l'Object Window. Par exemple, si vous recherchez toutes les issues existantes pour les Petites Salles Nordiques, entrez simplement "NorRmSm*Ex" dans la zone de recherche de l'Object Window. Tous les éléments d'issue possibles existant pour les Petites Salles Nordiques s'afficheront. Plus de détail sur les métacaractères sur Wikipédia
Construire une salle
Vous disposez désormais de toutes les informations nécessaires pour créer un véritable environnement jouable. Nous aborderons progressivement les premières étapes. Une fois acquis les fondamentaux, vous serez en mesure de créer tout un environnement en utilisant le kit des Ruines Nordiques à votre propre rythme.
Étape 1 : Créer une cellule
Avant de pouvoir faire quoi que ce soit d'autre, nous avons besoin de créer un espace pour travailler. Généralement, on créé un nouvel espace en dupliquant une cellule existante. La cellule que vous choisissez contient déjà des données qu'il vous sera peut-être nécessaire de modifier, mais nous verrons cela plus tard. Pour le moment, recherchez la cellule aaaMarkers dans la Cell View, effectuez un clic droit et choisissez Duplicate Cell (dupliquer la cellule). Vous devriez voir apparaître une nouvelle cellule dans la liste, juste en dessous de la cellule originale. Renommez cette nouvelle cellule en la sélectionnant et en appuyant sur F2. Nous appellerons ce donjon TombeDeLokir.
Maintenant que vous disposez de votre propre cellule de travail, assurez-vous de sélectionner la cellule TombeDeLokir (et non aaaMarkers) et effacez les objets listés dans la colonne des objets (à droite dans la Cell View) afin de partir d'une zone vierge. Ne craignez pas d'effacer le navmesh également, nous y reviendrons plus tard.
Faites un clic droit sur la cellule TombeDeLokir et choisissez "View" pour l'afficher dans la Render Window.

Il est important d'être sûr à 100% de la cellule affichée avant d'effectuer la moindre modification. Il y a deux moyens de le vérifier : dans la barre de titre de la Render Window, et dans la zone au-dessus de la barre de recherche de la Cell View. Les deux affichent le nom de la cellule active.
Step 2: Placing Your First Piece
Let's get started by placing our first piece. Take a look at your Object Window and expand: "World Objects > STATIC> Dungeons > Nordic" You'll notice several sub-kits here, but for now we're just concerned with the Small Room, or "SmRooms" sub-kit. Expand that sub-kit now, and the list on the right-hand side of your Object Window will populate with a number of pieces beginning with "NorRmSm".
Now that we have the sub-kit loaded and ready to go, select "NorRmSmWallSide01" and place it into your cell by dragging and releasing it over the Render Window. You may or may not see the object appear. In either case, right-click on the newly-created reference ID in your Cell View Window. Choose "Edit". As seen in Fig 2, change the XYZ Position coordinates to 0,0,0, and click OK.
Double-click the ref ID in the Cell View to manually focus the Render Window camera on it, and you should see a piece of floor floating in space. Double-clicking the object also made this object the current selection, so you can use your camera controls to get a good look at it.
Working on the Grid
Before going any further, it's important to understand "the Grid", and "Snapping" to it.
When we work in the Render Window, we are actually within an invisible, three-dimensional Cartesian Grid. The center of this grid, at XYZ coordinates (0,0,0), is referred to as the "Origin" - which is where we manually placed NorRmSmWallSide01 only moments ago. See Fig. 2
You don't always need to be aware of the grid. When placing an enemy, rotating a treasure chest, or adjusting the position of a light, for example, precision isn't important. The Grid is critical when working with kits, however. Kit pieces are designed to "snap" to each other precisely, and the Grid is the only way to get this precision. "Eyeballing" kit pieces will always leave gaps and seams.
Everything in the Creation Kit is measured in "Units". These units don't correspond to any real-world units of measurement, but Fig. 3 should give you an idea of how they scale against our kit and some characters.
The Nordic Ruin works well on a 128-unit grid. To set this up, either right-click anywhere in the Render Window and choose "Render Window Properties", or click this button in the Main Toolbar: ![]() . This will cause the dialog in Fig. 4 to appear. Choose the "Movement Tab" if it is not already visible. There are several options in here, but for the moment we just want to make sure that "Snap To Grid" is set to 128, and "Snap To Angle" is 45. Click Apply to save your settings and dismiss the dialog.
. This will cause the dialog in Fig. 4 to appear. Choose the "Movement Tab" if it is not already visible. There are several options in here, but for the moment we just want to make sure that "Snap To Grid" is set to 128, and "Snap To Angle" is 45. Click Apply to save your settings and dismiss the dialog.
Returning to the Render Window, make sure that snap-to-grid is toggled on. This is controlled with the "Q" hotkey or this button: ![]() . Likewise, snap-to-angle should be enabled. This is toggled with "Ctrl+Q" or
. Likewise, snap-to-angle should be enabled. This is toggled with "Ctrl+Q" or ![]() .
.
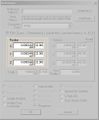
Fig. 2:
Manually placing our first piece at the origin.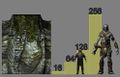
Fig. 3:
Some reference markings for unit scale
Fig. 4:
Preferences: Movement Tab


Step 3: Fitting the Pieces Together
Select your NorRmSmWallSide01 piece we placed before. Use "ctrl+D" to create a duplicate piece. This will place a new NorRmSmWallSide01 reference directly on top of the pre-existing one. Note that the duplicated object is automatically selected for you.
-
Remember that you have to "click in" to the render window before performing operations like duplicate. Also, if objects inside the render window are not being selected, type CTRL+P or click the  Enter Portal Mode button in the main toolbar.
Click and drag on the object inside the Render Window to move the newly-created wall piece. With grid-snapping turned on, it will lock into place relatively easily.
Two walls is hardly a room; we need corners! Return your attention to the Object Window and search for "NorRmSmCorIn01", then drag it into the render window. Rotate the piece into the correct orientation to line up with one of your walls and drag it into place. See Fig. 5. Remember to have your angle-snapping turned on and locked at 45 degrees.

When dragging new references to the Render Window, they will be placed with their pivot point wherever your cursor is when you release the left mouse button. This makes it easy to quickly create new pieces at the correct floor height. If you release over the void, the object will be placed at the camera.
Some kits have a "flow", which means that pieces have to be configured in a specific way for aesthetic reasons. For example, in this kit, walls are either "side" or "front" types. The two walls you've placed are side walls, as denoted in the name of the piece. Any perpendicular walls must therefore be of the front type. In this case, it's because of ceiling details that flow the length of the room, and using the pieces incorrectly can create large gaps in the ceiling.
In the Object Window, find "NorRmSmWallFront01" and drag it into the Render Window. If needed, Rotate the piece to line it up with one of the corner pieces. Complete the outer walls with two additional "NorRmSmWallFront01" pieces. You can then finish the room's walls using corners and the same amount of "NorRmSmWallFront01" and "NorRmSmWallSide01" pieces on each side.
The room is nearly complete - except for the gaping hole in the center.See Fig. 6. Place a NorRmSmMid01 piece, which can be snapped into the gap. Duplicate the mid piece and keep snapping until the hole is filled. There's something you have to check at this point: this piece also has specific flow, so rotation is important, even though it may not appear to be at first glance.
To check the ceiling flow, rotate the camera so you're looking at the ceiling. Notice the linear pattern in the pieces. Rotate the mid pieces individually where necessary to connect the pattern to the walls. See Fig. 7 for the correct configuration.
-
Rotating the camera to look up can be disorienting, especially if you are new to the Creation Kit or working in 3D. Be patient and use Shift+F to re-focus the camera and start over if you end up looking into the void.
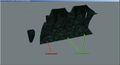
Fig. 5:
NorRmSmCorIn01 lined up with NorRmSmWallSide01.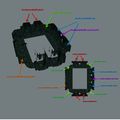
Fig. 6:
The outer edges of your room.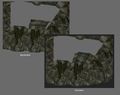
Fig. 7:
The NorRmSmMid01 piece placed incorrectly, notice the gap. On the right the piece is in the correct configuration.


Step 4: Connecting Rooms and Finishing Layout
We've completed a room with walls, a ceiling, and a floor - but no way out. Time to add a door. Delete one of the NorRmSmWallFront01 pieces by selecting it in the render window and pressing "delete". In the Object Window, search for NorRmSmWallFrontExSm01 and drag it into the render window. Remember to preserve front/side consistency. Since this exit is on a "front" wall, use a "front" exit piece.
-
Not sure what object you have selected? The Main Toolbar displays this in its lower-left corner. If you have multiple objects selected, it displays the most recently selected object name and "+X more" to give you an idea how large your total selection is. Your current selection is also highlighted in the Cell View Window
Try creating a hallway connected to the new doorway. In the object window search for NorHallSm1WayEndExSm01. Make sure your Object Window is opened to WorldObjects>Static>Dungeons>Nordic>SmHalls. Note the ExSm suffix, shorthand for "Exit Small". This lets us know it will snap with any other ExSm piece in the Nordic kit. Be sure grid-snapping is still on and snap the pieces together.
You now know everything you need complete the first layout pass for this dungeon. Try using the image below to do so now. If you get stuck, try downloading the example plugin to see the layout completed.
Fig. 1:
The completed layout map.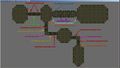
Fig. 2:
Completed layout with labels


-
When loading example plugins, remember not to load your plugin to avoid conflicts caused by having two cells with the same name.
Step 5: Checking It Out In the Game
As you work, it's a good idea to frequently test your work in-game. For a refresher on loading your plugin, check here. As you walk around the space, look for gaps and seams you may have accidentally missed in the editor.
If you choose to load the above plugin to your game, or if you named your newly created cell the same as LokirsTomb, you can teleport to it by typing COC LokirsTomb in the console.

-
When testing, it's helpful to use the COCMarkerHeading. These markers are only used for testing - when using the COC console command, this is where you will appear. Only one of these markers should be placed per cell. If a cell has a pre-existing coc Marker, simply move it before saving the plugin. Like all markers, if it's hidden, press "M" to show it. If you are having trouble finding it in the Object Window, simply type "COC" into the filter box and select the *ALL category.
Problem
-
'Creation-kit' has been having some slight problems with rendering objects from your mod into the real game, although this is a problem for some people. If you make a mod that has a Piece of Static objects in it, and then you save and upload, but when you go to test it out it is not there then the problem has occurred, currently there is not a fix to this, I will be looking for a way on avoiding this, or preferable fixing it. Hopefully Bethesda Game Studios.
| Sommaire du tutoriel | Tutoriel suivant | ||
| Langues : | English • français • 日本語 • polski • русский |
|---|