Bethesda Tutorial Layout Part 1/ja
 | このページは日本語です。 テキストのすべてまたは選択された部分の翻訳が必要です。 |
| このページは日本語です。 リンク先ページの編集上の訂正または翻訳が必要です。 |
| Bethesda Tutorial Layout Part 1/ja | |
|---|---|
| レベルデザイン シリーズ、1章 | |
| チュートリアルハブに戻る | |
| 次のチュートリアル | |
| プラグインの実例: | |
| 初期 | 完成 |
| コンパニオン・ビデオ・チュートリアル | |
Overview[edit | edit source]
Overview(概要)
このチャプターは「Ancient Nord Ruin(古代ノルド廃墟)」を使用して「interior space(内部スペース)」のレイアウトを作成するための案内になります。
このチャプターで読者が学べること:
☆「kits(キット)」が何であるか、それらの使用方法
☆キットのピースを「Object Window(オブジェクトウィンド)」でどうやって探すか
☆「Kit piece(キットのピース)」の命名規則
☆キットピースの合体方法
☆ゲーム内でカスタムダンジョンをテストする方法
This chapter will guide you through the basics of creating a layout for an interior space using the "Ancient Nord Ruin" art.
The reader will learn:
- What "kits" are and how to use them
- How to find kit pieces in the Object Window
- Kit piece naming conventions
- How to place and fit kit pieces together
- How to test a custom dungeon in game
Kits[edit | edit source]
Kits(キット)
スカイリムの大部分が「キット」を使用して作成されます。これらキットはさまざまな空間を作成するため、組み合わせて使用するよう設計されてた「Environment Art(環境パーツ)」の断片で構成されています。そしてこれらキットはゲームでたくさんのエリアを作成するのに役立ちます。このことはゲームプレイの目新しさや実験という意味でも寄与するものとなるでしょうが、一方で、作成されるカスタムエリアの量は最低限である必要があります。
スカイリムのキットで重点的に使用するのは「Ancient Nord Ruin(古代ノルド廃墟)」キットです。このキットはほとんどのプレイヤーが馴染み深いので、私たちはレイアウトの第一段階としてこれを使用することにしました。他に役に立つキットは例えば「Cave Kit(洞穴キット)」と「Imperial Fort Kit(インペリアル砦キット)」などです。
The majority of spaces in Skyrim are created using "kits". These kits are composed of pieces of environment art designed to be used together to create a wide variety of spaces, and are instrumental to our ability to create the large number of areas in the game with the flexibility to keep things fresh and experiment with gameplay, while minimizing the amount of custom art that needs to be created.
One heavily used kit in Skyrim is the "Ancient Nord Ruin" kit. Because most players will be very familiar with the kit, we'll be using it for the first phase of our layout in this tutorial. Some other examples of the kits available are the Cave Kit and the Imperial Fort Kit.
Finding Kit Pieces in the Object Window[edit | edit source]
Finding Kit Pieces in the Object Window(「Object Window(オブジェクトウィンド)」でキットピースを見つける)
キットを有効にするため「Skyrim.esm」のチェックボックスをダブルクリックし、「OK」を押して読み込んでください。このプロセスでどんなエラーが出ても「Yes」と答えてください。
「Object Window(オブジェクトウィンドウ」)でキットのカテゴリを見るためにObject Windowの左のカテゴリ枠にある「World Objects」項目を広げてください。さらにその下位層の「Static」、その下位層の「Dungeons」、そのまた下位層の「Nordic」と順番に項目をさらに広げていってください。あなたはこの操作の過程で開かれた他のキットについて閲覧してみることも可能です。最終的に「Nordic」のさらに下位層の「SmRooms」サブキットを開いてみてください。
その開かれたオブジェクト(Object Windowの左に展開されたオブジェクト群)は「Preview Window」でその3Dオブジェクトをプレビューすることができます。見たいオブジェクトの項目を右クリックし、「Preview」を選択してください。そのオブジェクトの3Dがウィンドウに現れるはずです。このウィンドウは「Render Window」と同じカメラ操作で視点変更し、Object Window内であなたが選んだいかなるオブジェクトも自動アップデートされた形でプレビューすることが可能です。このようなことから「Preview Window」はそのオブジェクトを閲覧するのに役立つでしょう。
キットのピースはとても数が多く、最初のうちはとても手ごわく思えるでしょう。がんばってください!キット周りを理解・作業するのは時間がかかりますし、試行錯誤が必要でしょう。すぐに結果を求めたり、早々に次のステップに行こうとせず、キットの理解に時間をかけてみてください。
To make the standard kits available, first click on the load button ![]() on the toolbar at the top of the creation kit window, double-click the checkbox in front of "Skyrim.esm" to make sure it is selected, and click OK. Answer "yes" to any errors that pop up during this process.
on the toolbar at the top of the creation kit window, double-click the checkbox in front of "Skyrim.esm" to make sure it is selected, and click OK. Answer "yes" to any errors that pop up during this process.
To view categories of kits in the object window, expand the ‘World Objects’ category on the left side of the Object Window. From there, expand the "STATIC > Dungeons" categories. Several kit types are available. For the purposes of this tutorial we will be using the "Nordic" category. You can browse through this category to see the different sub kits and pieces that are available for use in this kit. For now, choose the "SmRooms" sub-kit.
You can use the Preview Window (en) to preview objects by right clicking an object in the object window and selecting "preview". A window will pop up showing the object. This window automatically updates to show whatever object you select in the Object Window (en), so it can be handy to keep up for browsing the art. Unfortunately, the camera controls for the Preview Window are a markedly different and simplified subset of those in the Render Window (en), and these differences can take some getting used to.

Kits are very robust, and the large number of pieces at your disposal can be overwhelming at first. Stick with it! Just knowing your way around the kit is a huge part of being able to effectively work with it, and this will take some time and experimentation on your part. Give yourself a generous amount of time for this before moving on. Try not to get frustrated at slow progress right now!
Kit Naming Conventions[edit | edit source]

Kit Naming Conventions(キットの命名規則)
ここで以下のサブキットのピースの名前を調べてみましょう:「NorRmSmWallSideExSm01」。キットは名前自体が一種のコードになっています。最初はわかりづらいかもしれませんが、一度命名規則を理解できれば、一目でそのキットのピースの仕様について知ることができるようになります。
この名前を分解してその意味を調べていきましょう。
Nor これは「Nord(ノルド)」のつづりを短縮したもので、「Nord Ruins(ノルド廃墟))のパーツであることを示します
Rm これは「room(部屋)」のメンバーであり、例えば「NorHall~」は「Nord Hall(ノルドのホール)」、つまり「Hall(ホール)」メンバーのサブキットパーツとなります
Sm これは「Small(小さい)」を示し、大きいは「Bg」の名前が付けられています
Wall これは「Wall(壁)」を示し、このキットピースには「Wall」「Mid」「Cor」の種類があります
Cor これは「Cor(角)」を示し、「CorIn」は内側の角、「CorOut」は外側の角を示します
Side これは「Nordic Small room」のキットで「Front(正面)」か「Side(サイド)」という形で使用されます。これは後でまた説明します
Ex これは出口・戸口用のピースで、同じキットの「Doors」や「Ex」の名前が入った戸口に上手くはまるものがあるでしょう
SM これは出口・戸口のサイズを示します。「Nordic Room」キットは小さい出口に「Sm」を、大きい出口に「Bg」を使用しています。サイズが合っている対のみフィットするでしょう
01 数字は通常、ピースのバリエーションを意味します。数字が増えればそれだけ各ピースが特定のバリエーションをもっていることになります
あなたは「Object Window filter(オブジェクトウィンドの上部にある「Filter」)」にこれら名前の一部をタイピングすることで必要とするピースを検索することができます。例えば「Nordic Small Room」ピースの全てが見たければ「Filter」に「NorRmSm」とタイピングしてみてください。この検索はObject Windowの左側のウィンドで選択されたカテゴリに基づいて、検索結果を表示するでしょう。
(図Fig. 1)
一度命名規則を学べば、「Object Window」でピースを探す時、ワイルドカード(代入できるエックスのようなもの)として"(*)" アスタリスクを使用することができるでしょう。例えば「Object Window Filter」で「NorRmSm*Ex」と検索すれば全ての「Nordic Small Room」の出口がリストに表示されるでしょう。ワイルドカードについてもっと知りたい場合は「wildcards at Wikipedia」を参照のこと。
Let's examine the name of a piece of this sub-kit: NorRmSmWallSideExSm01. The name is a sort of code - it may not make much sense at first, but once you understand the naming convention it tells you everything about the piece at a glance.
Let's break down this name and examine the meaning of each component.
| Nor | Short for "Nord" - this lets us know it's part of the Nord Ruins kit |
| Rm | Stands for "room", the sub-kit this piece is a member of. For example, a piece beginning with NorHall would be part of the Nord Hall sub-kit. |
| Sm | This stands for "small". The Nordic Room kit uses "Sm" for small rooms and "Bg" for big rooms. |
| Wall | Fairly self-explanatory: this is a wall. Pieces in this kit are wall, mid, or cor (for corner) pieces. |
| Cor | Corner pieces. Designated as CorIn (inside corner) or CorOut (Outside corner.) |
| Side | Pieces in the Nordic Small room kit fit together as either "Front" or "Side" More on this later. |
| Ex | Denotes an exit/doorway piece. This will snap nicely with doors and matching "Ex" doorways within the same kit. |
| Sm | Denotes the size of the exit/doorway piece. The Nordic Room kit uses "Sm" for small exits and "Bg" for big exits. Only matching sizes will fit together. |
| 01 | The number suffix usually means that a piece has multiple variations. The number increments to identify each variation the piece has. |
You are able to search for the pieces you need by typing any of these parts into the Object Window filter. For example, if you want to view all of the Nordic Small Room pieces, type "NorRmSm" into the filter. The search will turn up results based on the category selected on the left side of the object window.

Once you've learned the naming convention, you can use the asterisk "(*)" to serve as a wildcard when searching for pieces in the Object Window. For example, if you are searching for all possible exits from a Nordic Small Room, just enter "NorRmSm*Ex" into the Object Window Filter. Each possible exit piece for the Nordic Small Room kit will appear. More about wildcards at Wikipedia
Building a Room[edit | edit source]
Building a Room(部屋の作成)
実際にゲームでプレーできるスペースを作成するのに必要な全ての情報はここに揃っています。始めのステップはゆっくりと説明していくつもりです。一度原理を学べば、あなた自身のペースで「Nordic Ruins」キットを使用して完全なレイアウトを作成できるでしょう。
You are now equipped with all the information you need to create an actual, playable space. We'll go slowly through the first handful of steps. Once you've learned the fundamentals, you'll be able to create a full layout using the Nordic Ruins kit at your own pace.
Step 1: Creating A Cell[edit | edit source]
Step 1: Creating A Cell(セルの作成)
何をするにもまず作業をするスペースを作成する必要があります。これは一般的に既存のセルをコピーすることで作成します。あなたがこれから選ぶセルは少し変更する必要があるデータを持っていますが、これについては後で対処することにします。まずは、「Render Window」の「interior(内部セル)」タブから「aaaMarkers」を見つけ、それを右クリックして「Duplicate Cell」を選んでください。「aaaMarkers」のすぐ下に「aaaMarkersCOPY0000」という名でセルがコピーされたのが確認できるはずです。その「aaaMarkersCOPY0000」を選択してF2キーを押すことで、この新しいセルを改名してください。私たちはこのダンジョンを「LokirsTomb」と呼ぶことにします。
これで作業するスペースとなるあなたオリジナルの内部セルが出来たことになります。「LokirsTomb」セル(「aaaMarkers」ではない)を選択して「Cell View」ウィンドウパネルの右にリストされているオブジェクト群を全て削除してください。私たちはこのセルがまっさらな状態からスタートすることを望んでいます。なお「Navmesh(ナビメッシュ)」を削除したことについては今は気にしないでください。後でそれを作成するつもです。
「LokirsTomb」セル項目を右クリックして「View」を選んでください。「Render Window」に「LokirsTomb」セルが視覚的に表示されます。
何かを編集する際には、今何のセルを読み込んでいるのか確実に把握していることが重要です。コレをチェックする方法は2つあります。「Render Window」のタイトルバーで名前を確認するか、「Cell View」ウィンドウの右上にある検索用タブ上に、現在読み込まれているセル名が表示されるので、そこで確認することができます。
Before we can do anything else, we need to create a space to work in. This is most commonly done by duplicating an existing cell. The cell you choose will bring over some data you may need to modify, but we'll deal with that later. For now, locate and right-click on the interior cell aaaMarkers and choose Duplicate Cell. You should see a new cell appear in the Cell List just below it. Rename this new cell by selecting it and pressing F2. We'll call this dungeon LokirsTomb.
Now that you have your own interior cell to work with, be sure to select the LokirsTomb cell (and not aaaMarkers) and delete the LokirsTomb objects listed in the object window (right side of the Cell View pane), as we'll want to start fresh. Don't worry about deleting the navmesh for now. We'll get to that later.
Right click on the LokirsTomb Cell and pick "View" to assign it to the render window.

It's important to be 100% sure of what cell you have loaded before doing any editing. There are two places to check this: the title bar of the Render Window (en), and the area above the filter box in the Cell View (en) window both show the name of the currently-loaded cell
Step 2: Placing Your First Piece[edit | edit source]
Step 2: Placing Your First Piece(最初のピースを設置する)
それでは最初のピースをセルに置くことを始めましょう。「Object Window」で「World Objects > STATIC> Dungeons > Nordic」と順に項目を広げて(展開して)いってください。ここで他にもサブキットがいくつかあることに気づくでしょうが、当分私たちに関係があるのは「SmRooms」かそのサブキットになります。「SmRooms」をリストから選択し「Object Window」の右側に「NorRmSm~」で始まるピースがリストアップされるのを確認してください。
さてこれでサブキットが読み込まれました。「NorRmSmWallSide01」を選び、「Render Window」の中にそれをドラッグ&ドロップして、そのピースをLokirsTombセルに置いてください。あなたはそのピースであるオブジェクトが「Render Window」に現れるのを見ることが出来るはずです。次に「Cell View」ウィンドウの右側のリストに新しく作成された「NorRmSmWallSide01」のリファレンスIDを右クリックし「Edit」を選んでください。そして下の(図Fig. 2)に見られるようにPosition(座標)のXYZ軸を「0,0,0」に変えて、OKボタンをクリックしてください。
「Cell View」右のリストから「NorRmSmWallSide01」をダブルクリックし、「Render Window」上でカメラのフォーカスを当該オブジェクトに合わせてください。ダブルクリックでそのオブジェクトが現在選択されているものとなったので、あなたはそのオブジェクトを良く眺められる(当該オブジェクトを中心とした)カメラ制御動作をさせる事ができるようになっているはずです。
(図Fig. 2)
Let's get started by placing our first piece. Take a look at your Object Window (en) and expand: "World Objects > STATIC> Dungeons > Nordic" You'll notice several sub-kits here, but for now we're just concerned with the Small Room, or "SmRooms" sub-kit. Expand that sub-kit now, and the list on the right-hand side of your Object Window will populate with a number of pieces beginning with "NorRmSm".
Now that we have the sub-kit loaded and ready to go, select "NorRmSmWallSide01" and place it into your cell by dragging and releasing it over the Render Window. You may or may not see the object appear. In either case, right-click on the newly-created reference ID in your Cell View Window. Choose "Edit". As seen in Fig 2, change the XYZ Position coordinates to 0,0,0, and click OK.
Double-click the ref ID in the Cell View (en) to manually focus the Render Window camera on it, and you should see a piece of floor floating in space. Double-clicking the object also made this object the current selection, so you can use your camera controls to get a good look at it.
Working on the Grid[edit | edit source]
Working on the Grid(グリッド上の作業)
これから先に進める前に、「Grid」と「Snapping」について理解することは重要です。
「Render Window」で作業している際、目に見えなくても実際には私たちは立体的な形格子の中にいます。 XYZ軸が(0,0,0)の場合、このグリッドの中心に私たち(というよりその作業対象となっているオブジェクト)は居ることになり、それは「Origin」と呼ばれます - 「NorRmSmWallSide01」が現在設置されているところです。(図Fig. 2)を参照してください。
あなたはいつもグリッドを意識する必要はありません。敵を設置したり、宝箱を回転させたり、照明の位置を調整する場合には精度はあまり要求されないでしょう。しかしキットの作業をしている時のグリッド使用は重要です。キットは精密に互いにピタリとはまるように設計されています。そしてグリッドはこの精度を得る唯一の方法です。これを使用することでキットピースは視認可能なギャップや断層を無くすことができるでしょう。
CKは全て「Units(ユニット)」で測定されています。これらユニットは本当の世界の測定方法と食い違っています。(図Fig. 3)を参照して今使用しているキットとキャラクターの大きさの比率をつかんでみてください。
(図Fig. 3)
Nordic Ruinは128ユニットグリッド上で作業するのがいいでしょう。これをセットアップするのは「Render Window」のどこかを右クリックして「Render Window Properties」を選択するか、メインツールバーで「Render Window Properties」 ボタンをクリックしてください。すると(図Fig. 4)のウィンドウが表示されるので、「Movement」タブを選んでください。ここにはいくつかオプションがありますが、さしあたり「Snap To Grid」に「128」の数値をセットし、「Snap To Angle」に「45」をセットしてください。そして「Apply」ボタンで変更を適用させてください。
そうしたら「Render Window」に戻って、「snap-to-grid(グリッド表示とスナップ)」を確かめてください。これはホットキーの「Q」キーかで切替が可能です。同様に「snap-to-angle(グリッド表示とアングル)」を有効にしてください。これは「Ctrl+Q」かで切替が可能です。
(図Fig. 4)
Before going any further, it's important to understand "the Grid", and "Snapping" to it.
When we work in the Render Window, we are actually within an invisible, three-dimensional Cartesian Grid. The center of this grid, at XYZ coordinates (0,0,0), is referred to as the "Origin" - which is where we manually placed NorRmSmWallSide01 only moments ago. See Fig. 2
You don't always need to be aware of the grid. When placing an enemy, rotating a treasure chest, or adjusting the position of a light, for example, precision isn't important. The Grid is critical when working with kits, however. Kit pieces are designed to "snap" to each other precisely, and the Grid is the only way to get this precision. "Eyeballing" kit pieces will always leave gaps and seams.
Everything in the Creation Kit is measured in "Units". These units don't correspond to any real-world units of measurement, but Fig. 3 should give you an idea of how they scale against our kit and some characters.
The Nordic Ruin works well on a 128-unit grid. To set this up, either right-click anywhere in the Render Window (en) and choose "Render Window Properties", or click this button in the Main Toolbar (en): ![]() . This will cause the dialog in
. This will cause the dialog in  to appear. Choose the "Movement Tab" if it is not already visible. There are several options in here, but for the moment we just want to make sure that "Snap To Grid" is set to 128, and "Snap To Angle" is 45. Click Apply to save your settings and dismiss the dialog.
Returning to the Render Window (en), make sure that snap-to-grid is toggled on. This is controlled with the "Q" hotkey or this button: ![]() . Likewise, snap-to-angle should be enabled. This is toggled with "Ctrl+Q" or
. Likewise, snap-to-angle should be enabled. This is toggled with "Ctrl+Q" or ![]() .
.
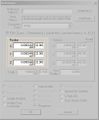
Fig. 2:
Manually placing our first piece at the origin.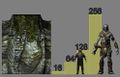
Fig. 3:
Some reference markings for unit scale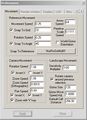
Fig. 4:
Preferences: Movement Tab


Step 3: Fitting the Pieces Together[edit | edit source]
Step 3: Fitting the Pieces Together(ピースを合わせる)
以前に置いた「NorRmSmWallSide01」を選択してください。「ctrl+D」を使用してそのピースの複写(コピー)を作成してください。これは「Render Window」で見ると、既存のピースの上に直接配置されます(重なって1つに見えるので注意)。これによってコピーされたピースが現在選択されているのに注意してください。
覚えていてください。複写のような操作を実行する前には、「Render Window」の中をクリックして有効にしてください。また「Render Window」の中のオブジェクトが選択されていない時は、「CTRL+P」かメインメニューバーのボタンをクリックしてください。
「Render Window」の中をクリック&ドラッグして新しく作成された壁のピースを動かしてください。「grid-snapping(グリッドスナップ)」が聞いているので比較的操作しやすいはずです。
2つの壁だけでは部屋とは言えません:コーナー(角)がなければなりません。「Object Window」から「NorRmSmCorIn01」探し「Render Window」にドラッグしてください。そしてそのピースを正しい方向に回転させて壁の1つの横に並べてください(図Fig. 5参照のこと)。現在「angle-snapping(アングルスナップ)」が効いているので45度でロックされていることを忘れないでください。
(図Fig. 5)
「Render Window」に新しいリファレンスをドラッグする時、あなたのマウスカーソルの場所にピボッドポイント(中心軸)が置かれます。このピボットポイントの置かれる時点は、あなたが左クリックのボタンを離した時となります。これで正しい高度(高さ)で新しいピースをすばやく簡単に作成する事ができるでしょう。もし無効な場所にオブジェクトを放り込んだ場合、そのオブジェクトはカメラのそばに設置されるでしょう。
いくつかのキットには「flow(フロウ)」があります。これは美的理由で特定の方法で組立てなければならないことを意味します。例えばこのキットでは壁は「サイド」または「フロント」タイプのどちらかです。あなたが置いた「サイド」タイプの壁は名前のとおり側面を意味します。このケースでは、天井のディティールに違いがあり、フロントの壁は天井の模様が単独で完結しているのに対し、サイドの壁は模様が続いています。したがってこの天井の模様(これをここではフロウという言葉で表している)を乱さないようにピースを選ぶ必要があり、そうしないと壁に穴が出来てしまう可能性があります。
Object Windowから「NorRmSmWallFront01」を探し、それをRender Windowの中へドラッグしてください。もし必要ならばピースを回転させて、コーナーピースの横に並べてください(コーナーを接続ポイントとしてフロントの壁はサイドの壁に垂直のかたちで設置します)。フロントの壁は3つのパーツで構成します。2つ「NorRmSmWallFront01」を追加しフロント壁を作成してください(図Fig. 6では真中に「NorRmSmWallFrontExSm01」が入っていますが、これは後で修正される完成形を先取しているので注意)。
そして現在「NorRmSmWallSide01」は2つありますが、その対面に同じように2ピース設置してください(Ctrl+Dで複製すると簡単です)。次にフロントの対面には「NorRmSmMid01」ピースを置いてください。そしてコーナーのピースを3つ追加して部屋の4隅が埋まるように設置してください。ここまでで以下の(図Fig. 6)のようになっていれば問題ありません。
(図Fig. 6)
部屋の真ん中の穴を除けば部屋はもうほとんど完成しています。「NorRmSmMid01」を部屋の真中に敷き詰めていってください。ここであなたはチェックしなければならないことがあります。このピースは特定の流れがあるので、一見なんの問題もなさそうに見えますが、回転させてみることが重要です。
天井のフロウをチェックするためにカメラを回転させてください。このピースの天井には線形のパターンがついているのに注意してください。個別にピースを回転させて天井の模様のパターンが線形になるようにしてください。正しい構成については(図Fig. 7)を参照してください。
(図Fig. 7)
見上げるためにカメラを回転させるのは、特にCKで初めて3Dの作業をするならば、方向感覚を失わせるかもしれません。我慢強く、「Shift+F」を使用してカメラの焦点のやり直しをしながらがんばってください。
Select your NorRmSmWallSide01 piece we placed before. Use "ctrl+D" to create a duplicate piece. This will place a new NorRmSmWallSide01 reference directly on top of the pre-existing one. Note that the duplicated object is automatically selected for you.
-
Remember that you have to "click in" to the render window before performing operations like duplicate. Also, if objects inside the render window are not being selected, type CTRL+P or click the  Enter Portal Mode button in the main toolbar (en).
Click and drag on the object inside the Render Window to move the newly-created wall piece. With grid-snapping turned on, it will lock into place relatively easily.
Two walls is hardly a room; we need corners! Return you attention to the Object Window (en) and search for "NorRmSmCorIn01", then drag it into the render window. Rotate the piece (en) into the correct orientation to line up with one of your walls and drag it into place. See Fig. 5. Remember to have your angle-snapping turned on and locked at 45 degrees.

When dragging new references to the Render Window, they will be placed with their pivot point wherever your cursor is when you release the left mouse button. This makes it easy to quickly create new pieces at the correct floor height. If you release over the void, the object will be placed at the camera.
Some kits have a "flow", which means that pieces have to be configured in a specific way for aesthetic reasons. For example, in this kit, walls are either "side" or "front" types. The two walls you've placed are side walls, as denoted in the name of the piece. Any perpendicular walls must therefore be of the front type. In this case, it's because of ceiling details that flow the length of the room, and using the pieces incorrectly can create large gaps in the ceiling.
In the Object Window (en), find "NorRmSmWallFront01" and drag it into the Render Window. If needed, Rotate the piece to line it up with one of the corner pieces. Complete the outer walls with two additional "NorRmSmWallFront01" pieces. You can then finish the room's walls using corners and the same amount of "NorRmSmWallFront01" and "NorRmSmWallSide01" pieces on each side.
The room is nearly complete - except for the gaping hole in the center.See Fig. 6. Place a NorRmSmMid01 piece, which can be snapped into the gap. Duplicate the mid piece and keep snapping until the hole is filled. There's something you have to check at this point: this piece also has specific flow, so rotation is important, even though it may not appear to be at first glance.
To check the ceiling flow, rotate the camera (en) so you're looking at the ceiling. Notice the linear pattern in the pieces. Rotate the mid pieces individually where necessary to connect the pattern to the walls. See Fig. 7 for the correct configuration.
-
Rotating the camera to look up can be disorienting, especially if you are new to the Creation Kit or working in 3D. Be patient and use Shift+F to re-focus the camera and start over if you end up looking into the void.
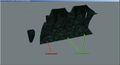
Fig. 5:
NorRmSmCorIn01 lined up with NorRmSmWallSide01.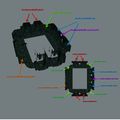
Fig. 6:
The outer edges of your room.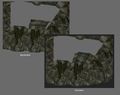
Fig. 7:
The NorRmSmMid01 piece placed incorrectly, notice the gap. On the right the piece is in the correct configuration.


Step 4: Connecting Rooms and Finishing Layout[edit | edit source]
Step 4: Connecting Rooms and Finishing Layout(部屋をつなげてレイアウトを終える)
壁も天井も床もある部屋が完成しました。しかし出口がありません。ドアを加えましょう。フロント壁の真中の「NorRmSmWallFront01」をRender Windowから「delete」で1つ削除してください。Object Windowで「NorRmSmWallFrontExSm01」を探し、Render Windowへドラッグしてください。フロント・サイドの一貫性を忘れないでください。出口は「front」壁にあるので「front」のExitピースを使用してください。
確実にオブジェクトは選択されていますか?メインツールバーディスプレイは左下隅にこれを表示します。あなたがもし複数のオブジェクトを選択するならば、それは最も最近選択されたオブジェクトの名前と「+X more」と表示されます。これでオブジェクトが現在何個選択されているか知ることができます。これと同じく現在選択しているオブジェクトは「Cell View」ウィンドウでもハイライトで強調されます。
新しい戸口に接続された廊下を作成してください。Object Windowで「NorHallSm1WayEndExSm01」を探してください。それは「WorldObjects > Static >Dungeons >Nordic >SmHalls」にあります(いままで「SmRooms」のオブジェクトを使っていたので気をつけてください)。注意:「~ExSm」は「Exit Small」の意味です。グリッドスナッピングがまだオンであることを確認してください。
ようやくこのダンジョンの最初のレイアウト過程が完了しました。もしあなたがこのレイアウトに関して行き詰まったのならば、サンプルプラグインをダウンロードして、レイアウトの完成形を確認してみてください。以下は完成したダンジョンの(図Fig. 8-9)です。
(図Fig. 8)
(図Fig. 9)
サンプルプラグインを読み込む時は、同じ名前の2つのセルがあることによって引き起こされるコンフリクト(競合)を避けるため、あなたのプラグインは読み込ませないようにしてください。
We've completed a room with walls, a ceiling, and a floor - but no way out. Time to add a door. Delete one of the NorRmSmWallFront01 pieces by selecting it in the render window and pressing "delete". In the Object Window (en), search for NorRmSmWallFrontExSm01 and drag it into the render window. Remember to preserve front/side consistency. Since this exit is on a "front" wall, use a "front" exit piece.
-
Not sure what object you have selected? The Main Toolbar (en) displays this in its lower-left corner. If you have multiple objects selected, it displays the most recently selected object name and "+X more" to give you an idea how large your total selection is. Your current selection is also highlighted in the Cell View Window (en)
Try creating a hallway connected to the new doorway. In the object window search for NorHallSm1WayEndExSm01. Make sure your Object Window (en) is opened to WorldObjects>Static>Dungeons>Nordic>SmHalls. Note the ExSm suffix, shorthand for "Exit Small". This lets us know it will snap with any other ExSm piece in the Nordic kit. Be sure grid-snapping is still on and snap the pieces together.
You now know everything you need complete the first layout pass for this dungeon. Try using the image below to do so now. If you get stuck, try downloading the example plugin (en) to see the layout completed.
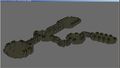
Fig. 1:
The completed layout map.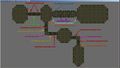
Fig. 2:
Completed layout with labels


-
When loading example plugins, remember not to load your plugin to avoid conflicts caused by having two cells with the same name.
Step 5: Checking It Out In the Game[edit | edit source]
Step 5: Checking It Out In the Game(ゲームでチェックしましょう)
作業をする時に、ゲームでそれを頻繁にテストするのは良い案です。あなたのプラグインをゲームに適用させるには 「Installing the Creation Kit」の「Loading Your Plugin in the Game」を参照してください。作成した空間を歩く時はあなたがエディタで発見できなかった穴や継ぎ目がないかどうか探してみてください。
あなたが上記のサンプルプラグインか、あなた自身が作ってこのチュートリアルと同じく「LokirsTomb」と今回のダンジョンを名づけたならば、コンソールで「COC LokirsTomb」とタイピングすれば、目的のダンジョンにテレポートすることができます。
テストプレイの際「COCMarkerHeading」を使用するとデバッグがはかどるでしょう。これらのマーカーはテストプレイに使用されるのみのものです。「COC」コンソールコマンドを使用する時のみ、それは出現します。そして1つのセルに1つだけそのマーカーは置かれるべきです。セルに既存のCOCマーカーがあるならば、セーブする前にそれを移動させてください。全てのマーカーと同じくエディタ内でそれが隠れて見えない場合は「M」キーを押してください。Object WindowでCOCマーカーを探すのに手間取るようならば「Filter」を利用して「All」カテゴリから「COC」を検索してください。
As you work, it's a good idea to frequently test your work in-game. For a refresher on loading your plugin, check here. As you walk around the space, look for gaps and seams you may have accidentally missed in the editor.
If you choose to load the above plugin to your game, or if you named your newly created cell the same as LokirsTomb, you can teleport to it by typing COC LokirsTomb in the console.

-
When testing, it's helpful to use the COCMarkerHeading. These markers are only used for testing - when using the COC console command (en), this is where you will appear. Only one of these markers should be placed per cell. If a cell has a pre-existing coc Marker, simply move it before saving the plugin. Like all markers, if it's hidden, press "M" to show it. If you are having trouble finding it in the Object Window, simply type "COC" into the filter box and select the *ALL category.
| チュートリアルハブに戻る | 次のチュートリアル | ||
| Language: | English • français • 日本語 • polski • русский |
|---|