Bethesda Tutorial Layout Part 2/ja
 | このページは日本語です。 テキストのすべてまたは選択された部分の翻訳が必要です。 |
| このページは日本語です。 リンク先ページの編集上の訂正または翻訳が必要です。 |
| Bethesda Tutorial Layout Part 2/ja | |
|---|---|
| レベルデザイン シリーズ、2章 | |
| チュートリアルハブに戻る | |
| 次のチュートリアル | |
| プラグインの実例: | |
| 初期 | 完成 |
| コンパニオン・ビデオ・チュートリアル | |
Overview[edit | edit source]
Overview(概要)
このチャプターはレイアウトのテクニックを少し深く探求していきます。具体的には、より有機的な「洞窟」キットを作成します。
このチャプターで読者が学べること:
☆複数のキットの使用・移行
☆有機的なキットの動作
☆グリッドを解除してスナップリファレンスを使用する
This chapter delves a little deeper into layout technique. Specifically, working with the more organic "cave" kit.
The reader will learn:
- Using and transitioning between multiple kits
- Working with an organic kit
- Working off the grid and using a Snap Reference
Organic Level Design[edit | edit source]
Organic Level Design(有機的なレベルデザイン)
全て角度90度設定でグリッドを使用することで、キットの組立てがより簡単にできるようになります。これはノルド遺跡やインペリアルの塔のような「建築物」で効力を発揮します。
しかし、自然環境のような有機的なものを作成する場合には、あなたはグリッドをオフにしたいと思うかもしれません(特に洞窟のような自然環境を作成する場合にはそう思うかもしれません)。運が良いことに、利用可能な多くのキットは、そのような作業進行を念頭に置いて組立てられています。このセクションではノルドダンジョン洞窟のキットで作業していきましょう。 You can easily create levels by connecting kit pieces on the grid, all at 90 degree angles. This works well for "architectural" dungeons, such as Nord ruins or Imperial Towers. However, natural environments use more organic features, so as you create, you may find yourself wanting to go off the grid, especially when creating natural environments such as caves. Luckily, many of the kits available are built with such a workflow in mind. For this next section, we'll work in the Cave kit into the Nordic dungeon.
The Cave Kit[edit | edit source]
The Cave Kit(洞窟キット)
洞窟キットは本来、ノルドキットのようなものに機能するものです(スナッピングルールに従って一連のサブキットで構成されたようなキットのこと)。しかし洞窟はSkyrim中で見られるように、より有機的な自由度も兼ね備えています。このキットは多彩で、デザイナーは、ほとんどどんな想像上の部屋でも作成する事ができます。しかし、今まで作成したノルドの洞窟とは少し手法が異なっています。
利用可能な複数の洞窟キットには氷、鉱山などのバリエーションがあります。私たちはこれから「Green Cave」キットを使用していきます。あなたがObject Windowでそれを探す際には、接頭語を検索して調べるのが良いでしょう。そうすれば氷、鉱山などの洞窟は初めから検索対象から除外することができます。
The Cave kit functions essentially like the Nordic Ruins kit - it's composed of a series of sub-kits that obey snapping rules - but the caves allow for more organic freedom, as seen throughout Skyrim. The versatility of this kit allows a designer to create just about any kind of chamber imaginable. However, working this way is a little different than the way we built the Nordic portion of this dungeon.

There are multiple Cave kits variations available: Ice, Mine and Caves. We'll be using the Green Cave kit. When searching in your object window, you can start all searches with the prefix caveg*, which will prevent Ice and Mine variations from appearing.
Creating a Shell[edit | edit source]
Creating a Shell(シェルの作成)
私たちはこれからLokirの墓の最後の部屋を洞窟部屋に置き換えるつもりです。(図Fig. 2.1)にあるエリアを削除して、(図Fig. 2.2)のようにしてください。
(図Fig. 2.1)
(図Fig. 2.2)
私たちはその削除した部屋を単純な「シェル(殻)」部屋へ置き換えるつもりです。洞窟作成の作業をする場合、非常に基本的な形から始めて、次に自然な見た目の空間を作成するために内部を組み立てるのは、とても良い方法です。シェルは4×4の大きさの部屋にしましょう。
以下のピースをRender Windowにドラッグしてください。これらのピースのビジュアルは(図Fig. 2.3)があるので参考にしてください。
☆CaveGLRoomCorner01 ☆CaveGLRoomCorner02 ☆CaveGLRoomCorner03 ☆CaveGLRoomCorner04 ☆CaveGLRoomWall01 (x2) ☆CaveGLRoomWall02 (x2) ☆CaveGLRoomWall03 (x2) ☆CaveGLRoomWall04 (x2) ☆CaveGLRoomMid01 (x4)
(図Fig. 2.3)
(図Fig. 2.4)の絵のようにピースの集まりをこれからアレンジしていきます。「最後の部屋」としてこの部屋をいじっていきましょう。プレイヤーがこの部屋を行き来できるよう、いくつかピースを削除していきましょう。ここで心配すべきなのは、この部屋の形状のおおざっぱさです。
(図Fig. 2.4)
We're going to replace the final room of the Lokir's Tomb with a cave chamber. Delete the area pictured in Fig. 2.1 so that it looks more like Fig. 2.2
We're going to replace the deleted room with a simple "Shell" chamber. When working with Caves, it's often best to start with a very basic shape, then build inwards to create a natural-looking space. Our shell will be a large 4x4 room. Locate and drag the following pieces into the Render Window (en). These pieces are pictured in Fig. 2.3 as a visual aid.
- CaveGLRoomCorner01
- CaveGLRoomCorner02
- CaveGLRoomCorner03
- CaveGLRoomCorner04
- CaveGLRoomWall01 (x2)
- CaveGLRoomWall02 (x2)
- CaveGLRoomWall03 (x2)
- CaveGLRoomWall04 (x2)
- CaveGLRoomMid01 (x4)
Arrange the loose pieces together as pictured in Fig. 2.4. This will be the starting point for our final room. We'll be deleting a few pieces so that the player can get in and out of the room, but for right now we're only worried about roughing in the general shape in which we'll define the room.
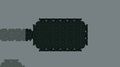
Fig. 2.1:
The starting layout of the final room
Fig. 2.2:
After the portion has been removed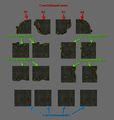
Fig. 2.3:
A breakdown of all the pieces needed to build the new cave shell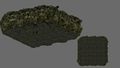
Fig. 2.4:
The constructed cave shell


Transitions[edit | edit source]
Transitions(トランジションズ)
複数のキットを使用した作業の場合、あるキットから次のキットへのトランジションズ(異なるパーツの接合を自然にすること)を作成する必要があります。この目的のためにいくつかのピース(「NorHallBg1wayToCaveG01」など)が存在しますが、あなたが想定した利用可能なピースがなくとも、心配をする必要はありません。容易にあなたのトランジションズを作成することができ、これはビジュアルがユニークになるという利点があります。
別のピースで「Large Nordic Hall」を拡張することで、このトランジションズを始めましょう。「NorHallBG1way01」をコピー(既存のそのピースを選択し、「Ctrl + D」)してホールの終わりにそれをくっつけてください。
ホールのトランジションズを作成するため、以下の「CaveG」ピースを使用します:
☆CaveGLWallDoorL01 ☆CaveGLWallDoorLB01 ☆CaveGLHall1Way01
(図Fig. 2.5)のようにそれらのピースを組み立ててください。「Snap-to-Grid」が確実にオンになっているか確認してください。それらのピースは当分の間、スナップを利用しての設置で問題ありません。
(図Fig. 2.5)
一度そのトランジションズエリアが作成できたら、「Snap-to-Grid」をオフにしてください。そして3つのピース全てを選択し、「Large Nordic Hall」へ接続してください。そしてあなたにそれが良く見える位置へカメラを移動させてください:(図Fig 2.6)を参考にしてみてください。エディターでどんなに注意深く隙間がないか確かめていても、実際のゲーム上でそれを確認するのは(テストプレイをして隙間がないか確かめるのは)良い習慣です。
(図Fig 2.6)
幾つかの複数のキットピースを動かすと時々(図Fig 2.8)で見られるような「Spider Webbing」と呼ばれる小さなつなぎ目が出きてしまう事があります。それらは「Snap-to-Reference」で修正することができます。それについては次のセクションで説明します。
(図Fig 2.8)
When working with multiple kits, you'll need to create transitions from one kit to the next. Some pieces exist specifically for this purpose (such as NorHallBg1wayToCaveG01), but if there isn't a piece available for what you had in mind, don't worry. You can easily make your own transitions, which have the advantage of being visually unique.
Begin this transition by extending the Large Nordic Hall by another piece. Create a duplicate of NorHallBG1way01 (select the existing piece and ctrl+D) and attach it to the end of that hall.
To create the hall transition, you'll need the following CaveG pieces:
- CaveGLWallDoorL01
- CaveGLWallDoorLB01
- CaveGLHall1Way01
Assemble these pieces as shown in Fig. 2.5. Make sure that snap-to-grid ![]() is turned on. We'll be freely placing these pieces in a moment, but need them snapped to each other for now.
is turned on. We'll be freely placing these pieces in a moment, but need them snapped to each other for now.
Once the transition area is created, turnSnap-to-grid ![]() off. Select all three pieces, and move them in line with the Large Nordic Hall. Adjust the positioning until it looks good to you; Fig 2.6 provides an example. It's a good idea to visually spot-check this in-game before continuing, keeping an eye out for any bad gaps. Better to fix them now, when it only means adjusting a few pieces!
off. Select all three pieces, and move them in line with the Large Nordic Hall. Adjust the positioning until it looks good to you; Fig 2.6 provides an example. It's a good idea to visually spot-check this in-game before continuing, keeping an eye out for any bad gaps. Better to fix them now, when it only means adjusting a few pieces!

Moving a selection of multiple kit pieces can sometimes introduce small seams, sometimes referred to as "spiderwebs", as noted in Fig 2.8. These can be fixed with snap-to-reference, which is discussed in the next section.

Fig. 2.5:
Breakdown of the transition pieces, individually and assembled(inset)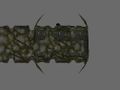
Fig. 2.6:
The transition in place
Working Off the Grid[edit | edit source]
Working Off the Grid(グリッドをオフにしての作業)
より有機的な空間を作成するために、グリッドをオフにして作業することは重要なことです。しかしこれは私たちがスナップルールを無視することを意味しません。グリッドオフ作業はメインワールドグリッドの如何に関わらず、そのレベルの組立てをするという意味です。次に私たちが先ほど作成したようなトランジションズを使用して、それらを接合していきます。これでより自然な感じの空間を作成することが可能になります。
以前のチュートリアルで私たちはグリッドをオンにしてノルドの遺跡を作成しました。今度はその洞窟部屋をグリッドをオフにして組み立てましょう。作業工程は以下のようになります。
[1] まず最初に「Snap to Grid」と「Snap to Angle」をオフにします
[2] 私たちが作成したシェルの全てのピースを選択してそれを約45度回転させて、(図Fig 2.7)のようにしてください
[3] Large Nordic Hallway(廊下)に最も近いそのシェル部屋の角を削除してください
[4] シェル部屋の残りを全選択して、それを先ほどのトランジションズピースの一部に交差するまで移動させてください。これは(図Fig 2.7)を参照してください
[5] いくらかシェル部屋の高さを下げて、プレイヤーが床よりも高い位置から部屋に入るようにしてください。これは精密科学ではありません。Z軸に沿ってトランジションズまでそのシェル部屋を(図Fig 2.7)ぐらいまで下げてください
(図Fig 2.7)
In order to create more organic spaces, it's important to become comfortable working "off the grid". This doesn't mean that we're going to disregard snapping rules, however. Working off the grid means that we're going to be assembling components of the level independently of the main world grid, then using transitions, such as the one we've just created, to join them. This allows us to create much more natural-feeling spaces than are possible otherwise.
The Nordic Ruins we created in the previous tutorial are "on the grid". The cave chamber we are building now will be "off the grid". Let's explore that workflow now.
- First we make sure that snap to grid
 and snap to angle
  are turned off.
 - Select all the pieces in the shell we've just created and rotate it approximately 45 degrees, as shown in Fig 2.7.
- Delete the corner of the large room closest to the Large Nordic Hallway
- Reselect the rest of the room and move it until the walls of your room intersect part of the Cave Transition piece, also shown in Fig 2.7
- We're also going to shift the cave shell down somewhat, so the player will enter the room higher than the floor. This isn't an exact science - just bring the room down along the Z axis until the transition looks similar to that shown in Fig 2.7.
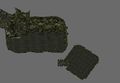
Fig. 2.7:
Breakdown of the transition pieces, seperate and assembled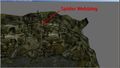
Fig. 2.8:
An example of spider-webbing


Working With Snap-to-Reference[edit | edit source]
Working With Snap-to-Reference(Snap-to-Referenceでの作業)
グリッドオフを部屋全体に適用するのは1つの方法ですが、一度設置したあと、編集できないのでは上手くありません。次の演習はそれがどのように可能か(グリッドの取扱いを)説明します。
私たちは今まで望んだとおりに部屋を設置してきましたし、それが可能でした。それでは、その洞窟部屋の角をつかんで「ctrl+K」で回転をリセットしてみてください。スナッピングをオンにして現在の場所にそのピースを戻すことが出来るか試してみてください。あなたはそれができないことに気づくはずです - その理由は今リセットしたピースは、現在グローバルグリッドにスナッピングされているからです。
Render Windowをクリックしてアクティブにし、Shift+Qキーを押してください。以下で見られるようにマウスアイコンがクロスヘアに変化したのを確かめてください。 無効な上にある時そのアイコンは赤色になります。そして有効な場合、白色になります。部屋のピース上をカーソルで探って、白色になった時は、そこをクリックしてください。
あなたがたった今選択したピースと一致するグローバルグリッド・アングルを一時的に変更します。このセクションの始めにリセットしたピースを選択して、もとの場所にスナッピングして戻してください。これはノーマルグリッドオフの作業をするにはよい方法ですが、ビジュアルの異常や蜘蛛の巣状態(図Fig 2.8参照)にならないよう注意してください。
スナップリファレンスをクリアし、グローバルグリッドに直すときには、「Shift + Q」キーを押して、灰色の無効の場所のどこかでその赤色になっている十字アイコンをクリックしてください。
Placing an entire room off the grid is one thing, but it's no good if we can't work with that room once placed. The next exercise will show how that's possible - and is critical to working off the grid.
Now that we've got the room placed as we want it, try grabbing a corner of the cave room and resetting its rotation with ctrl+K. Turn snapping on and attempt to put snap that piece back into place now. You should notice pretty quickly that it can't be done - the reset piece is snapping to the global grid.
Click back into the Render Window (en) and press Shift+Q. Notice that your mouse icon has changed to a crosshair, as seen below.
The icon will be red when over the Void (en): ![]() , and white when over a valid reference:
, and white when over a valid reference: ![]() . Hover over any piece in the off-kilter room we've placed and click when the crosshair turns white.
. Hover over any piece in the off-kilter room we've placed and click when the crosshair turns white.
What this has done is temporarily changed the global grid and angle orientation to match the piece you've just selected - known as the snap reference. Try selecting the piece we reset at the beginning of this section and snapping it back into place now. This is a great way to work off the normal grid, but make sure all your pieces snap together without any visual abnormalities or spiderwebbing (Fig 2.8).
Reshaping the Cave[edit | edit source]
Reshaping the Cave(洞窟の再形成)
現在作成しているこの洞窟部屋の大きさは標準的ですが、この洞窟キットはより有機的な空間にできるよう設計されてもいます。ただ、この有機的空間作成は、知らず知らず当初望んだものより大きな空間を作成してしまい、プラグインを侵食していく可能性があります。したがって内部の組み換えでほんの少しこの部屋の形を変えるようにしましょう。全てのキットは作業の流れを念頭においてデザインされており、この洞窟キットも例外ではありません。
この洞窟キットはたくさんの異なるピースであなたの再形成を助けます。以下の種類の柱と壁(図Fig. 2.9参照)を設置しましょう
☆CaveGLPillar01 ☆CaveGLPillar02 ☆CaveGLPillar03 ☆2xCaveGLWallStraight01
(図Fig. 2.9参照)
これらのピースを部屋の南の壁にもっていきましょう。有機的な外観のためグリッド・アングルスナッピングをオフにして、壁を作成してください。柱を使用して壁の間のつなぎ目を隠してください(図Figs. 2.10と2.11を参照のこと)。時間をとって頻繁にゲーム内で割れ目、つなぎ目が開いてないかチェックしてください。
(図Figs. 2.10)
(図Figs. 2.11)
壁を作り直したら、二つの特別な「cliff(垂直)」ピース(図Fig. 2.12参照)を使用して、段差を取り入れましょう。
☆CaveGCliffsCornerOut01NS ☆CaveGCliffs01
(図Fig. 2.12参照)
段差は、大きくて平らな部屋よりも、その見た見ばかりでなく戦闘を面白くします(図Figs. 2.13と2.14参照)。
自由に他の壁、岩、床、柱で実験して、あなたの部屋を作成してください。サンプルと同じ見た目にする必要はありません。
(図Figs. 2.13)
(図Figs. 2.14)
What you have right now is a pretty standard large cave room. The cave kit is designed specifically to convert rooms such as this into more organic spaces. The idea is to create a space larger than we need and start eating into it with add-in pieces - so let's change the shape of this room a little bit by building inwards. Every kit in Skyrim is designed with this workflow in mind, but the cave kit exemplifies it.
The cave kit comes with many different pieces to help you reshape your play space. Place in the following loose columns and free walls, pictured in Fig. 2.9.
- CaveGLPillar01
- CaveGLPillar02
- CaveGLPillar03
- 2xCaveGLWallStraight01
We're going to use these pieces to bring in the southern wall of the room. In order to get that organic look,turn off snap to grid and snap to angle and start moving the pieces around to form the wall. Use the pillars to hide any seams between the walls. (See Figs. 2.10 and 2.11) Take your time and frequently check your work in-game to look for any open gaps/seams.
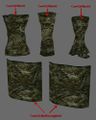
Fig. 2.9:
The individual pieces used in the cave wall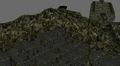
Fig. 2.10:
Before the new cave wall is in place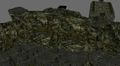
Fig. 2.11:
The cave wall pieces in place


Now that we've reshaped the walls, let's play with the verticality of the level using two cave-specific "cliff" pieces, pictured in Fig. 2.12.
- CaveGCliffsCornerOut01NS
- CaveGCliffs01
Verticality in a level makes encounters more interesting than fighting in a large, flat room, as well as being more natural and pleasing to the eye. (See Figs. 2.13 and 2.14) Feel free to experiment with other walls, rocks, floors and pillars to get the right feel and flow in your rooms. There's no need to match the example directly; experiment and express yourself here.
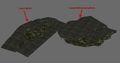
Fig. 2.12:
The cave cliff pieces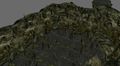
Fig. 2.13:
Before the new cave cliffs are in place
Fig. 2.14:
The cave cliffs in place


Filling in the Gaps[edit | edit source]
Filling in the Gaps(割れ目を埋める)
これでゲームプレイスペースが作成できたわけですが、あなたはおそらく大きな割れ目(向こう側に灰色の空間が見える隙間)があるのに気づいたと思います。これをカバーしていきましょう。ここにサンプルのピースを挙げておきます(図Fig. 2.15参照):
☆CaveGLPillar01 ☆CaveGBoulderL01 ☆CaveGBoulderL04 ☆CaveGRockPileS01 ☆CaveGDirtMound01
天井と壁のより大きい割れ目には「Pillar(柱)」と「Boulder(丸石)」が使用できます。土のドテと岩山は異なったキットの間のトランジションとして使用できると思います(図Figs 2.16と2.17)。
以前と同様、あなたがそれに満足するまでそれらのピースを使用して、挑戦してみてください。
(図Figs 2.16)
(図Figs 2.17)
Now that you've got gameplay space worked out, you'll probably notice large gaps that expose the grey void. You'll want to cover these up before you're done here. Here are the pieces we'll be using in this example, pictured in Fig. 2.15.
- CaveGLPillar01
- CaveGBoulderL01
- CaveGBoulderL04
- CaveGRockPileS01
- CaveGDirtMound01
The pillar and boulders can be used for the larger gaps in the ceiling and wall. The dirt mound and rock piles work great for ground transitions between different kits (see Figs 2.16 and 2.17). As before, feel free to try using any of the pieces you want until you find ones that you think work well: for example, in Fig 2.17, an additional CaveGCliffs01 has been used to give a nicer step down.
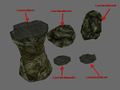
Fig. 2.15:
The cave fillin pieces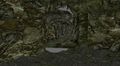
Fig. 2.16:
Before the new cave fillin are in place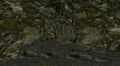
Fig. 2.17:
The cave fillin in place


Once you're happy with the layout of this chamber and the general layout of the tomb, you're ready to move onto smaller details - clutter.
| チュートリアルハブに戻る | 次のチュートリアル | ||
| Language: | English • français • 日本語 • polski • русский |
|---|