Bethesda Tutorial Layout Part 2
| Bethesda Tutorial Layout Part 2 | |
|---|---|
| Level Design Series, Chapter 2 | |
| Return to Tutorial Hub | |
| Next Tutorial | |
| Example Plugins: | |
| Initial | Completed |
| Companion Video Tutorial | |
Overview[edit | edit source]
This chapter delves a little deeper into layout technique. Specifically, working with the more organic "cave" kit.
The reader will learn:
- Using and transitioning between multiple kits
- Working with an organic kit
- Working off the grid and using a Snap Reference
Organic Level Design[edit | edit source]
You can easily create levels by connecting kit pieces on the grid, all at 90 degree angles. This works well for "architectural" dungeons, such as Nord ruins or Imperial Towers. However, natural environments use more organic features, so as you create, you may find yourself wanting to go off the grid, especially when creating natural environments such as caves. Luckily, many of the kits available are built with such a workflow in mind. For this next section, we'll work in the Cave kit into the Nordic dungeon.
The Cave Kit[edit | edit source]
The Cave kit functions essentially like the Nordic Ruins kit - it's composed of a series of sub-kits that obey snapping rules - but the caves allow for more organic freedom, as seen throughout Skyrim. The versatility of this kit allows a designer to create just about any kind of chamber imaginable. However, working this way is a little different than the way we built the Nordic portion of this dungeon.

There are multiple Cave kits variations available: Ice, Mine and Caves. We'll be using the Green Cave kit. When searching in your object window, you can start all searches with the prefix caveg*, which will prevent Ice and Mine variations from appearing.
Creating a Shell[edit | edit source]
We're going to replace the final room of the Lokir's Tomb (the really big one) with a cave chamber. Delete the area pictured in Fig. 2.1 so that it looks more like Fig. 2.2
We're going to replace the deleted room with a simple "Shell" chamber. When working with Caves, it's often best to start with a very basic shape, then build inwards to create a natural-looking space. Our shell will be a large 4x4 room. Locate and drag the following pieces into the Render Window. These pieces are pictured in Fig. 2.3 as a visual aid.
- CaveGLRoomCorner01
- CaveGLRoomCorner02
- CaveGLRoomCorner03
- CaveGLRoomCorner04
- CaveGLRoomWall01 (x2)
- CaveGLRoomWall02 (x2)
- CaveGLRoomWall03 (x2)
- CaveGLRoomWall04 (x2)
- CaveGLRoomMid01 (x4)
Arrange the loose pieces together as pictured in Fig. 2.4. (Hint: You need one type of wall piece per side to get the pieces to fit together correctly without seams. It might be easier if you start with the middle, then add the walls, making sure they match correctly as you go.) This will be the starting point for our final room. We'll be deleting a few pieces so that the player can get in and out of the room, but for right now we're only worried about roughing in the general shape in which we'll define the room.
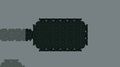
Fig. 2.1:
The starting layout of the final room
Fig. 2.2:
After the portion has been removed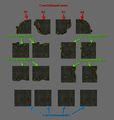
Fig. 2.3:
A breakdown of all the pieces needed to build the new cave shell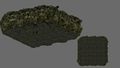
Fig. 2.4:
The constructed cave shell


Transitions[edit | edit source]
When working with multiple kits, you'll need to create transitions from one kit to the next. Some pieces exist specifically for this purpose (such as NorHallBg1wayToCaveG01), but if there isn't a piece available for what you had in mind, don't worry. You can easily make your own transitions, which have the advantage of being visually unique.
Begin this transition by extending the Large Nordic Hall by another piece. Create a duplicate of NorHallBG1way01 (select the existing piece and ctrl+D) and attach it to the end of that hall.
To create the hall transition, you'll need the following CaveG pieces:
- CaveGLWallDoorL01
- CaveGLWallDoorLB01
- CaveGLHall1Way01
Assemble these pieces as shown in Fig. 2.5. Make sure that snap-to-grid ![]() is turned on. We'll be freely placing these pieces in a moment, but need them snapped to each other for now.
is turned on. We'll be freely placing these pieces in a moment, but need them snapped to each other for now.
Once the transition area is created, turnSnap-to-grid ![]() off. Select all three pieces, and move them in line with the Large Nordic Hall. Adjust the positioning until it looks good to you; Fig 2.6 provides an example. It's a good idea to visually spot-check this in-game before continuing, keeping an eye out for any bad gaps. Better to fix them now, when it only means adjusting a few pieces!
off. Select all three pieces, and move them in line with the Large Nordic Hall. Adjust the positioning until it looks good to you; Fig 2.6 provides an example. It's a good idea to visually spot-check this in-game before continuing, keeping an eye out for any bad gaps. Better to fix them now, when it only means adjusting a few pieces!

Moving a selection of multiple kit pieces can sometimes introduce small seams, sometimes referred to as "spiderwebs", as noted in Fig 2.8. These can be fixed with snap-to-reference, which is discussed in the next section.

Fig. 2.5:
Breakdown of the transition pieces, individually and assembled(inset)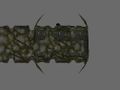
Fig. 2.6:
The transition in place
Working Off the Grid[edit | edit source]
In order to create more organic spaces, it's important to become comfortable working "off the grid". This doesn't mean that we're going to disregard snapping rules, however. Working off the grid means that we're going to be assembling components of the level independently of the main world grid, then using transitions, such as the one we've just created, to join them. This allows us to create much more natural-feeling spaces than are possible otherwise.
The Nordic Ruins we created in the previous tutorial are "on the grid". The cave chamber we are building now will be "off the grid". Let's explore that workflow now.
- First we make sure that snap to grid
 and snap to angle
  are turned off.
 - Select all the pieces in the shell we've just created and rotate it approximately 45 degrees, as shown in Fig 2.7.
- Delete the corner of the large room closest to the Large Nordic Hallway
- Reselect the rest of the room and move it until the walls of your room intersect part of the Cave Transition piece, also shown in Fig 2.7
- We're also going to shift the cave shell down somewhat, so the player will enter the room higher than the floor. This isn't an exact science - just bring the room down along the Z axis until the transition looks similar to that shown in Fig 2.7.
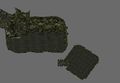
Fig. 2.7:
Breakdown of the transition pieces, seperate and assembled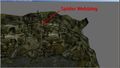
Fig. 2.8:
An example of spider-webbing


Working With Snap-to-Reference[edit | edit source]
Placing an entire room off the grid is one thing, but it's no good if we can't work with that room once placed. The next exercise will show how that's possible - and is critical to working off the grid.
Now that we've got the room placed as we want it, try grabbing a corner of the cave room and resetting its rotation with ctrl+K. Turn snapping on and attempt to put snap that piece back into place now. You should notice pretty quickly that it can't be done - the reset piece is snapping to the global grid.
Click back into the Render Window and press Shift+Q. Notice that your mouse icon has changed to a crosshair, as seen below.
The icon will be red when over the Void: ![]() , and white when over a valid reference:
, and white when over a valid reference: ![]() . Hover over any piece in the off-kilter room we've placed and click when the crosshair turns white.
. Hover over any piece in the off-kilter room we've placed and click when the crosshair turns white.
What this has done is temporarily changed the global grid and angle orientation to match the piece you've just selected - known as the snap reference. Try selecting the piece we reset at the beginning of this section and snapping it back into place now. This is a great way to work off the normal grid, but make sure all your pieces snap together without any visual abnormalities or spiderwebbing (Fig 2.8).
-
Whenever you're ready to clear your snap reference and return to using the global grid, just shift+Q and click the red crosshair anywhere in the grey void.
Reshaping the Cave[edit | edit source]
What you have right now is a pretty standard large cave room. The cave kit is designed specifically to convert rooms such as this into more organic spaces. The idea is to create a space larger than we need and start eating into it with add-in pieces - so let's change the shape of this room a little bit by building inwards. Every kit in Skyrim is designed with this workflow in mind, but the cave kit exemplifies it.
The cave kit comes with many different pieces to help you reshape your play space. Place in the following loose columns and free walls, pictured in Fig. 2.9.
- CaveGLPillar01
- CaveGLPillar02
- CaveGLPillar03
- 2xCaveGLWallStraight01
We're going to use these pieces to bring in the southern wall of the room. In order to get that organic look,turn off snap to grid and snap to angle and start moving the pieces around to form the wall. Use the pillars to hide any seams between the walls. (See Figs. 2.10 and 2.11) Take your time and frequently check your work in-game to look for any open gaps/seams.
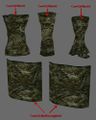
Fig. 2.9:
The individual pieces used in the cave wall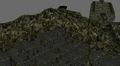
Fig. 2.10:
Before the new cave wall is in place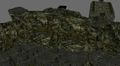
Fig. 2.11:
The cave wall pieces in place


Now that we've reshaped the walls, let's play with the verticality of the level using two cave-specific "cliff" pieces, pictured in Fig. 2.12.
- CaveGCliffsCornerOut01NS
- CaveGCliffs01
Verticality in a level makes encounters more interesting than fighting in a large, flat room, as well as being more natural and pleasing to the eye. (See Figs. 2.13 and 2.14) Feel free to experiment with other walls, rocks, floors and pillars to get the right feel and flow in your rooms. There's no need to match the example directly; experiment and express yourself here.
Fig. 2.12:
The cave cliff pieces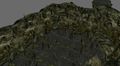
Fig. 2.13:
Before the new cave cliffs are in place
Fig. 2.14:
The cave cliffs in place


Filling in the Gaps[edit | edit source]
Now that you've got gameplay space worked out, you'll probably notice large gaps that expose the grey void. You'll want to cover these up before you're done here. Here are the pieces we'll be using in this example, pictured in Fig. 2.15.
- CaveGLPillar01
- CaveGBoulderL01
- CaveGBoulderL04
- CaveGRockPileS01
- CaveGDirtMound01
The pillar and boulders can be used for the larger gaps in the ceiling and wall. The dirt mound and rock piles work great for ground transitions between different kits (see Figs 2.16 and 2.17). As before, feel free to try using any of the pieces you want until you find ones that you think work well: for example, in Fig 2.17, an additional CaveGCliffs01 has been used to give a nicer step down.
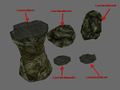
Fig. 2.15:
The cave fillin pieces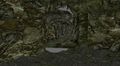
Fig. 2.16:
Before the new cave fillin are in place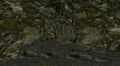
Fig. 2.17:
The cave fillin in place


Once you're happy with the layout of this chamber and the general layout of the tomb, you're ready to move onto smaller details - clutter.
| Return to Tutorial Hub | Next Tutorial | ||
| Language: | English • français • 日本語 • polski • русский |
|---|