Bethesda Tutorial Layout Part 1/ru
Компоновка часть 1
 | На русском языке Требуется помощь переводчика |
 | Статья распространяется под лицензией Creative Commons. Авторы: Vel (получено разрешение на публикацию), Tiara, Garin и см. историю. |
| Компоновка часть 1 | |
|---|---|
| Серия: Дизайн уровней, глава 1 | |
| К другим учебникам | |
| Следующая статья | |
| Примеры плагинов: | |
| Initial | Completed |
| Сопутствующий видеурок | |
Краткий обзор
Эта глава описывает основы компоновки интерьера, используя для этого набор "Ancient Nord Ruin".
Читатели узнают:
- Что представляет из себя инструментарий (Kit) и как им пользоваться.
- Как находить части моделей в окне Object Window.
- Соглашение по части наименований в инструментарии.
- Как размещать и подгонять друг к другу части интерьеров.
- Как протестировать свое подземелье в игре.
Инструментарий
Большая часть игры Skyrim создана с помощью "инструментов" ("tools"). Эти инструменты представляют собой элементы окружения, разработанные для совместного использования при создании широкого спектра локаций и являются инструментарием, позволяющем создавать большое количество областей в игре с гибкостью при обновлении геометрии и экспериментировать с ней, при этом минимизируя количество собственных моделей.
Одним из очень часто используемых наборов строений в Скайриме, является "Ancient Nord Ruin" (Древние руины нордов). Так как игроки лучше всего знакомы именно с этим строением, мы будем использовать его в начале этого урока при создания планировки. Доступны, конечно, и другие наборы, например Cave Kit (Набор строений для пещер) и Imperial Fort Kit (Набор строений имперского форта).
Поиск и нахождение частей набора в окне Object Window
Чтобы получить доступ к стандартному набору, вначале щелкните на кнопке Load на панели инструментов в верхней части окна программы Creation Kit, дважды щелкните напротив "Skyrim.esm", чтобы выделить этот файл, и нажмите ОК. Отвечайте "Yes" на все возникающие сообщения об ошибках во время загрузки этого файла.
Чтобы увидеть категории наборов в окне Object Window, раскройте категорию "World Objects (en)" в левой части окна Object Window. В этом списке раскройте категорию "STATIC -> Dungeons". Вам будут доступны несколько типов наборов. В этом уроке мы будем использовать категорию "Nordic". Вы можете пройтись по этой категории и посмотреть на различные поднаборы у части геометрии, которые доступны для использования. В данный момент выберите поднабор "SmRooms".
Для предварительного просмотра объектов вы можете использовать окно предпросмотра Preview Window (en). Щелкните правой кнопкой мыши на выбранном объекте и в контекстном меню выберите пункт "preview". Появится контекстное окно, отображающее объект. В этом окне вы можете использовать такие же элементы управления камерой, какие присутствуют в окне Render Window (en), и оно автоматически обновляется, показывая любой объект, выбираемый вами в Object Window. Такое поведение делает Preview Window (en) очень полезным, если оно будет открыто, пока вы просматриваете различные объекты.

Инструментарий очень обширный и вначале такое обилие объектов может вас немного пугать. Ничего страшного, привыкнете! Знание того, как пользоваться инструментарием, уже является огромным преимуществом для эффективной работы, а вам нужно потратить определённое время на эти эксперименты. Дайте себе возможность изучить этот инструмент и потратить на это достаточно времени. Пусть у вас не опускаются руки в самом начале, если процесс создания модификаций будет не столь быстрым, как вы бы хотели!
Соглашения по поводу названий

Давайте посмотрим на названия объекта, входящего в поднабор: NorRmSmWallSideExSm01. Название объекта - это что-то типа кода. Вначале никакого смысла в этом названии, возможно, и не видно, но как только вы поймете именные соглашения, это название сообщит вам о себе всё.
Давайте разделим это название и посмотрим, что означает каждая из частей.
| Nor | Сокращение от "Nord" - это говорит нам, что мы имеем дело с набором Nord Ruins. |
| Rm | Стандартное сокращение для комнат "room", частью которой является данных поднабор. Например, части построек, начинающиеся с NorHall будут частью поднабора Nord Hall. |
| Sm | Стандарт для "мелких" объектов "small". Набор Nordic Room использует "Sm" для небольших комнат, а "Bg" - для больших. |
| Wall | Довольно очевидно (Wall - Стена). Частями геометрии в этом наборе являются стены (wall), средние части комнат (mid) и углы (cor). |
| Cor | Часть углов. Разделяются как CorIn (внутренние углы) и CorOut (Внешние). |
| Side | Части в наборе Nordic Small, которые соединяются друг с другом как "Front" или "Side". Подробнее об этом - позже. |
| Ex | Обозначает часть выхода/дверного проема. Данная геометрия очень хорошо привязывается к дверям и соответствует проёмам "Ex" из этого же набора. |
| Sm | Обозначает размер выхода/дверного проема. Набор Nordic Room использует "Sm" для небольших выходов и "Bg" для больших. Только соответствующие размеры будут подходить друг к другу. |
| 01 | Номер суффикса, обычно означает, что у этой части геометрии разные варианты. Увеличение этой цифры означает очередность варианта данной геометрии. |
У вас есть возможность поиска этих частей геометрии с помощью введения текста любой из перечисленных частей в поле фильтра окна Object Window. Например, если вы хотите увидеть все части набора Nordic Small Room (Небольшая комната Нордов), напишите в фильтре "NorRmSm". Поиск вернёт результат, основываясь на выбранной категории в левой части окна Object Window.

Когда вы изучите именованные соглашения, вы сможете использовать знак звездочки (*) для подстановки при поиске частей геометрии. Например, если вы ищете все возможные части в Nordic Small Room, просто впишите в поле фильтра "NorRmSm*Ex". Вы увидите все модели с проёмом или выходами набора Nordic Small Room. По подстановочным знакам больше написано на вики.
Building a Room
You are now equipped with all the information you need to create an actual, playable space. We'll go slowly through the first handful of steps. Once you've learned the fundamentals, you'll be able to create a full layout using the Nordic Ruins kit at your own pace.
Step 1: Creating A Cell
Before we can do anything else, we need to create a space to work in. This is most commonly done by duplicating an existing cell. The cell you choose will bring over some data you may need to modify, but we'll deal with that later. For now, locate and right-click on the interior cell aaaMarkers and choose Duplicate Cell. You should see a new cell appear in the Cell List just below it. Rename this new cell by selecting it and pressing F2. We'll call this dungeon LokirsTomb.
Now that you have your own interior cell to work with, be sure to select the LokirsTomb cell (and not aaaMarkers) and delete the LokirsTomb objects listed in the object window (right side of the Cell View pane), as we'll want to start fresh. Don't worry about deleting the navmesh for now. We'll get to that later.
Right click on the LokirsTomb Cell and pick "View" to assign it to the render window.

It's important to be 100% sure of what cell you have loaded before doing any editing. There are two places to check this: the title bar of the Render Window, and the area above the filter box in the Cell View window both show the name of the currently-loaded cell
Step 2: Placing Your First Piece
Let's get started by placing our first piece. Take a look at your Object Window and expand: "World Objects > STATIC> Dungeons > Nordic" You'll notice several sub-kits here, but for now we're just concerned with the Small Room, or "SmRooms" sub-kit. Expand that sub-kit now, and the list on the right-hand side of your Object Window will populate with a number of pieces beginning with "NorRmSm".
Now that we have the sub-kit loaded and ready to go, select "NorRmSmWallSide01" and place it into your cell by dragging and releasing it over the Render Window. You may or may not see the object appear. In either case, right-click on the newly-created reference ID in your Cell View Window. Choose "Edit". As seen in Fig 2, change the XYZ Position coordinates to 0,0,0, and click OK.
Double-click the ref ID in the Cell View to manually focus the Render Window camera on it, and you should see a piece of floor floating in space. Double-clicking the object also made this object the current selection, so you can use your camera controls to get a good look at it.
Working on the Grid
Before going any further, it's important to understand "the Grid", and "Snapping" to it.
When we work in the Render Window, we are actually within an invisible, three-dimensional Cartesian Grid. The center of this grid, at XYZ coordinates (0,0,0), is referred to as the "Origin" - which is where we manually placed NorRmSmWallSide01 only moments ago. See Fig. 2
You don't always need to be aware of the grid. When placing an enemy, rotating a treasure chest, or adjusting the position of a light, for example, precision isn't important. The Grid is critical when working with kits, however. Kit pieces are designed to "snap" to each other precisely, and the Grid is the only way to get this precision. "Eyeballing" kit pieces will always leave gaps and seams.
Everything in the Creation Kit is measured in "Units". These units don't correspond to any real-world units of measurement, but Fig. 3 should give you an idea of how they scale against our kit and some characters.
The Nordic Ruin works well on a 128-unit grid. To set this up, either right-click anywhere in the Render Window and choose "Render Window Properties", or click this button in the Main Toolbar: ![]() . This will cause the dialog in Fig. 4 to appear. Choose the "Movement Tab" if it is not already visible. There are several options in here, but for the moment we just want to make sure that "Snap To Grid" is set to 128, and "Snap To Angle" is 45. Click Apply to save your settings and dismiss the dialog.
. This will cause the dialog in Fig. 4 to appear. Choose the "Movement Tab" if it is not already visible. There are several options in here, but for the moment we just want to make sure that "Snap To Grid" is set to 128, and "Snap To Angle" is 45. Click Apply to save your settings and dismiss the dialog.
Returning to the Render Window, make sure that snap-to-grid is toggled on. This is controlled with the "Q" hotkey or this button: ![]() . Likewise, snap-to-angle should be enabled. This is toggled with "Ctrl+Q" or
. Likewise, snap-to-angle should be enabled. This is toggled with "Ctrl+Q" or ![]() .
.
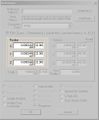
Fig. 2:
Manually placing our first piece at the origin.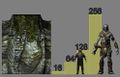
Fig. 3:
Some reference markings for unit scale
Fig. 4:
Preferences: Movement Tab


Step 3: Fitting the Pieces Together
Select your NorRmSmWallSide01 piece we placed before. Use "ctrl+D" to create a duplicate piece. This will place a new NorRmSmWallSide01 reference directly on top of the pre-existing one. Note that the duplicated object is automatically selected for you.
-
Remember that you have to "click in" to the render window before performing operations like duplicate. Also, if objects inside the render window are not being selected, type CTRL+P or click the  Enter Portal Mode button in the main toolbar.
Click and drag on the object inside the Render Window to move the newly-created wall piece. With grid-snapping turned on, it will lock into place relatively easily.
Two walls is hardly a room; we need corners! Return you attention to the Object Window and search for "NorRmSmCorIn01", then drag it into the render window. Rotate the piece into the correct orientation to line up with one of your walls and drag it into place. See Fig. 5. Remember to have your angle-snapping turned on and locked at 45 degrees.

When dragging new references to the Render Window, they will be placed with their pivot point wherever your cursor is when you release the left mouse button. This makes it easy to quickly create new pieces at the correct floor height. If you release over the void, the object will be placed at the camera.
Some kits have a "flow", which means that pieces have to be configured in a specific way for aesthetic reasons. For example, in this kit, walls are either "side" or "front" types. The two walls you've placed are side walls, as denoted in the name of the piece. Any perpendicular walls must therefore be of the front type. In this case, it's because of ceiling details that flow the length of the room, and using the pieces incorrectly can create large gaps in the ceiling.
In the Object Window, find "NorRmSmWallFront01" and drag it into the Render Window. If needed, Rotate the piece to line it up with one of the corner pieces. Complete the outer walls with two additional "NorRmSmWallFront01" pieces. You can then finish the room's walls using corners and the same amount of "NorRmSmWallFront01" and "NorRmSmWallSide01" pieces on each side.
The room is nearly complete - except for the gaping hole in the center.See Fig. 6. Place a NorRmSmMid01 piece, which can be snapped into the gap. Duplicate the mid piece and keep snapping until the hole is filled. There's something you have to check at this point: this piece also has specific flow, so rotation is important, even though it may not appear to be at first glance.
To check the ceiling flow, rotate the camera so you're looking at the ceiling. Notice the linear pattern in the pieces. Rotate the mid pieces individually where necessary to connect the pattern to the walls. See Fig. 7 for the correct configuration.
-
Rotating the camera to look up can be disorienting, especially if you are new to the Creation Kit or working in 3D. Be patient and use Shift+F to re-focus the camera and start over if you end up looking into the void.
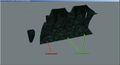
Fig. 5:
NorRmSmCorIn01 lined up with NorRmSmWallSide01.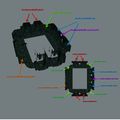
Fig. 6:
The outer edges of your room.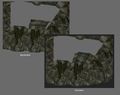
Fig. 7:
The NorRmSmMid01 piece placed incorrectly, notice the gap. On the right the piece is in the correct configuration.


Step 4: Connecting Rooms and Finishing Layout
We've completed a room with walls, a ceiling, and a floor - but no way out. Time to add a door. Delete one of the NorRmSmWallFront01 pieces by selecting it in the render window and pressing "delete". In the Object Window, search for NorRmSmWallFrontExSm01 and drag it into the render window. Remember to preserve front/side consistency. Since this exit is on a "front" wall, use a "front" exit piece.
-
Not sure what object you have selected? The Main Toolbar displays this in its lower-left corner. If you have multiple objects selected, it displays the most recently selected object name and "+X more" to give you an idea how large your total selection is. Your current selection is also highlighted in the Cell View Window
Try creating a hallway connected to the new doorway. In the object window search for NorHallSm1WayEndExSm01. Make sure your Object Window is opened to WorldObjects>Static>Dungeons>Nordic>SmHalls. Note the ExSm suffix, shorthand for "Exit Small". This lets us know it will snap with any other ExSm piece in the Nordic kit. Be sure grid-snapping is still on and snap the pieces together.
You now know everything you need complete the first layout pass for this dungeon. Try using the image below to do so now. If you get stuck, try downloading the example plugin to see the layout completed.
Fig. 1:
The completed layout map.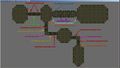
Fig. 2:
Completed layout with labels


-
When loading example plugins, remember not to load your plugin to avoid conflicts caused by having two cells with the same name.
Step 5: Checking It Out In the Game
As you work, it's a good idea to frequently test your work in-game. For a refresher on loading your plugin, check here. As you walk around the space, look for gaps and seams you may have accidentally missed in the editor.
If you choose to load the above plugin to your game, or if you named your newly created cell the same as LokirsTomb, you can teleport to it by typing COC LokirsTomb in the console.

-
When testing, it's helpful to use the COCMarkerHeading. These markers are only used for testing - when using the COC console command, this is where you will appear. Only one of these markers should be placed per cell. If a cell has a pre-existing coc Marker, simply move it before saving the plugin. Like all markers, if it's hidden, press "M" to show it. If you are having trouble finding it in the Object Window, simply type "COC" into the filter box and select the *ALL category.
| К другим учебникам | Следующая статья | ||
| Language: | English • français • 日本語 • polski • русский |
|---|